WRAPPING UP A GARDEN PROJECT FOR FALL
Work on the oval circle garden continued this weekend and by the end of the day on Sunday I let out a sigh of relief. If a blizzard came tomorrow (unlikely as we've not yet had a frost), I'd be OK with how far this project got this season.

On Saturday I reset the outer circle of cobblestones. One thing I had not expected was for them not to fit perfectly. This, of course, was a ridiculous notion, but until I set the first segment it had never even occurred to me that the math wouldn't work out for me to only be able to use whole cobblestones. This was a bit of a predicament as a half-hearted attempt to split one using a small chisel and a light hammer left me frustrated and suffering from very sore wrists. I only needed two pieces so I just left the holes and planned to deal with it later.

On Sunday I got a truckload of paver base. The place I got it from called it limestone screenings, other places call it paver base or road base and in some places in the country its stone dust. I think the difference is primarily the type of stone it comes from and here we have lots of limestone. In any case, it's a coarse sandlike material with tiny bits of stone in it that compacts nicely. The first time I used limestone screenings for a small path ages ago, I was convinced it had made the soil around it extremely alkaline and therefore inhospitable to most plants. That didn't work for that application because I has put it under flagstones, filled in the gaps with soil and tried to grow groundcover between the stones. As one plant after another failed there, I realized it was probably the limestone base.
Fortunately, since the path will be completely separate from the soil, held at bay by metal edging and cobblestones, I shouldn't have to worry about that effect on plants.
After dumping the base in the paths, I tamped the entire thing down. Then I wet it and let the water filter through before going back and filling in low areas with more base. I could have used a little more base but with one cubic yard of the stuff weighing about 1.2 tons and me borrowing a half-ton truck, I wasn't able to get as much as I would have liked. Once I had it smoothed and leveled by eye (since this is going to be topped with gravel it doesn't need to be perfectly level like it would have to be if I were setting stone on top it), I tamped it again, wet it down again and then walked away.
While I was at the nursery getting the base I found two broken cobbles that I figured I could put in the holes where I had gaps. They aren't a perfect fit, but I think once the cobbles get some age on them they'll blend in. And if they don't I can always change them out later and I'm only out the $1 they charged me for them.
Originally I was going to get the gravel this fall as well, but I've rethought that. Since I might be a little light on paver base, I'm going to let it settle and compact over the winter and then decide in spring if I should add more base or just top it up with all gravel. There's a significant cost difference: the paver base was $20 a ton and the gravel is $100 per ton. The other advantage to waiting on the gravel is that I don't have to worry about soil or seeds ending up in it and I can start next spring with clean and completely weed-free paths. In fact, I may wait to put the gravel in until after I plant the beds as there's sure to be some soil flying about.
Since this project is almost wrapped up for the season, here's a quick look at what's been done.
This is what the garden, the first I'd ever made from scratch (14 years ago now) looked like at its best. You'd notice it was nothing special even then.

It's a little easier to get a feel for the positioning and layout of the garden from Google Earth.

Here's a rough design concept for the renovated garden.

The first step was to move out the plants. I moved what I was keeping but was not returning to the garden and clustered all the chives for the chive hedge together where they will overwinter and I'll replant them in spring.

Then Mr. Much More Patient and I spent some quality time arguing about math as we laid out the location for the paths. I reviewed the serious mistakes I made when I designed the paths originally and ripped out all the dreaded landscape fabric.

Then I was left to do a little light digging.

With the paths dug, we installed the metal edging for each "spoke."

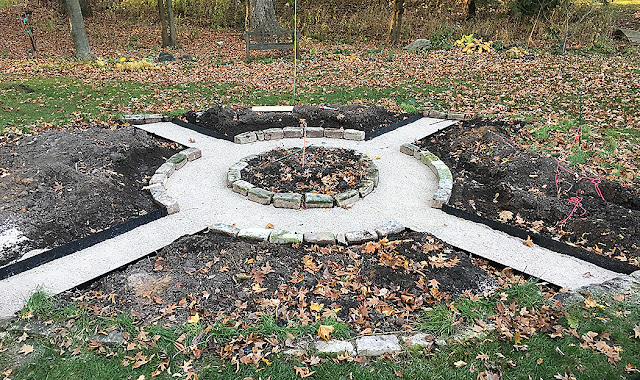
And that led to where it is now.
That means that the only thing left to do this fall is to level out the heaps of soil. And then the fun begins. I can't wait to really get stuck in to the planting plan. What a great way to spend a cold winter day.


On Sunday I got a truckload of paver base. The place I got it from called it limestone screenings, other places call it paver base or road base and in some places in the country its stone dust. I think the difference is primarily the type of stone it comes from and here we have lots of limestone. In any case, it's a coarse sandlike material with tiny bits of stone in it that compacts nicely. The first time I used limestone screenings for a small path ages ago, I was convinced it had made the soil around it extremely alkaline and therefore inhospitable to most plants. That didn't work for that application because I has put it under flagstones, filled in the gaps with soil and tried to grow groundcover between the stones. As one plant after another failed there, I realized it was probably the limestone base.
Fortunately, since the path will be completely separate from the soil, held at bay by metal edging and cobblestones, I shouldn't have to worry about that effect on plants.
After dumping the base in the paths, I tamped the entire thing down. Then I wet it and let the water filter through before going back and filling in low areas with more base. I could have used a little more base but with one cubic yard of the stuff weighing about 1.2 tons and me borrowing a half-ton truck, I wasn't able to get as much as I would have liked. Once I had it smoothed and leveled by eye (since this is going to be topped with gravel it doesn't need to be perfectly level like it would have to be if I were setting stone on top it), I tamped it again, wet it down again and then walked away.
While I was at the nursery getting the base I found two broken cobbles that I figured I could put in the holes where I had gaps. They aren't a perfect fit, but I think once the cobbles get some age on them they'll blend in. And if they don't I can always change them out later and I'm only out the $1 they charged me for them.
Originally I was going to get the gravel this fall as well, but I've rethought that. Since I might be a little light on paver base, I'm going to let it settle and compact over the winter and then decide in spring if I should add more base or just top it up with all gravel. There's a significant cost difference: the paver base was $20 a ton and the gravel is $100 per ton. The other advantage to waiting on the gravel is that I don't have to worry about soil or seeds ending up in it and I can start next spring with clean and completely weed-free paths. In fact, I may wait to put the gravel in until after I plant the beds as there's sure to be some soil flying about.
Since this project is almost wrapped up for the season, here's a quick look at what's been done.
This is what the garden, the first I'd ever made from scratch (14 years ago now) looked like at its best. You'd notice it was nothing special even then.

It's a little easier to get a feel for the positioning and layout of the garden from Google Earth.

Here's a rough design concept for the renovated garden.

The first step was to move out the plants. I moved what I was keeping but was not returning to the garden and clustered all the chives for the chive hedge together where they will overwinter and I'll replant them in spring.

Then Mr. Much More Patient and I spent some quality time arguing about math as we laid out the location for the paths. I reviewed the serious mistakes I made when I designed the paths originally and ripped out all the dreaded landscape fabric.


And that led to where it is now.

That means that the only thing left to do this fall is to level out the heaps of soil. And then the fun begins. I can't wait to really get stuck in to the planting plan. What a great way to spend a cold winter day.
Labels: circle garden, garden, gravel path, oval, path
posted by Erin @ The Impatient Gardener at
3:00 PM
![]()
![]()


2 Comments:
It looks fabulous. What a contrast with those dirt piles. A lot of work but well worth it i'd say.
Such excitement. I would be chomping at the bit to get those areas planted. The paths are so inviting even as they are. Fun fun.
Post a Comment
Thank you for taking the time to comment! I appreciate it. I try to respond to comments here or sometimes via email so make sure to check back.
Subscribe to Post Comments [Atom]
<< Home