The Impatient Gardener: January 2016

31 January 2016

FRIDAY FINDS ... on SUNDAY

I've missed Friday Finds two weeks in a row and I didn't want to let this one pass completely so I bring you a rare Sunday post.

I'll dispense with the usual preamble and get right into it. Here's some of the best of what I was loving on the web last week.

New House New Home photo

Heather shared some great drought-tolerant perennials for her garden. It was just the kind of post I needed in deep, dark midwinter.

I've been trying to play around with new furniture placement in the office (sliding doors, closets, a regular door and big windows are seriously complicating the issue), and I found this great room planner on the Pottery Barn website. I like that it allows you to drop in PB furniture or generic furniture sketches and then change the size.

I don't have a pond for many reasons (not the least of which is that I don't need an on-site Newf pool), but I admire beautiful ponds in other people's gardens. Melissa shares a great tip on how to have a crystal clear pond without using chemicals.

Ben Blossom photo via Gardenista

And if you do have a pond, you can also have a very cool pond house.

I was happy that Eric asked me back to his Gardenfork podcast again. I always have a great time talking to him, but I'll be honest: I never listen to the podcasts after the fact. I cannot stand my own voice. I should probably just get over that, right? Anyway, check it out ... it was a fun one.

I hope you all had a great weekend! Guess what ... it's February!

Labels:

28 January 2016

AND THE RENO BEAT GOES ON ... AND ON

I figured it was time for an update on our little office / back room project, but prepare yourself for the most unexciting update ever.

Last I mentioned it, the drywall was up and the ceilings were painted and ready to be installed. That was ages ago. At least it seems like it. I think it was about two weeks ago. Since then, the ceiling and crown molding went up (they did a great job on that) and I got to painting.

As they say, it gets worse before it gets better.
The wainscoting in that room suffers from the same problem as the rest of the paneling in the house: it was painted over shiny poly, shellac or varnish without being sanded or primed. That means it's a pain to paint it if you want to do it right.

I opted for doing it mostly right and gave it all a really good sanding, but I didn't necessarily get all the way down to wood. After that I cleaned it and caulked all the gaps, which are plentiful in that old paneling. Then I primed with the same Zinnser BIN primer I used on the ceiling planks, and following up with Benjamin Moore Aura in satin. I used Mascarpone, which is the white we have in most of the house. Even though I gave it two coats, it's looking a little thin in some areas so I think I'll need to do a third coat.


Before the ceilings, crown and trim were installed, we painted the walls (it's so much faster when you don't have to cut in around the ceiling or door trim). I'll be honest, when I asked you all for your opinion on what color I should paint that room, I was leaning heavily toward something in the aqua family. But the the voters were very much in favor of a navy-ish color and a few people commented or wrote me practically begging me not to do the aqua. Well, you guys swayed me.


You can see more of the teal color in it here.

We ended up going with BM Summer Nights, which is a deep navy that leans toward teal in some lights. I liked the idea of a very tealish-navy as that picks up a color from the Chaing mai dragon fabric on the chairs. I'll also be completely honest and admit that the name of the color helped convince me to go that dark. I hate to say it, but I am absolutely influenced by paint color names. It's probably not at all good design, but it's the way my brain works.

We were able to crank out two coats of wall paint (I favor matte paint for walls) quickly and it looked great until they came to install the ceilings and put a bunch of dings in it that I had to go back and patch. I still haven't fixed the paint and I think I'll probably end up just doing an entire third coat so I don't have noticeable touchup areas.

I've filled all the holes in the trim, but I still need to paint it all, plus the two closet doors. I was on such a roll with painting and things were going so great but somewhere along the line I lost steam and I'm having a really hard time getting going again. Now it's to the point where I just need to crank it out. It doesn't help that we have no light in that room right now so if I work at night it's by shop light.

The sad fact about this project is that it was supposed to be done two weeks ago. A few things took a little longer than they should. The contractor left for a week for another project, putting a pause on the whole thing. But the big hangup has been the floors. I talked a little about this on Facebook, but allow me to bring you up to speed.

When they were finished with the drywall but hadn't yet done the ceilings or trim, the room was in a horrible state. It was absolutely covered in dust and dirt and there were holes in the floor covering they had put down to protect the wood floors. Drywall compound was everywhere (I was not impressed with the drywaller who was really, really messy; others I've worked with in the past have always worked very "clean"), including caked on our floors through the holes. We spent an entire day ripping up the red rosin paper they put down and cleaning up. In fact we blew up our shop vac and had to get another one. Then we had to scrape all of that drywall compound off. And when we lifted the paper (I wanted to clean the floor and get new paper down for painting and to make sure we weren't grinding a bunch of dirt in), we discovered that the dye in the red rosin paper had stained the floors in the area where the paper had gotten wet.

Three large areas of pink streaks like this covered our floor when the dye from red rosin paper stained the wood.

Our beautiful light floors (which were actually in great shape in that underused room, save for a bit of sunfade around the area rug) looked like a kid had gone to town with a pink highlighter. I'll spare you the details of dealing with this, but basically the contractor had never heard of this (I've since found out this is fairly common knowledge that red rosin paper absolutely cannot get wet), half accused us of doing something wrong and then agreed that it was his responsibility after we all met with the flooring guy, he filed an insurance claim, I had to deal with his insurance company and now it all seems to be handled and we'll be reimbursed the cost of refinishing the floor in that room.

The result was fine but in the meantime it has completely taken the wind out of my sails for this project. Everything was put on hold while we waited for a resolution on the floors and I used that and an excuse for my painting procrastination.

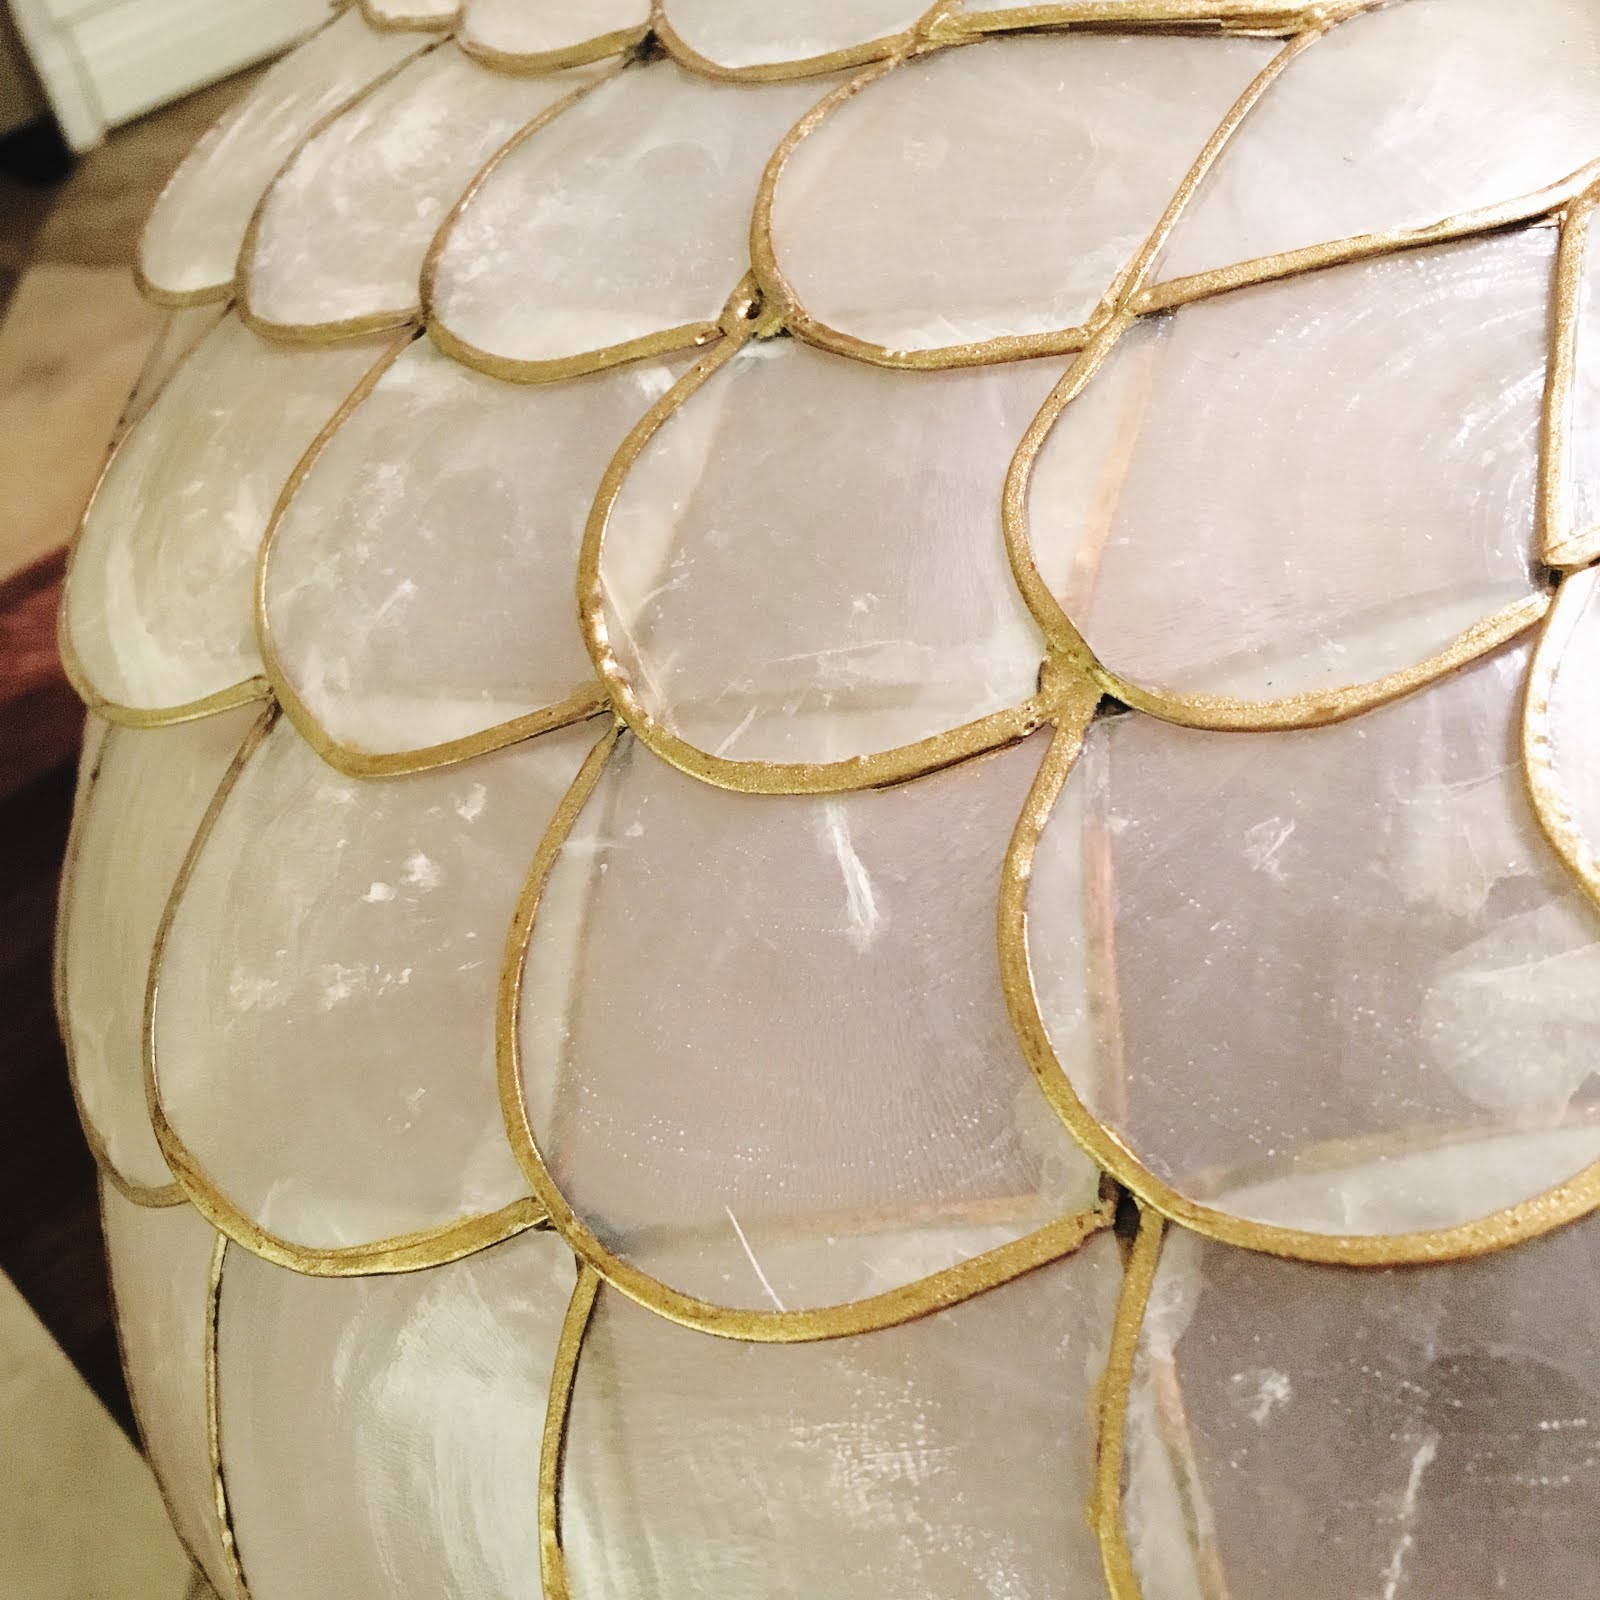
So that's where it is. Totally not finished. But here's a peek of a little something that's going in that room.


In other news, we've had to add an interesting detail to our stairs. What do you think?


In case you can't quite tell, that's plastic lattice zip-tied to the balusters. It's not there because it's stylish, that's for sure. Our geriatric cat Desdemona seems to be completely blind now and a couple weeks ago she walked between two balusters right off the edge of the second floor. She was OK (she's taken the same fall at least three other times that we know of), but we didn't want it to happen again, so scoured Home Depot for a quick solution and came up with an expensive sheet of vinyl lattice. We just cut it to the length and width we needed and used a handful of zip ties to hold it on. So far it's working great and poor Desi's biggest issue has been accidentally stepping in her food dish.

Like I said ... it's an unexciting update, but now you're filled in.

Labels: , ,

26 January 2016

SOMETHING DIFFERENT IN SEEDS


I spent the weekend celebrating my birthday. It wasn't a "special" birthday and the intention was for it to be very low-key, but things kept popping up, so I just kept eating and drinking and celebrating with friends and family. That was fantastic, but it pushed off me organizing my seed order for another weekend. And I have to say, I'm starting to get nervous about it.

I have, however, been perusing catalogs and websites and finding so many interesting things to grow. No one can ever say that growing a garden is boring after seeing the amazing selection of seeds available these days. I never can decide whether to go to the tried-and-true varieties or something a little more oddball.

Here are some of the interesting seeds that I've run across (some affiliate links used).

Asian Winged Beans also available here
Dara Ammi (flowering carrot) also available here

Lobbericher Yellow carrots

Dwarf Coffee Plant
Molokai Purple Sweet Potato
Jarrahdale Pumpkin also available here
Martian Jewels sweet corn
A Grappoli D'Iverno tomato also available here

What sorts of varieties do you favor? Old standards or something new? Have you ordered seeds yet? If so, please tell me about it so I can live vicariously through you!

Labels:

21 January 2016

WHAT I USE FOR STARTING SEEDS

It's already the third week in January and seed starting is right around the corner. I feel like I'm behind this year, having only ordered a few sweet pea varieties from Floret Flower Farm's new store. I need to start making lists and ordering soon because nothing is more disappointing that not being able to find the varieties you want.

In the meantime, I thought I'd run through what I use for my seed starting. There's nothing super sophisticated about what I use, but I'm pretty happy with the items I have. Really all that's missing is a proper greenhouse and that's not exactly something you just randomly order one day.

I'm including links (not affiliate links) to the places I think I bought these things from or somewhere else I can find them, but it's worth shopping around to look for a sale. I've found many of these items at my local garden center as well.


SEED-STARTING MATS

A heated mat not only helps seeds germinate (most seeds have a temperature at which they germinate best), but it also gives you more options for places you can germinate seeds. Many seeds don't need light to germinate, so, as long as the soil is warm enough, you can start them anywhere. For me, this means that I can do the germination step in my basement, creating more room in the areas where you have to worry about light. I have a cheap, single-tray heat mat that I don't recall the source of, and then last year I got a heavyweight double-tray mat that is great. I also got a thermostat for the mat, but it seems like I had it maxed out most of the time last year, so I don't think that's really a necessity.

Soil blocks make it easy to see when seedlings are ready to pot on.

TRAYS AND MORE

This is something to buy in bulk. You need something to hold the seeds. I like to start just about everything in some kind of module form, rather than planting a big tray and having to prick out seedlings. For some things I'll use small tray inserts, which are then put in plastic trays (be careful when you buy trays; some have drainage holes in them and some don't. I prefer ones without holes so I don't have to worry about water leakage), but last year I grew most things in soil blocks and loved it. You can read about my soil blocking experience here.

If you opt to make your own soil blocks—and I really feel like it's worth the extra effort—you'll need a soil blocker. I also like a big tray to mix everything in because there's a lot of water involved in making soil blocks. Get the optional shelf too.

Regardless of which kind of tray you go with, you'll need a few humidity domes. The shallow ones work fine; by the time plants are large enough to outgrow the dome they don't really need all that humidity anyway. Be careful things don't get too hot under the domes.


SEED STARTING MIX

You have to have something to grow this stuff in and in most cases, it should be soilless and sterile. Since most of plants I start from seed are edible and since one of the main things I want out of the vegetables I grow is for them to be organic, I choose organic seed mixes. Espoma has a nice one as does Dr. Earth. If you are using soil blocks, you can buy pre-made soil block mixes or make your own, which is my preference. You can find the "recipe" I used last year here.

This is my skinny-light setup. Note the spray bottle filled with Manure Tea.

LIGHTS

Don't feel like you need to seek out special grow lights. They are essentially souped-up shop lights. That said, I bought special grow lights. :) I have a skinny light with two bulbs in it and a larger one with four-tube lights, which is far superior. The skinny light is the auxiliary light now that I use for plants that are more mature and can survive better with mostly natural light. Don't skip on the width of your light because you'll end up having to rotate your trays multiple times a day.

I like this stand, which allows you to easily adjust the height of lights. I'm certain you could easily fashion something out of PVC pipes to do the same thing.

My dad bought my mom a stackable growing system for Christmas like this and it looks great. I really like it and had I known my seed-starting habit would grow so much, I probably would have started with something like this.

I also rely on timers to run the lights, leaving them on for about 16-18 hours a day. I don't use a special timer, just the same ones we use outside for our Christmas lights.


POTTING ON

There comes a time in every seedling's life when it outgrows its first home. My goal in seed starting is to only have to pot on every plant once before it reaches its final home in the garden, which is why I like the 2-inch soil block size. Seedlings can grow for a fair amount of time before they need to be moved into a real pot (you'll know when the roots start sticking out the sides). I have oodles of 3-inch and 4-inch plastic pots that I use to pot on seedlings. Most of them are pots I save from buying plants, but if you need to supplement your collection you can buy them.

You can reuse your trays to hold all your pots as well, but I also save flats from nurseries.

WATERING

This is a bit of a no-brainer, but obviously you need to water this stuff. I like to have a spray bottle to mist seedlings if necessary. If I use soil blocks, I water into the bottom of the tray, rather than onto the blocks, which can erode. I also like to use Moo Poo Tea to water with whenever I can. I really do think it helps.

That's everything I use for seed starting, save for the seeds, of course. What does you seed starting setup look like?


Labels: ,

18 January 2016

HOW TO PAINT WOOD CEILNG PLANKS

I'm doing all the painting the back room / office, which has been taking up a considerable amount of the time I normally spend gazing at seed catalogs. Fortunately, I've powered through the majority of it and in the process developed a pretty good method for painting wood ceiling planks.


Having painted the wood ceilings in the kitchen (they were pickled pink when we moved in), I can assure you that if you have any choose in the matter at all, you want to paint ceiling planks before they are installed. The money you will save on massages or chiropractor bills is worth it.

Our contractor bought these to match the wood ceilings in the kitchen and hallway. They are two 4-inch planks with a V-groove in the middle with a tongue and groove. When you put them up they look like individual planks. When you turn the boards over, they are plain, 8-inch-wide planks, so they can be used in that configuration as well. In the bedrooms upstairs we went with 5- or 6-inch individual tongue-and-groove boards, which I actually prefer, but I wanted to match the existing ceilings downstairs. The tags on them called them "carsiding," so look for that if you can't find them by searching for planks.

Be selective about choosing boards. There are a few turkeys in the bunch the contractor brought over that hopefully he can cut the bad bits off of. The big thing to look for is a large knot in the tongue, because if (when) that falls out, there's nothing under it. A few of the boards have a decided hook in them as well and you want to try to avoid that for obvious reasons.

If you're planning to paint your planks, the main thing you have to be worried about is the knots. If you don't prep your planks properly (say that three times fast), the knots will bleed through and you'll be repainting in six months. This happened on our professionally painted boards upstairs and it was a pain, so do what you can to prevent it. 


The first step is to fill all the knots. This is my favorite wood filler now. It doesn't harden up in the can like others and it works on interior and exterior applications. It also dries in 30 minutes which is very helpful. I just use a plastic putty knife to smooth it on any knots, dings or scratches. 

Look for baddies like this and fill them with putty.
Here's a knot that has been sanded and filled, but I went back and filled it again because there were still a few indentations.
When it's dry, I sand the entire face of the board. It's important to get all the "mill glaze" off the of the boards as well as smooth out the wood filler. I only sand the faces of the planks and don't bother with the v-groove or tongue. I use the random orbital sander (the most used power tool in the house) with 150-grit sandpaper, because that's what I had. I would have used 180-grit if I had it, but either will do. 

When the boards are sanded, I vacuum off as much dust as I can and follow up with a damp rag. This is when I fill any dings or holes that I missed filling or that didn't get fully filled the first time. Then I go back and sand those by hand.

I use a 4-inch foam roller and a brush for the priming step, which is the most important. It is imperative that you use a stain blocking primer that specifically says it seals knots. I like Zinnsser products and used the new BIN latex stainblocker primer (I try to use latex when I can just for ease of cleanup). It's not cheap—$30 a gallon—but completely worth it. 

After filling the knots and sanding, prime the tongue and the groove with a brush, then follow up with a mini roller on the flats, tipping off the primer with a brush. 

Start with a brush in the V-groove and on the tongue, then follow up with the roller on each board. This goes very quickly and you can move fast. Then follow up with the brush and "tip" the primer, just smoothing everything out and making sure the edges are covered. You want to pay special attention to the tongue and the outside groove and make sure you don't have runs or puddles in these areas because that will make them difficult to mount. 

Our workbench is a mess, but I recommend a glass of wine with your paint tray.
Wait for the primer to dry—usually about an hour—and then do it all over again. Two coats of primer may sound excessive, but remember, the goal here is to seal those knots. I don't sand in between primer coats, and if there is a particularly dark knot that I can still see through two coats of primer, sometimes I go back and just touch that up. Better to be safe than sorry.

Next use 220-grit sandpaper on a sanding block to give everything a quick rub down. You're just trying to smooth out the primer, not remove it, so a quick sanding generally suffices. I also sand the groove at this stage. Again, follow up with a good dust removal process.

I prefer to paint wood ceilings with semigloss paint. It's the only time, other than occasionally when painting furniture, that I use a gloss shinier than satin. I originally painted the kitchen ceiling in satin and didn't care for it and had to go back and do it with semigloss. 

I like doing the finish coat with a brush. It takes a little longer than rolling it on, but I feel like I have more control over the paint with a brush vs. brushing the groove, following up with the roller and then tipping the paint. Work quickly and, when the paint is still wet, just lightly run your brush over the entire plank from one end to the other without stopping. This will even out any areas where the brush may have stopped.


Let them dry and they are ready to mount. I'll let the professionals handle that, and I'll be back with a mini tutorial on what happens next when that's finished.


Labels: , , ,

15 January 2016

FRIDAY FINDS & MORE RENO NEWS

Holy smokes, a whole week got away from me without a single post. Sorry about that! Busy week with a lot of late nights up painting.

A quick update on the reno in the office before I get to the fun stuff. We had a little surprise early in the week when the drywall guy thought he was finished, but we thought he wasn't at all. We asked for smooth walls (can you blame us for going smooth after finally ridding ourselves of that texture?) like we have in the rest of the house, but the finish was some kind of sprayed-on primer  with a very rough texture. So we made him sand them all down and now they are nice and smooth. And our house is covered in a fine layer of dust because that stuff goes everywhere. At least it's not as bad as when I sanded the walls in the hallway.

Smooth (but dusty) walls. This is before we pulled up the rosin paper and realized that it stained the wood floors. Oh and that shop vac box is there because we blew up our other one cleaning up there over the weekend and had to buy a new one.

With that settled, Mr. Much More Patient did some cleanup. We were happy with how the walls ended up but the drywall guy was horrible about cleaning up. The red rosin paper they had put on the floors to protect them was ripped in a lot of places so dust got under there and we wanted to clean it up before it got more ground in. Except when Mr. MMP ripped up the rosin paper he not only found glops of drywall dried to the floor, but where the rosin paper got wet (it was snowing much of the time they were working in there), it stained the floor red. So far we've tried hardwood floor cleaner, soap and water, elbow grease and Simple Green and nothing has worked. The people who refinished our floors several years ago recommended we try mineral spirits and I found a suggestion online to try a magic eraser, so I'll give those a shot. But if that doesn't work, the floor is at least going to need to be screened (this is where they rough it up with a screen rather than sanding and put one coat of finish on it). Which is expensive, takes time and is going to require a rather unpleasant conversation with our contractor.

But let's think positively and say that's all going to work itself out. We'll be painting in there all weekend (thanks for weighing in on the color, by the way ... the poll was pretty heavily in favor of a navy color) and the contractor is scheduled to come back early next week to put the wood ceilings up and the trim back on. Stay tuned on Instagram as I'll put some updates there as they happen.

But onto the fun stuff. Here's what I'm digging this week.

The coolest staircase handrails ever. Obviously you have to have the right space for them, but wow, who knew handrails could be such statement pieces?

I bet this post irritated some people, but I have to say I agree with most of it, particularly the bit about handscraped floors. (Sorry if you have them! All that matters is that you like them.)

This is just a great update from an excellent blog. Plus there are puppies in it, so how can you go wrong?

http://passthepistil.com/greens-for-small-spaces/
Pass the Pistil photo
Last year, I said that leaf lettuce was the one thing that everyone should grow, and now Emily at Pass the Pistil offers some suggestions for growing greens in small spaces.

I like this super fun bathroom. I don't think I'd want a bathroom like this for my main bathroom but if you had a house with several bathrooms I think it would be neat to have one that's just fun.

That's it for this week gang. I promise to be back with some real posts next week. As for my plans for the weekend, they are the same as last weekend: paint, paint, paint. Good thing I like painting.

What's on your docket for the weekend?


Labels: ,

08 January 2016

FRIDAY FINDS & A RENOVATION UPDATE

It's the first  Friday Finds of the year, but first a quick update on what's happening in the back room / office (I really need to just figure out a name for that room and call it that once and for all). Drywall is up, including on the ceiling, which was a surprise to me. Since we're putting wood planks up, and since we discovered a stained plywood ceiling up there, I figured the planks would go right on top of that. But apparently there has to be a fire barrier and I guess drywall fits that bill.


They are also fixing the damaged drywall around our chimney so the living room has been rearranged and full of ladders all week. All of that gives the house a very "under renovation" feel that seems to be bringing some issues to the surface. I'm starting to think that Mr. Much More Patient has PTSD from our big renovation because he can't wait for this to be over and really this is small potatoes compared to what we've done in the past.


What I know for sure is that it will all be worth in the end. It always is. If you want to see more as this progresses, follow me on Instagram, where I'm pretty much putting up at least one picture a day that shows what's happening.

That's what's happening in my house ... here's some things happening in places that are presumably much less dusty.

This story from Erin from Floret Flower Farm (the gardening blogosphere's latest, greatest success story) about how she realized that SHE was her own brand is fascinating and it spurred all kinds of ideas for things we should probably be doing differently at work (and a few things for the blog).

Great advice on seed shopping. Add it to the list of things I need to get going on.

One of the things I love about the end is everyone's top posts lists and years in review. Taking a look at what is popular on Margaret Roach's blog is sort of a bellweather of what's happening in the gardening world.

I also liked Hooked on Houses top renovations of the year.

And Grow a Good Life had a great year-end round up as well.

You're going to be hearing a lot from me on seed starting soon, so brush up on your grow light knowledge here.

The weekend plans at my house depend entirely on how far things have gotten by the end of the day. With luck I'll be painting the wood planks for the ceiling and maybe a door or two. What are you up to?


Labels: , , , , ,

06 January 2016

RENOVATION ... AGAIN

Surprise! I've been talking about all kinds of projects, namely a bit of DIY in the basement and redoing the downstairs bathroom, but here we are doing a project (and by we, I mean the people we hired to do it) that I don't think I've even mentioned. This is how stuff goes around here. And this is what I came home to last night.


Consider this the penultimate step in ridding our house of the horrific wall texture that some former owner thought was a good idea. When we bought the house, every room other than the kitchen was covered in this thickly applied drywall compound applied in a fashion similar to one of those really fluffy cakes. Most of it went away when we did our big renovation and discovered that we had to shore up the living room ceiling (the weight of all that drywall compound contributed to a serious sag). I was more than happy to have to redo the drywall.

Then two years ago I did the hallway myself, mostly with a belt sander. For the record, even though it turned out pretty well, this was a really bad idea (I think I still cough up drywall dust).

The back room, aka the office, aka the original master bedroom is the worst room in the house as far as the texture goes. Our theory is that they started in that room and then "refined" their technique, because the swoops are really close together and it's all over the ceiling. There is a distinctive lemon meringue pie vibe in that room.

Here's what it looked like before this all started.

Things you should note about this photo: 1. The horrible wall texture; 2. The boob light; 3. The paint color samples on the wall, because at some point I thought paint was going to fix the problem in there. The sliding doors (which honestly I don't love but true French doors just aren't practical in our climate) lead out to the deck. 


One surprise—there are ALWAYS surprises when you start ripping open walls, especially in an older house—was that the ceiling underneath that drywall is stained plywood sheets, clearly the original ceiling. They are the same dark stain that lurks under all of the wainscoting in the house (and that was covered up with a not-very-good paint job). I can't imagine how dark this house must have been before someone painted everything and, I think, put in bigger windows. Frankly, even though that renovation was done in a rather sketchy way, I'm so glad someone did it because I'm not sure I would have seen past the darkness if I had looked at this house in its original state. 
So we're having that room re-drywalled from the original wainscoting up. The ceiling will be replaced with painted wood planks like in the kitchen. All this came about because at some point we had a leak on the chimney and the ceiling drywall was damaged. We feel fairly confident that we've fixed the leak so it was time to fix the drywall and it only made sense to have both projects done at once.

One thing I learned with our big renovation (and subsequent kitchen redo) was that if you can avoid getting your head set on an end date, you'll be a happier person, so I haven't asked about one nor really thought about it much. I will eventually, and I'm happy to see that they are working quickly, but for now I don't want to stress about it.

I'm doing all of the painting in this room and even though it's a small room, there's a lot of fiddly painting to be done. The wainscoting, which matches that in the living room and hallway, needs to be sanded, primed and painted because when the previous owners painted, they didn't sand or prime anything so if you so much as nudge the woodwork, the paint chips off. If I can paint really fast, the wood ceilings will be painted before installation and then just touched up after, which is far preferable to doing it after (as I found when I thought I crippled myself permanently painting the kitchen ceiling). I can't hold up the installation though, so they'll go up when the guys are ready to put them up regardless of how far I get. There's also a ton of trim—chair rail, baseboard plus trim around four doors and a window—and three doors plus the new walls.

This is a bright, sunny room that functions as an office, sitting room and walkway during the summer when we're on the deck and want to take a more direct route to the bathroom or living room. It can have a nautical bent, sort of. This is the room where we hang two huge nautical charts (one of the Great Lakes, which was was the first Christmas gift I gave Mr. Much More Patient many years ago, and that we still refer to on occasion, and another of Lake Michigan that details the course the boat Mr. Much More Patient was sailing on when it won a very big sailboat race), so it has a little bit of a nautical bent.

The wainscoting, trim and wood ceilings will all be painted the same warm white that is in much of the rest of the house: Benjamin Moore Mascarpone. I like to keep the same white going where possible for simplicity's sake not to mention continuity. The upstairs bathroom and kitchen are both Cloud White because I needed something just a touch whiter and the downstairs bathroom will be White Heron because I am attempting to match the subway tile color as closely as possible.

So, would you like to weigh in on a wall color choice in this room? I have it narrowed down to a dark navy (shocker) or something in the light blue / turquoise / aqua area. Unless one of you has a completely different idea that I haven't thought of.

Here's a navy combination (using BM North Sea). The mock-up is just a generic room from the Benjamin Moore website, not the actual office.


And here's something a little lighter (and perhaps less serious) with Benjamin Moore Galt Blue (from their Williamsburg collection, which has some great colors in it).


Thanks for weighing on the color choice! I'll keep you updated on the progress back there.

Labels: , , ,

04 January 2016

A NEW HOME FOR THE STAGHORN

The staghorn fern got some new digs for the new year. You may recall that I wrote about how it was doing so well it needed to be repotted, and fortunately Kylee over at Our Little Acre saw my plea for some advice. Turns out she has a great tutorial on her blog about how to create a hanging planter for a staghorn fern.


I was very happy to have found it because, as I mentioned, I had reservations about hanging a wood board on my wall that would need to be soaked when I watered the fern. Hanging will also be much better when it goes outside for summer because I can easily hang it in a nice sheltered spot under the pergola on the deck.


The method was really easy. I just grabbed about a 6-inch grapevine ball that I had (probably from a Christmas decoration or something) and cut a hole in it using my pruning shears. It's always nice to have an excuse to pull out the garden tools in the middle of winter.

Then I lined it with sphagnum moss. Kylee recommends sheet moss, but I found this on Amazon and that seemed way easier than running to the closest store that might sell moss. Someday, when Amazon has taken over the world and created the world's biggest monopoly I will be really angry I gave them so much business, but it sure is convenient to have something as random as sphagnum moss show up at your door in two days.


This moss comes as a very thin square. Cut off a small amount of it, no more than a third, and rehydrate it by soaking it in water and watch it expand. I figured out that you only need a tiny part after I soaked the entire thing and ended up stocking the compost bin with a lot of moss.


I shook some of the soil off the roots and put a little fresh potting mix and worm castings in the moss-lined ball. I also put some banana peel in there. Lots of people out there swear by banana peels as a little bit of fertilizer for staghorn ferns. Normally I ignore those old wives tale kind of gardening treatments but I figure it won't hurt and might just help.


Once I got the root ball in the hole, I just filled in with more moss and that was it. Make sure to check out the full tutorial for more details. I haven't put the strings on it yet because I can't hang it quite yet, so for now it's sitting on top of the pot it just came out of. Now we just sit back and see how it likes its new home.


Labels: