The Impatient Gardener: May 2017

30 May 2017

A LAVENDER-LINED PATH DREAMED FULFILLED

The long path that now extends all the way to the garage was originally a short path that cut through an existing garden when we first bought our house. At the time, I'd never planted anything in the ground, only containers. I don't even know where or when I first saw a lavender-lined path, but I knew I wanted one before I really knew how to garden.

nepeta along path
Although it was pretty for much of the summer, when the Nepeta was overgrown it got a bit wild. So I'd cut it back and for a couple weeks it looked like the photo below.


I think back then I thought we couldn't grow lavender here (I can't tell you why I thought this, but it's not true), so I fashioned a lavender substitute: Nepeta. Nepeta has the same blue-gray foliage as lavender as well as blue-purple flowers. It also has scent that is released as you walk by, making it great for a path. But finding a low growing variety that wouldn't eat the path was a challenge. Over the years I tried several varieties, said to stay compact. I managed their rangy behavior by cutting it back after flowers, three times most summers, but that meant there were a lot of times when it looked shabby either because it was too big or had just been cut back.

This photo taken from the second floor gives the best overview of the path. The Nepeta is on the bottom of the picture, closest to the patio. 

As I mentioned a few weeks ago, it was a tough winter in the garden (and, as I've found out, for many other gardeners on the area). I lost almost all the Nepeta growing along the path (it now lines both sides of about a third of the path closest to the house). There were a couple of survivors that I moved elsewhere, but everything else was well and truly dead. Since I had to replace those plants with something, it felt like the right time to take the plunge and make the path planting I've always wanted.

This is the part where we get to question my sanity, because it's worth mentioning that in addition losing almost all of the Nepeta, I also lost five lavender plants. But hope springs eternal, particularly when it comes to gardening and hey, I'm willing to learn any lesson at least two or three times.

In the process of preparing the soil, I amended it with chicken grit, which is just small bits of gravel, at least where gardening is concerned, and I lined every planting hole with a handful of grit as well. This strategy worked pretty well in the past, so I'm hoping it will give the lavender the very sharp drainage it demands.
The plants are tiny right now, but with luck they'll grow quickly and fill in nicely.

'Phenomenal' lavender

The immediate effect, other than being delightfully weed-free, which it certainly was not before, is underwhelming. These were not large plants. But in my experience they grow quickly, so with luck they'll fill in nicely this summer. And from there, we'll just see how it goes.

Because when you want a lavender-lined path, you have to have a lavender-lined path.

Labels: , ,

26 May 2017

CRAZY TIME IN THE GARDEN + FRIDAY FINDS

We've officially hit the height of Holy Crap There's a Lot to Do in the Garden season. I've been taking it chunk by chunk, trying to completely finish one area before starting on another. The problem with this plan, of course, is that the other areas of the garden farther down the list are turning into jungles while they wait for their turn.

Short of hiring help, which I talk about every year and then come up with 18 reasons why that won't work, there's nothing to be done about it other than to just plod on. It is frustrating because right now a good amount of time is spent tending annuals and other plants that have congregated in multiple areas of my yard while they await planting. And yet, I'm still on the fence about whether I want to plant containers this weekend. It's still quite cold at night here (often in the 40s), and that's not treatment that most annuals like. Right now I can cover them all at night, but once they are in containers, it's every plant for itself.

Anyway, there's no question what I'm doing this weekend. Gardening. I'll take a few breaks for some Memorial Day gatherings and a graduation party, but we're rapidly getting to the part where I wish all the big work in the garden were done and I could go into maintenance mode. Also ... why are there so  many weeds? It is infuriating.

There are moments of glory in the garden though and here's one. This spirea. I'm pretty sure it's Glow Girl and I'm very sure I planted it too close to another spirea, but holy smokes, that foliage is outstanding. A loose hedge of these would be phenomenal.

I feel like that rogue ostrich fern is photobombing this picture.

Speaking of containers, which I guess I was about four paragraphs ago, I planted my first one last weekend, just to do one because I couldn't wait any longer. And I made a video of it. Check it out here and stick around the mini blooper toward the end of it.

And now a few finds for this Friday:

It's Chelsea Flower Show time, so I've been checking out all the gardens. Honestly it's a bit of a let down from previous years, but apparently the Brexit vote came right around the time they were taking garden submissions and very few companies felt comfortable spending money sponsoring show gardens then. Anyway, this is my favorite of the bunch. I'm not at all a fan of the Best in Show garden, although I imagine it garnered major points for being such a huge undertaking.

I think my friend Linda's garden looks better in spring than any other time of the year. She has such interesting foliage plants that all the fresh green popping up is delightful. Do check out her blog to see the fabulous photos she's been posting lately.

If you're into fairy gardens, don't miss Lisa's adorable wheelbarrow garden. I had a wheelbarrow that meant a lot to me and when it rusted out and got wobbly we pitched it. I now wish I would have saved it for a mini garden/container. Woulda coulda shoulda.

A few weeks ago I did a cocktail hour stroll through the garden, completely with cocktail making, on a live Facebook broadcast. It got LONG (I'm a talker), but if you want to check it out here you go. I want to do more of these (but maybe as videos instead of live broadcasts) because I can't think of a better match than cocktails and gardens.


Well that's it for me. What are you up to this weekend? Anything OTHER than gardening? Or do you take these holiday weekends off from the garden?


Labels: , , , , ,

23 May 2017

HIGH SEASON FOR HOSTAS

Hostas, at least the ones in my garden, are just about at their peak. They thrive in the cool nights, (semi) warm days and constantly damp soil thanks to spring rains. The armies of slugs haven't hatched to attack them yet and so far the deer have been (mostly) thwarted by my preventative measures.

Their leaves are brilliantly colored and nary a stem is flopped. So perhaps it's no surprise that this is the time that I typically end up tinkering with them. Earlier in the season, when they are in their stubby-shoots-coming-up stage, I tend to forget just what they look like fully unfurled. But now my lousy gardener's memory is jogged.

I vowed this winter (at least mentally if not publicly) to be better about maintaining my garden this year, and that starts with doing some dividing and rearranging that I've put off for far too long. So this weekend I did a bit more of that, and I have to say I'm happy with the result.

'June' hosta with 'Stripe it Rich' Hakonechloa after dividing
One 'June' hosta became three surrounding Hakonechloa 'Stripe it Rich'.

Since I made this video on how to divide hostas, lot of people have been asking me if it's too late to divide them now. The answer is an unequivocal no. In fact, you can technically divide them at anytime, but recognize that the more leafed out it is and the warmer the weather, the more you're going to have to water to counteract the stress it's been through.

Sunday afternoon I divided one of the Hakonechloa 'Stripe it Rich' grasses I grow in the east terraced garden. I've never seen that cultivar anywhere else but that plant grows so well in that half-day-of-sun situation. Originally there were three of them. One died, and the other two got quite big. My intention was to divide the remaining two (making for plants total), replant the third of the trio that had died and move the other division elsewhere in the garden. It's a good thing I started with the middle one because that thing was a beast to dig up and divide.

'Autumn Frost' hosta after moving
'Autumn Frost' in it's new home. I don't know a hosta that is more beautiful in spring.


After that bit was done, I moved two of the hostas that surrounded the center grass. One was 'Autumn Frost', which I consider to be the single best looking spring hosta that has ever been grown on the face of the planet, and another is an unknown. The third was 'June', which is certainly in my top five favorite hostas. 'June' had gotten quite large, so I decided to divide it into three and replace the moved hostas, although space things out a bit more to accommodate growth better than when I originally planted there.

'June' hosta

If I thought the grass was difficult to dig up, I clearly had no idea what 'June' had in store. In fact Mr. Much More Patient was called into rare garden service to grab a shovel and dig/pry opposite me. (In case you were wondering, he's been well trained for these moments, starting with "What is safe to step on here." He's a good man.) The root ball was so big I had to have him help me roll it out of the hole. Things were much more manageable once 'June' was finished with surgery and I'm happier that it's a bit more of a cohesive look there.

That job, which ended up taking well over an hour, was certainly not the only thing I did in the garden this weekend, but it probably brings the most satisfaction. And it's one more way I justify not having to go the gym. Crossfit has nothing on hosta dividing.


Labels: ,

17 May 2017

THE QUEST FOR 'SHROOMS CONTINUES

A while ago I showed you the rather odd loaf-like object taking up space in my refrigerator. Well, I'm happy to report that I was able to free up that space in the fridge this weekend, as the mushroom spawn has been planted scattered strewn.


The process of growing these Wine Cap mushrooms is less than exciting, and since I've never done this before, I pretty much just followed the instructions that came with the spawn, which was mixed with sawdust. My five-pound bag was enough for a 50 square foot area so, because my spatial relationship skills are not great, I laid out the bed area with birch logs. There is absolutely no need to do this, other than to make sure you have about the right size area and I liked the idea of knowing where exactly to look for my 'shrooms.


Because there was some grass and weeds in the area, I laid down some sodden cardboard as a weed block. This wasn't in the instructions that came from Field and Forest, but I saw this method in a few videos I watched. Then I spread several inches of damp wood chips on top. I used chips from maple and ash trees we had taken down a couple months ago, but you could use purchased untreated wood chips if needed. The instructions said a variety of chip size is best, and that's certainly what I had in my pile.


Then I took the "loaf" of spawn out of the fridge and broke it up in the bag, then sprinkled it all over the wood chips, trying to broadcast it evenly. After that, it was a few more wood chips and some damp straw.

And that's it. All I have to do now is make sure that the area stays damp but not wet, especially through the hot bits of summer.

This is about as big of a garden experiment as I've ever undertaken. Of course there was the potato tower a few years ago, but let's hope the outcome is significantly better than that.

With any luck, by the end of summer I'll be feasting on my very own homegrown mushrooms.

Have you ever grown mushrooms. Tell me about it!

Labels: , , ,

15 May 2017

HOW TO PLANT A TREE (THE NEW WAY)

Prepare yourselves. I'm about to tell you how to plant a tree in a way that may go against everything you've ever been told about planting a tree. But bear with me because I'm also going to tell you why it's a good idea to plant a tree like this.

Plant a tree for life, not for the short term.

First of all, you need to start thinking about a tree as a many-year (possibly a lifetime) investment. You need to think about the long-term health of it, not just the next five years. There are things you can do when you plant a tree that will determine if it lives to see your kids' weddings, or perhaps the next owner's kids' weddings.

The typical advice about planting containerized or balled and burlapped trees is to disturb the roots as little as possible and plunk it in a very wide but not too deep hole. For balled and burlapped trees this advice often includes leaving all the burlap intact to rot away naturally (which I've actually never seen happen), which you pretty much have to do in order to leave on the wire cage that holds the whole thing together.

Here are the problems with that method:
  1. Once roots start circling, as they are wont to do when grown in containers or spend a lot of time in the balled and burlapped state, they will continue to circle because they have "root memory." Roots that circle will never properly anchor a tree and are lightly to girdle the whole thing, essentially choking itself off.
  2. Trees, like almost all plants, do not like leaving familiar territory. Roots are unlikely to stretch out beyond the conditions in which they are accustomed. This is why it is no longer advised to put a "$5 plant in a $25 hole." Why would roots want to seek water and nutrition and stretch out if they are comfy in their little universe?
  3. It's very easy to plant containerized or balled trees too deeply because they've been growing that way at the nursery.
Balled and burlapped trees are typically grown in clay because it's the only kind of soil that will stay together in a ball, but few people grow trees in full clay. My garden is certainly an example of that. My soil is mostly sand or sandy loam, although there is some clay in a few spots in the yard where clearly fill had been brought in at some point.

So when I got a tree recently—an espalier Asian pear that I've been desiring for a long time—I planted it in a way that was pretty much exactly the opposite of what the nursery advised. I turned it into a bare root plant.

Don't freak out. This whole process moves quickly so at no point are the roots allowed to dry out. Here's the process:

1. Lift the whole thing into a very sturdy wheelbarrow. A kiddie pool would work too. Then fill it with a few inches of water and let it soak for several hours. The bottom of a balled and burlapped tree is likely to be hard as a rock so it needs some time to soften up.

How to plant a tree the new way
Start with the tree in a wheelbarrow or kiddie pool and allow the bottom to soak in a few inches of water for several hours to help loosen the root ball.

2. Then use a hose and some gentle work with your hands to carefully work all of the soil off the root ball without tearing away fine roots. I'm not going to lie, this is a long, messy process.

How to plant a tree-- the new way
Carefully wash all the soil off the roots. In the beginning of the process, above, you'll be breaking off big chunks. At the end, you have to tease it out through the roots, as shown in the quick video below. 


3. When all the dirt has been washed off from the roots, examine the root ball. Look for circling roots and cut them. Clean up jagged roots (mine had a ton of these that seemed to have been ripped off and scabbed over).

The new way to plant a tree
Here's what the roots looked like when I cleaned off the soil. There were two huge roots that had been ripped apart at some point and a few fiberous roots. I would have liked to see a lot more.

4. Find the root flare. This is where the trunk flares out and the roots begin. That is the level where you want the top of the soil when you plant.
5. Dig your hole as you usually would—at least twice as wide as the root ball and no deeper. In fact it's best to plant just a touch high to accommodate for the soil settling. Don't add any amendments to the hole. (I did sprinkle some mycrohizal fungi on the roots. There is some discussion as to whether this does anything or it's a feel-good thing, but I opted for feel-good put some on.)
6. Place your tree, making sure to face it the best direction and check that the soil level is correct by laying something—a long stake or a shovel— across the hole, then gradually add soil to the hole. About halfway through, firm in the soil—I like to face my foot toward the truck and my heel out and gently press down in a circle. Don't smash it! You're just trying to firm in the tree, not squish the life out of it.
7. Add in more soil and repeat the firming process.
Firm in the soil by gently pushing with your heel around the tree.

8. Water it well, preferably using the water from the root-washing process which can have beneficial bacteria in it.
How to plant a tree the new way.
Water in well, preferably using water from the root washing process.

9. Once you've watered and all the water has been absorbed, check the soil level again and add more if necessary.
10. Mulch deeply around the root zone, but don't pile up mulch on the trunk. If need be, water again at this stage.
11. Stake the trunk low and remember to remove the stake when the tree seems well anchored, no more than year from planting.
A few notes about my specific situation:
  • Because I was planting an espalier tree that will be supported by guide wires on the fireplace facade, I planted the tree quite close to the house, about 14 inches. This is much closer than you should ever plant a tree in any other case.
  • I also didn't stake the tree because of it's location and the guide wires. There won't be wind whipping this tree around so I skipped the stake, but it's an important step in almost any other case.
  • I firmed down the soil under the root ball only because I'd recently put that soil in from another spot in the garden. Here's why I did that. 
When the tree is planted, it's not uncommon that it will sulk a bit at first. Don't freak out. The tree is stressed. It has experienced a drastic change in growing conditions and its roots have been disturbed. This is unlike what you've probably experienced with other methods of planting (and a good reason to plant in spring or fall but not the heat of summer, which is stressful enough on its own), but keep in  mind that you're aiming for the long term health of the tree here. 

You will probably have to be very careful about watering for the first two weeks. I don't want the roots to dry out at all during this time, so I stay on top of the watering, but be sure not to over water, which is probably worse. Once you're past this first critical period, you should go to a "proper" watering schedule, which is to say regular but infrequent (generally weekly) deep watering. This encourages deep root growth rather than surface root growth.

How to plant a tree the new way
The planted tree is looking pretty good in its new home and it has acquired its own bodyguard.

I bet you're skeptical right now and maybe even thinking, "Planting the old way worked fine, why change it?" But did it really work better? Have you seen trees die or just fall over in a wind storm? Of course these things happen for other reasons as well, but often it's because of improper planting. And just think about it: Doesn't it make sense to get a tree growing in the soil that it will call home for the rest of its life from the get-go?

Here's a study on this method if you need a little science to quell your skepticism. And here's more information on the why of this.

Labels: , , , , ,

11 May 2017

THE FOLLY OF SHORTCUTS IN THE GARDEN

Last weekend I dug a hole that was large enough that I figured any neighbors who might have stopped by would probably slink away assuming I was digging a grave. I'm not kidding. This hole was about 6 feet wide by a good 3 feet deep and almost 3 feet wide. When I was finished moving all that soil out of there, I proceeded to get soil from a pile by the driveway and put that in the hole.

At some point during this process (perhaps while I was begging him to please just dump that wheelbarrow of dirt over there) Mr. Much More Patient asked the obvious question.

"Why are you moving dirt from here and putting in dirt from there? And isn't the dirt you are putting in there all of the dirt that you dug out from over there (pointing) like three weeks ago?"

I can't blame him for asking, but the answer, at its core, is simple: I rarely do shortcuts in the garden anymore.
A foot or more to go yet!

The fact is, I've learned that lesson so many times that I've finally wisened up to it. It's probably save to say that I regret every shortcut I've ever taken in the garden.

In almost every case those shortcuts involved soil preparation, and much like taking shortcuts on a painting project, the only way to fix these mistakes is to redo it. I don't have do a lot of soil amending, but weeds have been my downfall. Not properly weeding an area or doing something to kill the weeds before planting ends in regret every time.

I've also made the cardinal sin of being too lazy/short on time to water something after I've planted it, thinking it was going to rain soon enough or that there was already enough moisture in the soil. What a terrible thing to do to a plant!

So now I just take the long way through a project, even erring on the side of doing more than I need to. The giant hole I dug this weekend was in front of the stone fireplace where I'll be planting a new tree. Many plants that I've tried in that area have not thrived and I suspect the soil is the problem.

This is just beginning to get into the sand layer.

We've had a lot of work done on that chimney over the years, and all of it involves chipping out mortar. The people who do this kind of work are not very good about cleaning up, so there has been dust and chunks of mortar in the soil there in large quantities. I did a basic hardware store soil test  in that spot a couple years ago and the soil was extremely alkaline, a condition that most plants won't tolerate.

On top of that, this is an are of the yard that seems to have about a foot and a half of top soil and everything below that is solid sand. In other words, there's not a lot for roots to take up when they start growing.

So that's why I dug down several feet and removed all of the soil and sand in the area where the tree and other new plants are going and replaced it with excess soil, which is lovely stuff, dug from the circle garden. It's still native soil to my yard, it's just not poisoned with years of alkalinity.

That's a lot of soil moving. And it's so worth it, no matter how crazy my husband thinks I am.


Labels: ,

09 May 2017

HOW TO CHOOSE A MEMORIAL TREE

For many years I resisted the idea of planting a tree or shrub to memorialize a loved one who has passed. I can't imagine something worse than planting a tree to remember someone and having it falter. It would be like revisiting that loss all over again.

And then I planted a tree as a memorial and I changed my mind. I was simply looking for an evergreen for the back yard when I came across Picea glauca 'Hudsonii', which happened to share a name with our first Newfoundland dog Hudson, who was quite old at the time, and I made a mental note about it. A few months later Hudson passed away and I recalled that tree. Somehow it seemed like it was meant to be that I should happen upon a tree with the same name as our dog, so I found one at a local nursery and brought it home. Mr. Much More Patient and I planted it together, and put some of Hudson's ashes in the hole. That tree is directly out our back door so I look at it every day and think fondly about Hudson. We planted it three years ago and it is doing great, putting on new growth and bringing us joy every day.

We planted a tree for Rita while she was still alive, so we have two years of photos of her with it when it was in bloom.
The comfort that tree brought me, as silly as that may seem, changed my mind and quelled my fear of killing a memorial tree. So we planted another, except this one was for the dog we still had. It was actually Mr. Much More Patient's idea. Why not plant a tree for her while she was still here, we thought. We planted a lovely crabapple and we have great photos of Rita with the tree, which makes it that much more special now that she's not with us anymore. And when Rita died unexpectedly last spring, a group of friends pitched in to buy us another tree (a beautiful pink dogwood) for her. It was an incredibly touching gesture and I love that we planted it by Hudson's tree, a fitting location as the two were best buds.

Picea glauca 'Hudsonii', which we planted shortly after our first Newfoundland died, was looking good then and three years later it's even better. 

So I'm reformed. I think trees and shrubs are lovely way to memorialize a loved one or mark a joyous occasion such as a birth or wedding. They are a changing, growing, everyday reminder. If you're buying a memorial plant, here are a few things to consider:

1. SET IT UP FOR SUCCESS
This is the most important thing to keep in mind. Make sure whatever you're planning is hardy for the zone it will be grown in and not terribly difficult to grow. Also consider the location where it will be planted. If the person you're buying it for has a completely shaded yard, don't buy a tree that needs full sun. This is not the time to go out on the limb and try pushing the growing requirements of a tree.  Similarly, be very cautious about buying a very large tree. These need to be planted carefully and not every yard can accommodate that size of tree. There would be no worse position to put someone in that making them face having to remove a tree that had been purchased for them as a memorial because it had outgrown the yard.

2. DON'T CHEAP OUT
If you're buying a tree for someone else, don't buy something tiny because it's all your budget allows. It could be years before the tree looks good and very small trees need attention to shaping as well as some coddling and that's not the point of a memorial tree. It's better to choose something else that gives you more bang for your buck than buy something small.

3. CONSIDER FLOWERS
I think choosing a tree or shrub that flowers is especially nice for a memorial planting. Flowers draw your attention, making it a special time when a memorial tree is blooming. Sometimes flowers can help narrow down the right tree or shrub to choose. Perhaps it blooms around the time of the loved one's birthday or passing, or its flowers are a color that one might associate with the loved one it has been planted for. We chose the 'Coralburst' crabapple that we planted for Rita because she was a very girly dog, so pink seems appropriate.

4. CHOOSE SOMETHING SPECIAL
If you can choose a tree or shrub that has some connection to the loved one it is being planted in memory or in honor of. This might be the name, like our 'Hudsonii' spruce, or have a color connection like Rita's crabapple (and the pink-flowering dogwood our amazing friends later gave us), or just something that seems to fit a loved one's personality or persona.

5. ASK FOR HELP
When you're shopping for a memorial tree, go to a local nursery and ask for help choosing something the recipient is likely to have success with if you aren't sure what to pick. While you're there, inquire about the cost of planting or consider planting it yourself so that the person you're giving it to doesn't have to worry about it. Planting a tree is a big project and sometimes you don't want to give someone more work during a difficult time.

Here are few trees and shrubs that might make nice memorial gifts:
  • Lilac (a white lilac in particular could be a special plant)
  • Pagoda dogwood (Cornus alternifolia)
  • Magnolia (Consider in particular, smaller growing magnolias such as the "Little Girls" series, which includes 'Jane', 'Ann', 'Betty' and others, or something like 'Butterflies' with it's pale yellow flowers
  • Redbud
  • Crabapple
  • Japanese tree lilac (Syringa reticulate)
  • Japanese maple (be particularly careful with this as some can be very tricky to grow)
  • Serviceberry (Amelanchier)
  • Hydrangea 
I'll be the first to admit that giving someone a tree to memorialize a loved one is daunting, but no other gift could be as much of an every day reminder as a beautiful tree or shrub that grows as the recipient's memories grow even fonder. 

08 May 2017

PLANT DEATH HAPPENS; GARDENING GOES ON

Plant death happens.

But it sort of stinks when it happens to you. Every spring I check in with all my plants. It doesn't take but a minute: Dead or alive? Sometimes it takes some time so this is a question asked frequently. Sometimes all that remains is an empty spot in the garden where I could swear a plant used to be.

It seems like it was a rough winter in my garden. I'm surprised by this because it wasn't particularly cold save for a week here or there, and there wasn't a lot of snow. The latter may be the issue as snow offers a nice layer of insulation for plants. But a bunch of snow piled on top of a plant can be an issue too.

Since I'm dealing with this in my own garden right now, here's a few things to do when you think you might have to call in the plant coroner.

This should be a clematis ('Pamela') but so far it's just leftover stems. I am concerned but not greatly so. This plant has been a stalwart in my garden and a great performer and I can't think of why it may have failed. There's nothing to do about it other than sit tight and have faith.

1. DON'T PANIC

I have to remind myself of this all the time because the second I see a plant that might be dead, my first inclination is to dig out its remains and rid my garden and myself of the reminder of what was. Don't! If it's early in the season, there's still chance it may spring to life. It doesn't hurt anything to leave the plant in the ground for the time. I usually use this time to make some decisions about whether it needs to be replaced and with what.


2. LOOK FOR SIGNS OF LIFE

If I think a plant might have bit the dust, the first thing I do is really inspect it, looking for bits of green at the crown. I'll also look at other plants of the same variety to compare them too. The Nepeta I have planted along the path is looking terrible this year, and I have no idea why. At first I thought it was just slow to emerge, but when I looked closer I saw one very healthy plant with about 4 inches of growth, a couple with tiny sprouts and many with nothing.

If the plant in question is a woody shrub, you can scrape your fingernail on a branch and if you see green there's life left.

One of the Nepetas on the path is looking nice, with lots of fresh foliage (and some woodland violets—grrr—to boot). But the plant right next to it, below, is DOA. I should at least be seeing some signs of life on it if the same plant growing next to it has this much growth. All I see there is baby weeds that need to be dealt with.


3. MAKE A PLAN

OK, there is a chance your plant is dead. Keeping in mind tip No. 1, don't do anything drastic yet, but start thinking about what the backup plan is in case it is indeed DOA. That might meant replacing it with the same thing, which isn't a bad idea. Unless you suspect that the plant died because of a cultural problem—stressed from growing in too much shade or too much sun, or sitting in soggy soil or being grown in the wrong zone—in which case you're better off picking something more appropriate for that spot. Or not. Because maybe you were just hedging your bets on the condition requirements a little bit but you really love the plant. Sometimes it's worth giving a plant a second try. And of course, you may decide to go in a different direction all together.

I have planted—and dug up when it died—lavender at least three times. A few years ago I discovered a variety called 'Phenomenal' and heavily amended the soil to provide great drainage (lavender wants poor soil with sharp drainage). And it has been beautiful. So much so that I bought more plants. Guess what I'm pretty sure bit the dust this winter? Yep ... all of them. But I love them, so there's a good chance I'll be replanting them, because I love that plant.

4. DON'T BLAME YOURSELF

A plant may or may not have died in your garden. Big deal. Shake it off. It doesn't mean you're a bad gardener or have a brown thumb. Plants die. They die from old age, because they were a deer snack, because winter was cold, or not cold, or summer was too hot, or they were too wet, or too dry or because the soil was wrong. Instead of thinking about the plant that just died, think about how many plants are thriving and make up your beautiful garden.

Do you know how many plants have died under my care since I first planted something on my own the year I graduated from college? It has to be in the hundreds. Many have been no great loss. Some have really hurt. No surprise, I find the level of hurt involved in losing a plant is directly related to the price tag on it.

There is one great part about a plant death: New plants.

Longtime readers will know I have a serious clematis addiction, so the fact that there are several clematis in my garden that are being very slow to show their faces this spring is more than a little disturbing to me. And, even though I swore there would be no more clematis this year, I have ordered five that will be replacements if plants don't pop up, or they will find a different home if everything does come up, which I sincerely hope happens. There are worse things in the world for a gardener to face than having to buy some new plants (or to have a few spares to find homes for).

So take heart: Plant death happens, and yet gardening life goes on.


Labels: , ,

05 May 2017

ORC WEEK 5: MORE TIME, PLEASE!

This is the part of this six-week challenge where I've come to the full realization that there will be no major reveal in a week. Not a complete one anyway. This has been a frustrating project in that regard because nothing is seeming to come easily. I would guess this is more typical of most projects people do than when we redid our bathroom last spring. In that case, the decisions just flowed.

Part of the problem is that my brain is taking me to the garden, not to the Internet to look, seemingly endlessly, for the right area rug (now rugs). Never before have I wished more for an interior design friend who I could hand the reins over to.

In fact, there's been basically no progress on the room since last week. I'm still in shopping/decision-making mode, which I suppose should have been doing somewhere around Week One. Choosing items that work is much harder when you're trying (not very successfully, I might add) to stick to pretty tight budget.

This is what we'll use for the desk light. Unfortunately it came with a broken switch so we're waiting for a replacement to arrive.
There have been some missteps. Cushions that I ordered for the existing wicker chairs came and they were far too small. I decided the existing curtains are not going to work. A light came with a broken switch.

The good news is that we've been able to move Mr. Much More Patient's desk back into the space so he can get back to working properly.

The biggest decision I've been struggling with is that of rugs. Although I like the sort of muted-but-warm color palette that the fixed elements have in that room, I feel like a basement needs to go to great lengths to feel warm, so I'm looking at very vibrant area rugs. You gotta love a little rudimentary Photoshop work for such things.

This rug, a vintage one I found on ebay, is my favorite. Unfortunately it was a bit more than I wanted to spend and had not been cleaned. I figured by the time I had it cleaned it would be way out of my price range.

I've been playing around with other "faux vintage" rugs that are much more affordable, but I can't decide if I should go more towards pink or orange.
I did make one rug-related decision that I'm really happy about. I got this rug for the stairs to use as a runner. So good news: I love it. Bad news, that's a big project because I'll have to pull off the existing carpet (ew) and patch and paint the stairs before that can happen. See, this is why these projects are supposed to happen in winter!
The stairs to the basement are narrow so a typical runner wouldn't work. Instead I ordered several 2x3 rugs that I'll use for the stairs. 

This room will be finished and look great at some point, but I'm just giving you the head's up, next week's big reveal may be less than revealing. Such is life in the land of real DIY.

For better or worse, I'm redoing this room as part of the one room challenge. Make sure you check out the other guest participants (who, presumably, have made better progress than I have.)
And check out previous weeks in this project in case you've missed them:


Labels: , , , ,

03 May 2017

HOW TO BUY PLANTS THE DEER WON'T EAT

One the biggest challenges gardeners face, particularly in certain parts of the country including the Midwest, is wildlife damage. It is soul crushing when you go to your formerly beautiful garden to find plants mowed down overnight by deer.

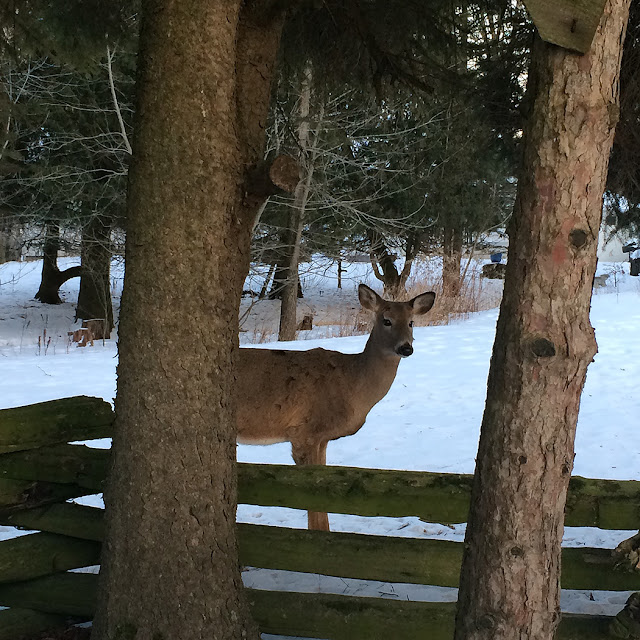
The deer in our neighborhood are so bold they basically give you the stink eye if you interrupt their meal.

There are ways to prevent damage in the first place, and the best, and perhaps only, truly proven method is a tall, sturdy deer fence. But that's not practical for a lot of people, so we're left employing various deterrent sprays and homegrown methods to keep the buggers away. Regardless of what method you choose—be it homemade or purchased spray, soap, water sprays, large dogs or maybe water gun—growing deer resistant plants goes a long way toward decreasing the damage.

I say "decreasing" because deer don't read plant labels very well and they've been known to nibble (or worse) on plants that they aren't supposed to like. A lot of that has to do with how much other food there is, but with deer populations increasing, they seem to be more than happy to pull up to the buffet we provide in our yards.

There's a reason all the cedar trees in our yard don't have any foliage below about 7 feet. They are like crack to deer.

Our house is a quarter-mile from a state park that is full of deer. Combine that with the rural terrain and it's safe to say we have a very healthy and large deer population in our neighborhood. When we first bought our house 15 years ago, we'd see groups of three or four deer standing around. Now when they come, there can be dozens. So I've gone through the ringer with figuring out which plants they like and which they'll avoid.

I'll offer some specific plants suggestions in additional posts, but there are a few characteristics common in plants that deer avoid.


1. PLANTS WITH SCENT
I'm using "scent" instead of "frangrance" not because it's necessarily a bad smell, but because deer can  and certainly do enjoy plenty of plants with fragrant blooms, including roses (apparently they don't care about thorns). But plants that have a distinct scent when you crush the leaves seem to be unappetizing to deer. Monarda, nepeta, most herbs, and anything in the onion family, such as chives and ornamental alliums, are off the Bambi menu.

2. TEXTURED LEAVES
Deer don't seem to be fans of textured leaves. Fuzzy leaves, such as you find on lamb's ear (Stachys byzantina) are a no go, but even crinkly-leafed plants fair well around our resident deer. This can include, believe it or not, very thick-leaved crinkly blue hostas, which also happen to be the same hostas that the slugs avoid. Ferns also fall into this category.

3. MOST SPRING EPHEMERALS
I tend to think of spring ephemerals—those plants that disappear and go dormant after they do their thing in spring—as woodland plants, although not all are. For whatever reason such plants seem to avoid the wrath of deer. Bleeding hearts and epimediums come to mind, but there are others, including trillium, but not all trillium. The trilliums that are not native to my area have been tested by deer. They don't seem to like them, but it's almost as though they recognize as different from the native trilliums and can't resist (and then seem to say to their friend, "Ew. Oh my gosh, this is so gross. Taste it!"). I can't explain why deer don't like these, but I tend to think, especially in the case of native woodland plants, that we wouldn't have them around if deer liked to eat them, so they are pretty safe to plant.


4. GRASSES
This one flummoxes me as well. If you've ever watched a deer eat, perhaps as you sat there paralyzed with horror as you watch it eat your enormous hosta, you'll notice the whole process is reminiscent of how horses eat. And horses eat grass. But for whatever reason, deer avoid ornamental grasses. Sometimes it's better not to question things and just go with it.


5. POISONOUS PLANTS
No one has ever given deer credit for being particularly intelligent creatures—although I swear to you the deer in the state park look both ways before they cross the road—but they know when a plant is going to make them really sick. Anything poisonous, including monkshood (Aconitum), castor bean (Ricinus) and daffodils, is pretty much guaranteed to be safe from deer browsing.

Deer are finicky and nothing is certain when it comes to what they will eat if they are very hungry or very lazy, but these characteristics are a good starting place to know what they'll probably avoid.

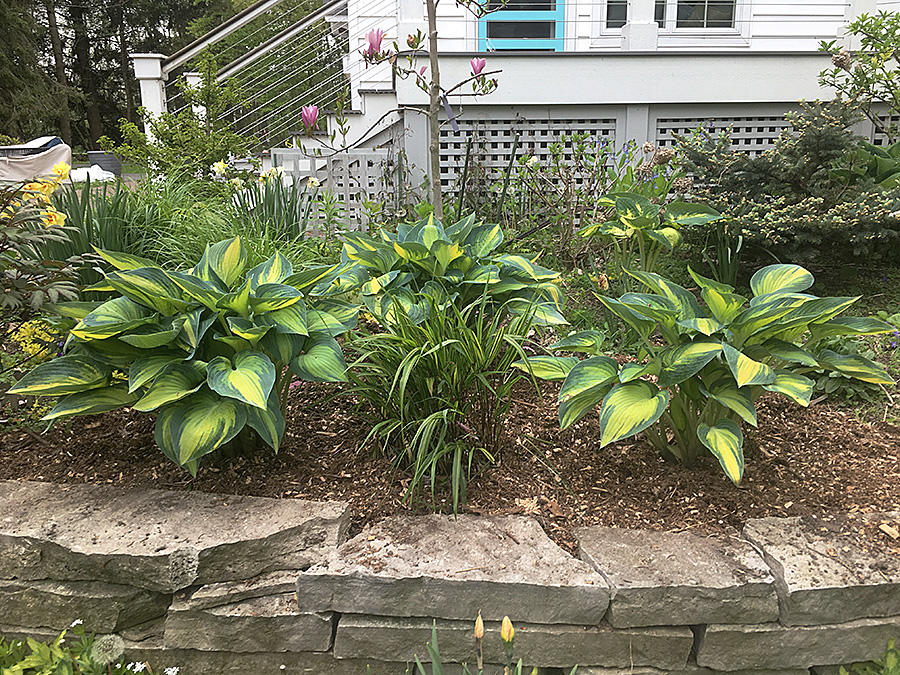
It's all well and good until they do this.


Labels: ,

01 May 2017

MESSAGE FROM MOTHER NATURE RECEIVED LOUD & CLEAR

I hate to complain about the weather, but this weekend was complete garbage. The end of last week was cold and dank, and things have only gotten worse from there.

I spent Saturday frantically working in the garden because I knew there would be no gardening on Sunday with 3 inches of rain predicted to fall and temperatures hovering around 40 degrees.

I finally relented and moved the racks around inside to accommodate the rapidly growing tomatoes.

Such weather is not great in the garden, but it's hell on the gardener. And I'm convinced that's because I got way too confident. Overall spring has been nice here. At a master gardener meeting last week, the general consensus was that everything seemed to be about two weeks ahead of previous year. I've been anxious to get the tomatoes outside to the temporary greenhouse (they are getting too big for inside and they really need more light than they are getting), but there's no way I can even entertain that idea in this cold weather. It appears that somewhere along the line I forgot that this kind of weather can and does happen at the end of April, beginning of May in Wisconsin.

The sun came out this morning, but these daffodils tell the story of the wet weekend.

One of the jobs for the weekend (that you'll see in the video below) was dividing overgrown carex that was so cramped it actually died out in several places.

This poor rose (and several others). I planted it Saturday and since then it has been poured on and freezing cold (literally ... it sleeted on Saturday night). 
Sometimes Mother Nature has a way of letting us know who's in charge. Message received.

I made a little video of my Saturday gardening craziness. There were so many other jobs on the agenda that I completely forgot about but I feel good about what did get done. And those poor roses that I planted have been enduring complete cold. I hope they forgive me.


I also made a video on dividing hostas the other day. You can check that out here.

Labels: ,