The Impatient Gardener: January 2013

28 January 2013

My laundry room essentials

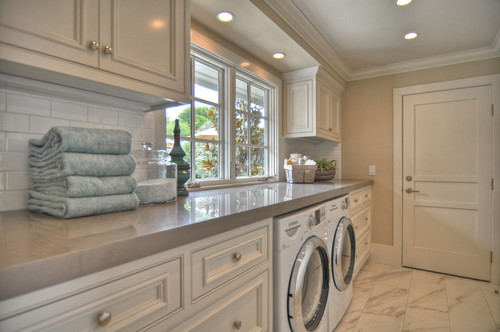
Earlier today I showed you how we spruced up our laundry room. I love the new laundry organizers and I can honestly say it makes an unpleasant task a little better. I'm not a great laundress (you won't catch me measuring my wool sweaters so I can properly block them after handwashing a la Martha Stewart) but there are two things I couldn't live without in the laundry room.

The Impatient Gardner -- felted wool dryer balls

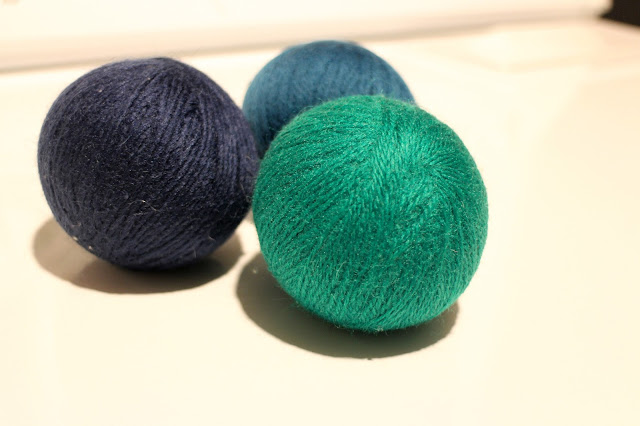
The first is my felted wool dryer balls. I love these things. Originally I got them because I wanted to find an alternative to chemical-laden dryer sheets. I have sensitive skin so I have to be careful about laundry detergents and I just don't like to use harsh chemicals if I can avoid it. I also had other hopes for the dryer balls. With two huge dogs and a cat around, there is a lot of pet fur in our house. And I was starting to get totally disgusted when clothing would come out of the dryer with more dog hair on it than it went into the laundry with. But I noticed that if a wool sock got in the dryer with it, most of the hair collected on the sock. I was hoping the balls would do the same thing.

For the most part, they do. I just pull all the little hair balls off them. They also make the laundry fluffy by beating it into submission and they make it smell good too. You can buy them pre-scented, but when the scent wears off, I just put a few dabs of essential oil on a few of them and stick them in a plastic bag for a day or so and then they are good to go for a few weeks to a month.

I have had people ask me if they are noisy and they can be. I don't think I'd use them if my dryer was next to my bedroom, but they aren't nearly as noisy as when you put tennis balls in the dryer with a comforter or something and the more stuff you have in the dryer, the less you hear them.

They do have a tendency to find their way into the far corners of fitted bedsheets, but I find them eventually. I have about 10 or so that just live in the dryer all the time. And they come in cool (color-fast) colors so they are sort of fun too.

The other thing I really love is the drying rack . I wanted something that would mount to the wall (well technically the door of the closets in the basement) and be able to be put away when not in use (which never happens). This rack just folds flat when you don't need it and pulls out when you do. I also love the stainless clips I have (I can't find them at The Container Store now, but these are similar). One clip will hold a pair of wet jeans with no problem. For the things I don't want to clip on, like sweaters, I just fold them over the bars.


The Impatient Gardner -- drying rack


What are your laundry room necessities?

I'm not getting any kickbacks or anything for this post. I just really happen to like the products I mentioned and wanted to share them with you.

Labels:

A little lipstick on a laundry pig

I want a laundry room that looks like this:


Or this:


Or this:


But that is not the laundry room I have, and as long as we live in this house (which we anticipate will be forever unless we win the lottery), it will never be.

We used to have a first-floor laundry "room." It was in the middle of the kitchen. It had to go because I'm never really done doing laundry and having clothes hanging around the kitchen is weird and a little gross. So we moved the laundry to the basement and created a pantry.

The unfinished part of the basement, which is where we put the laundry because that's where it made sense to put it from a plumbing and electrical standpoint, is rather dungeonlike.

So instead of what you see above, this is what our laundry "room" looks like, well at least until a month ago or so.


Now that's what they call putting it all out there. Since we are perpetually doing laundry, we adopted the "pile" method of sorting. After the one millionth time of tripping over a pile of laundry (tripping is one of the more frustrating things you can do, I've realized), I declared that something had to be done.

So I had Mr. Much More Patient do a little building. I told him I wanted one set of four laundry-basket sized cubes, and one set of two. And I told him to build them as cheaply as possible. If there ever was a project that qualified as putting lipstick on a pig, this is it.

He built my cubes out of oriented strand board which doesn't look or paint up as nice as MDF but apparently it is considerably cheaper. He had all the cuts made at Home Depot to keep things simple. Then he set them on a frame of 2x4 to get them off the ground a little bit, and I trimmed out the face with some 1x2s.

Then I hit it all with the sander, just to smooth things out a little and raided the paint closet for primer and paint. Lipstick for the pig, you know.

The four-plex got a couple coats of a chartreuse I picked up in the mistint section of the hardware store awhile ago, but then I thought that was, well, too much, so I put a thick stripe of a peacock color (BM Waterfall) in the middle. That turned out to be relatively pointless because you can't see it with the laundry baskets in there.

The Impatient Gardner -- laundry organization


Each cubby gets its own laundry basket for clean laundry, one each for me, Mr. MMP, towels/bed linens and miscellaneous stuff like dog towels and rags. That way you just take the entire basket to where it needs to go to be put away and it is already pre-sorted (and Mr. MMP has no excuses not to put his laundry away). I had him make the cubbies quite tall so the laundry baskets are easy to get out even when they are really full.

The Impatient Gardner -- laundry organization

In the two-plex tower, I painted the inside a mix of all the blues I had left. Most of them were colors I tried to paint the new bathroom, but a few other projects were thrown in there too. I even threw in every sample pot I had laying around that was any shade of blue. I bet I got rid of at least six cans of paint during this project. It felt great.

The Impatient Gardner -- laundry organization

Each of those cubbies gets a basket as well and those are both for dirty laundry. Originally I said that the dark basket was for darks and the white basket was for lights, but who am I kidding, I'm just happy if it gets in any basket.

The new system is working so well. I haven't had a pile of laundry stacked on a table or on top of the machines, or dirty laundry piled up on the floor since we put it there.

There is even a space for all the laundry products on a silver platter. So fancy! Actually this is one of several aluminum platters I have that my mother-in-law has given to us with a note that says, "You never know when you'll need a platter." Turns out she was right. Oh yeah, now we're talkin' swanky.

The Impatient Gardner -- Laundry on a silver platter

I'd love to find a cute, brightly colored rug for the space and maybe even something crazy like an actual light fixture instead of the bare bulb (getting wild now!).

So there's my lipstick. What do you think? It might not be the most beautiful laundry room, but it's at least tolerable now.

Make sure to check back later today for the low-down on some of my laundry room essentials

Labels: ,

23 January 2013

You know you're a gardener when ...

You absolutely loved the dowager countess' comment to her granddaughter Edith disparaging gardeners on Sunday's "Downton Abbey."

Edith (recently left at the altar and nearing "spinsterhood," at least her in estimation) needs a hobby and suggests perhaps gardening.

"Well no, you can't be as desperate as that," Lady Violet says.

If you're not a "Downton Abbey" fan (or if you call it "Downtown Abbey") you might miss the divine pleasure in that statement. The dowdy, quick-witted dowager countess (I call her that because I love the word dowager) is always quick to pass judgment and I can think of nothing finer than for her to mock my passion. Trust me, this kind of nasty comment from Violet is to be considered an honor.


Another way you know you're a gardener is when you get a rather utilitarian weapon-looking thing in the middle of January on the coldest day of the year (high of 2 degrees)  for a birthday present and you have to contain yourself from running outside to see you could plunge it in the frozen earth.

I give you the Professional Gardener's Digging Tool. This thing is a beast. I read about it (as is the case with many of my favorite gardening products) on North Coast Gardening and I dropped a hint about it way back in October. This is the (only?) benefit of a January birthday: if you didn't get it for Christmas you can still hold out hope that you might get it for your birthday.


This thing is like a hori hori on steroids. With a testosterone booster. It's insane and I love it. I found it hysterical that my main concern is cutting off my own hand but there is a sticker on it warning me to avoid underground power lines. You gotta love a tool that warns you of the potential to electrocute yourself. 


And best of all, it has a red handle, greatly reducing the chances of losing it in the garden, which happens all the time with my wooden-handled hori hori.

Now all we need is for that spring thaw. It is 14 degrees out there today; a sure sign that spring is on the way in Wisconsin.


Labels: , , , ,

18 January 2013

List checker-offers unite!

Raise your hand if you've ever put something on a list that you've already done just to have the satisfaction of crossing it off. I see you all out there with your guilty hands in the air. 

Let's face it, it feels damn good to cross things off a list and I'm happy to say that I've done a pretty good job crossing things off a list I published (there's nothing like putting your list out in front of an audience to make you want to succeed) back in August but I've not done a great job telling you about it. 

So I thought I'd circle back and feel the collective satisfaction of checking a few things off the list.

First on that list from back in August was to paint the kitchen chairs. I did that in September and I've been really happy with the results. That chalk paint is some hard-wearing stuff. Although I mentioned that I might end up painting the table with it, I never did that. Repainting the table is a project that needs to happen (in spring) but I haven't decided yet if I'll do it in chalk paint or not. It wears wonderfully but it does have a pretty specific finish which varies from chalky (duh) to a slight luster after a couple coats of wax and some buffing.

The Impatient Gardener -- chalk painted chairs


Next on the list was to get some art on the kitchen wall. Well you know how that turned out: huge success. I still love the vintage botanical charts every time I look at them and I can't think of anything that would have worked better in that spot. I feel like I should get a checkmark and a plus sign for that one.

The Impatient Gardener - Vintage botanical charts as art

At the time, I think I meant to mention that I also needed to get some art for the master bedroom but I forgot in the middle of that big ol' list. Well I'm happy to say I checked that one off the list too. There is a big, empty wall in our bedroom that has been getting a little depressing lately because it's so gray. Don't get me wrong, I love the paint color (Benjamin Moore Revere Pewter, which is also in the kitchen), but it was just too much. I knew I needed something big for that spot and I knew I wanted something colorful but not completely crazy because it is, after all, a bedroom. Fortunately I just happened to come across a One King's Lane sale featuring canvas prints from Michelle Armas at a fraction of the price she usually sells them for and I picked up two. One of them, called "Laura," is a monster that just so happens to fit perfectly on our bedroom wall. I love it because it brings in the light blue of the bedding and the window seat cushion and also goes with some of the accessories we have on the open shelves of the built-in. I think, technically speaking, I've got it hung sideways because there are some drips that are now running across the canvas, but that's the beauty of abstract art: you can hang it whatever way you like.

I've never bought a print on canvas before and I have to say I'm really impressed with the quality. It's difficult to tell it's not an original.

The Impatient Gardener -- Michelle Armas print "Laura"

The Impatient Gardener -- Michelle Armas print "Laura"

The Impatient Gardener -- Michelle Armas print "Laura"

The Impatient Gardener -- Michelle Armas print "Laura"

Next on the list was reupholstering the Craigslist cane chairs I bought a long time ago. I'm really anxious to do this project and I've purchased all the fabric I need for it, save for the really expensive Chiang Mai Dragon print that I keep trying to find on sale somewhere. So it's on the radar but this one didn't really get anywhere yet.

Redoing the back room is also still on the to-do list. In order to work on that room we need to move the furniture out of it so Mr. Much More Patient has declared that I have to make some room in the basement to store the furniture. And making room in the basement for that means getting a few other projects finished first. Plus, we're hoping to pound this one out in a few weeks so we're waiting until we're both home with a little time in our schedules to get started.

I also mentioned making some changes in the living room and I'm happy to report things are moving on that front. So far, I've changed out the ugly lamp, reupholstered the two chairs that sit in the window by the game table in a fun ikat dot print, bought a new, neutral couch (which I still love by the way), sent the mustard-colored chair and ottoman out for reupholstery (it's been two weeks and he said three to four so I'm hoping it will turn up soon) and, I'm very happy to announce, we finally got the rug we've been waiting for since spring. I haven't showed it to you yet (other than a sneak peek on Instagram) because I wanted to wait for the chair to come back first. There are a few other details to be attended to in there, but it's finally coming together and it's a total relief.

The Impatient Gardener -- How to reupholster a chair
Chair reupholstery 101
The Impatient Gardener -- Lee Industries couch
A new, neutral couch!
Next on the list was restaining the coffee table. I did that a few months ago but didn't show you because I forget to take pictures and I stained it a color that's not too different from what it was so it didn't make for a dramatic before and after. But the new stain completely rejuvenated it and even though the stain color is similar—it went from a dark cherry/mahogany color to a medium-toned stain similar to our media console—it now works much better in the room. 

I also mentioned a few things that needed to be done but weren't on the list for this winter. One of them—the downstairs bathroom—is still not being touched. That poor, ugly, forgotten bathroom is destined to be the last nail in the coffin in a renovation of our house that will span more than a decade. It still has the distinction of being the only room in the entire house that is completely untouched by us, even though it was declared to be the ugliest room in the house even before we had officially purchased it.

I also said the kitchen was not happening. Well, in fall we got a new walnut top for the island, so that's a minor improvement. And as it turns out, a few other improvements may be in the works, but we're waiting for a few quotes on some things before that one becomes official.

The Impatient Gardener -- Walnut butcher block top
A new walnut butcher block top.


So that leaves the list looking like this:

  • Paint the kitchen chairs
  • Paint the kitchen table
  • Get some art on the kitchen wall
  • Art for the bedroom
  • Reupholster the Craigslist chairs --coming soon
  • Re-do the walls and ceiling in the back room
  • Change the color scheme in the living room -- halfway there
  • Restain the coffee table
  • Gut reno the downstairs bathroom -- nope, not happening anytime soon
  • Make some changes in the kitchen -- maybe?

How are your winter to-do lists progressing? And what's on the to-do list that you're planning to tackle this weekend?

Labels: , , , ,

15 January 2013

Garden Bloggers Bloom Day

I promised I'd be back with a few photos to share from Garden Bloggers Bloom Day and since it's technically still the 15th, I haven't missed it yet.

Just two photos to share, both demonstrating one of the great things about letting plants stand during winter. They can still be beautiful.

I love the fuzzy seedheads that stick around on one of the clematis.


And of course Limelight hydrangea is a star in the garden even in January.
The Impatient Gardener -- Limelight hydrangea in winter

Make sure to check out what is happening in gardens around the country today at May Dreams Garden.

Labels: , ,

Looking for a little help from my friends

It's Garden Bloggers Bloom Day and I'll be back later with a few photos to actually participate (for the first time in months) but first I need a little help on a project.

Please note, that's a picture from the store, not one showing my growing silk clematis collection.

This is one that has been a long time coming. I picked up this dresser at the thrift store for $35 about two years ago. I bought it because I couldn't leave it there. I don't (and didn't then) have a place to put it right now, but I like it, so it will get used. Like the buffet that lived in the garage for a long time, this dresser has been languishing in our unheated, gross garage for a long time. And I've hit it with the car more than once.

The law has been laid down: I MUST start finishing some projects before I take on anything else. You can probably guess who came up with that edict, but I'm on board with it. He's right. Our house is way too small to be storing future projects. That's why I've passed up some great stuff at the thrift store (including this chair). If I can't fix it up and use it immediately, it doesn't come in the house.

Anyway, in late fall we pulled the dresser out of the garage and I got to work on sanding it. It was covered in mildew inside and stunk to high heaven. I cleaned it a bunch of times with various things including vinegar and have been letting it air out and now it's all sanded, smelling sweet and ready for the next step.

Ewww ... check out that mildew in there. People, don't leave your furniture in your garage for two years.
And that's where you come in. I want you to tell me what you think I should do with it. But this is not a no-holds-barred kind of thing. I have a general concept I'm hoping you'll help me flush out.

Because the top and sides are laminate veneer, the entire outside of it (top, sides, bottom rail, legs) is going to get painted white. If you are cringing at the thought of painting that plastic wood-type stuff, check out what I did to my desk at work. It's been well over a year and it has help up amazingly well. There's not a chip on it. But the drawers are real wood and they are sort of pretty, so I'm not going to paint those.

My inspiration to even buy this dresser started at Young House Love, where John and Sherry refinished a very similar dresser for their daughter Clara's room. They went with a dark stain and only painted the top.

Young House Love stained/painted dresser
Young House Love photo
Here's a similar finishing concept from Twenty-Six to Life.
Twenty-six to Life photo
Here's the opposite finishing from Birdhouse. The wood is sort of a medium tone, rather than dark like the examples above. Pay attention to the wood color here, not the positioning of paint vs. stain because it's not an option for me to stain the top and sides.
Birdhouse photo
Here's the reverse from Blessed Nest, again with a medium-tone stain (and amazing hardware).
Blessed Nest photo
Now we're getting slightly lighter with this one from Handmade Home.
Handmade Home photo
And even lighter on this dresser from The Lettered Cottage. Layla toned down the wood color with a little bit of gray stain, but this not too much different from the natural wood color of my dresser drawers.
The Lettered Cottage photo
And there's this one, which just gives you an idea of colors.

So, what color do you think I should go with for the stain? Since I don't know where this is going, let's just assume you don't have to worry about matching it to anything else. Logically it will end up in one of the bedrooms which, as you recall, have a darker bamboo floor in them, in case that affects your decision at all. 

This is the master bedroom, just to remind you of the floors in there.
Master bedroom -- bamboo floors, custom built-its

Let me know in the comments or on facebook what direction you think the dresser should go in.

Labels: ,

11 January 2013

PREPPING FOR WINTER ... A LITTLE LATE

Gosh, it's about time for a gardening post, don't you think?

I never really showed you some of what happens here in the winter when it comes to the garden. Winter brings a couple of serious challenges: protecting plants from the freeze/thaw cycle and protecting plants from hungry animals.

A lot of people think that it's the cold that is most harmful to plants, but really it's the continual cycle of freezing and thawing that does them in. If it would just freeze in late November, get a nice thick blanket of snow in December and then stay like that until it melted in March, most plants would be quite content. But that's rarely what happens, and it's even more rare these days when temperatures seem to fluctuate wildly. (It will be over 40 degrees tomorrow up here in southeastern Wisconsin, for instance.)

So some plants need some insulation, mostly at the roots. The best way to manage this is to give the root zone a good mounding of mulch (I love chopped up leaf mulch for this) very late in the season (like late November in our parts). But if you're like me, you might have brushed off that task when it got cold.

It's not too late to help your plants though. And even though the leaf mulch pile is pretty much frozen at this point, I happened to have just the right thing to use for insulation handy: the Christmas tree.

I cut most of the branches off our tree and stuffed/laid them around the more sensitive plants in the garden. In general, I only take extra steps at protecting plants that are either borderline hardy, relatively new (and therefore haven't had a chance to get as established as I would like) or really expensive/slow growing (because I don't want to have to replace them.)

I also often cage these plants to protect them both from wildlife and the local petlife. Our dogs have been trained to stay out of the garden and they don't dare step foot in it for most of the year, but all bets are off when it snows. I can't blame them too much as it's difficult for them to delineate the borders of the garden and honestly I don't worry about it too much once the ground is frozen, but the shoulder seasons are a bad time for big dogs to be tromping through the garden, stomping plants and compacting the soil. They also routinely bound through the garden, so I protect small or delicate plants with cages just to keep them from running them over.

I put the cage (just hardwire cloth bent around a few stakes) around the ginkgo (gingko biloba 'Gnome') in November, but I forgot to come back and stuff it with leaf mulch. So when I cut the Christmas tree apart, I just filled up the cage with soft branches. It won't work as good as the leaf mulch would have, but it will provide some insulation and a little wind protection too.

Winter plant protection -- The Impatient Gardener

Along the path you can see a couple other things I did for winter. First of all, I put up stakes along the path so we'd know where it was when we are shoveling or snow blowing. It's been a long time since we've had a snowfall that was big enough to cover the entire garden, but when it does happen it can be very hard to figure out where the path is and where the plants are. It would be a disaster to run the snow blower over the garden accidentally. On the left you can see that I wrapped the new Japanese maple (Acer palmatum 'Mikawa Yatsubusa') in burlap, held up by a square tomato cage. I really love that little tree but I'm worried about it because our zone can be borderline for Japanese maples and because with the crazy summer we had, it had set (and still has) huge leaf buds in October. I did this same thing with the 'Orangeola' Japanese maple for its first several years and it worked so well that it is now too big to cage. Although I had put some leaf mulch inside the burlapped cage, I also threw some pine tips in there for added insulation. 

On the right side of the path you can see another cage, which I just put up this weekend (whoops). That is to protect the dogwood (Cornus alternifolium 'Golden Shadows' ) that I replanted this spring. Unfortunately I got to it too late as all of the ends of the branches were nipped by deer. I will trim them back to a healthy bud or branch in late winter or early spring (usually March) and hopefully all will be well.

Winter plant protection: burlap and cages -- The Impatient Gardener

Some plants are left to fend for themselves. Picea englemannii 'Blue Magoo' (which is growing painfully slowly, considering it's supposed to end up at 8 feet tall) seems to have established itself well in the past two years, so other than throwing a small amount of leaf mulch around it, I didn't do anything special. I see from this picture that I need to loosen the twine holding the leader to the stake because the trunk is actually a little curved.


Most perennials in my garden are left standing through winter. Studies have shown that plants are more hardy when they are left standing through winter. The downside to this is that it's a lot of clean up to do in spring when you're already busy in the garden. I like to see something in the garden during winter so this clematis, which works its way to the front of the house every summer is allowed to stand. It's a group 3 so in early spring when I do my clean up I will cut it back to the first bud, usually about 6 inches above the ground.

A local commercial perennial grower told our master gardener group that he cuts everything back in fall but lets all the plant material lay where he cuts it to act as a natural mulch. I think that's a pretty clever idea if you're inclined to cut back your perennials in fall.

The one exception I make to the "Let it stand" rule is with free-seeding perennials like Rudbeckia. I make sure to cut those back and remove the plant material early in the process so they don't seed all over the place. Anyone want some Rudbeckia? Trust me, I have some for you!

Leave perennials standing for winter to improve hardiness -- The Impatient Gardener

I'm trying something new to protect the trunk of new trees this year. I put a foam pipe insulator around the trunk of the fringe tree (Chionanthus virginicus).  It's not about keeping it warm, rather it will keep little critters from gnawing on the bark.

Pipe insulator to protect young trees from rodent damage -- The Impatient Gardener

Here's what rabbits did to one of my Japanese maples (Acer japonicum acontifolium) a couple years ago when I left the trunk unprotected. The new fringe tree has such a piddly little trunk that a chewing rabbit could do a lot of damage.


One last comment on winter care of plants: It's almost always better to just let snow lay on plants rather than try to knock it off. This is Blue Mohawk soft rush—a great grass from Proven Winners that I really am loving—which will be cut back in early spring along with the rest of the grasses, but the same holds try for shrubs. You'll often do more damage to shrubs by trying to knock off or brush off snow than if you had just left it. There are some exceptions to really icy, heavy snow, but that's usually a last resort, where you have nothing to lose by trying to knock it off because the weight of the snow could bring it down on its own.


How did you prepare your garden for winter? Did you do a better job than I did actually taking care of it before winter was fully upon us? What creative use for your Christmas tree do you have?

Labels: , , , ,

08 January 2013

NOT GOODBYE, JUST UNTIL WE MEET AGAIN

The mustard yellow chair and ottoman in the living room went away Monday morning. They are off to get a new look at a local upholsterer.

Mustard chair headed for reupholsterer -- The Impatient Gardener
Yeah, I should probably vacuum before I take pictures.

The ottoman (and more dog fur). You can see the fabric swatch on the X-bench in the background.
I love that chair and, like our sofa, it pretty much has someone sitting in it every night. It is 12 years old and has held up really well and I still love the look of it. We're going an entirely different direction with the fabric for it, and I have to admit, I'm a little nervous. Honestly, I'm a lot nervous. What if it doesn't work with the rug (that is FINALLY coming this week; nothing like waiting since May)? What if I tire of the pattern? 


We're having it recovered in Calico Corners' Twist fabric, which looks a little bit like a chainlink fence in a swatch until you realize it's a very large pattern. It also has a great texture to it and I love textured fabrics. I'm also having contrasting welt put on it in an off-white to match the white in the main fabric. I tried to find a Sunbrella fabric that would work but believe it or not I had no success. So I ended up with a random off-white. I bought all the fabric during Calico Corners' big fall sale so I wouldn't say I got a great deal on it, but it at least brought it down to a realistic price.

Calico corners Twist Indigo fabric
Calico Corners Twist Indigo fabric

See how sharp contrast welting can look? (P.S. I should not have done a search for contrast welting ... I have yet to find an example of it on a print and now I'm worried it will be too busy.)

Crate & Barrel chair from a few years ago.


Casasugar photo
Unfortunately the reupholsterer said it will be three to four weeks to finish it. I hope he's the underpromise-and-overdeliver type and he'll be calling me in two weeks to tell me it's finished, but I sort of doubt it. One of the wicker chairs from in front of the fireplace will stand in for the time-being, which may not be a good thing. It was readily apparent last night that the dogs love the idea of having an entire area rug to themselves. They won't be happy when the furniture goes back to its normal locations.

It's nerve wracking to take a design risk, but I rarely do it so I figure it's about time. Committing to a pattern is hard thing to do on anything bigger than a throw pillow and I really don't know how it will turn out. I'm even more worried about the contrast welt, but I love it every time I see it in a photo so it's time to turn that into action. Right? Gosh I hope so.

Labels: , , ,

07 January 2013

The project clock is ticking

It's crunch time. It might not seems like it, but the clock is ticking. The holidays are over and the daily arrival of another seed catalog reminds me that it's only four or five months until all waking, non-working, non-eating hours will be spent in the garden. And that means that any indoor projects that need doing better get done in these dark days of winter.

If you're a homeowner there are always projects to be done. I look around and see a ton of painting that should be done even though it seems like just two years ago or so I painted every square inch of this house. The chipped paint and unmatched trim colors in some rooms are a reminder that I actually didn't paint much of anything downstairs.

And then there's the ugly fact that some of the painting that needs to be done is actually repainting some of the walls I did paint during that marathon. Here's the problem: knots are not your friend. All of our custom wood paneling (made to match the existing random-width panels in the house) and the wood ceilings in the bedroom had knots. And if you're painting wood with knots, they will rear their ugly heads at some point.

The knots in the bedroom ceiling started bleeding through the paint within six months. For awhile I could look past that, but now it really looks shabby. Recently I noticed that some knots are very noticeably in the hallway upstairs. In both cases, measures were taken to make sure this didn't happen. The painters spray-primed the boards with Zinsser BIN shellac-based primer. When we painted the paneling, we spot-primed the knots with the same primer, which is supposed to seal the knot. We followed that up with more all over primer plus two coats of paint.

Knots seeping through the paint -- The Impatient Gardener
Do you see those sneaky knots coming through the paint?
What I think I've discovered is that you really need to seal knots twice several months apart. We had the painters come in about a year ago to look at the ceiling and they did a test patch of BIN followed by a coat of paint and it still looks perfect with no bleeding. They are coming back and repainting the ceiling when it fits in their schedule.

So in addition to the other painting projects around the house, I'll probably be adding that hallway wall to the list.

But painting is not a fun thing. The results are almost always fun and worth the effort but it's not exactly a project that makes you want to leave work early to run home to get started on. Fortunately there are a lot of other, more enjoyable, projects to be done.

Even the little stuff needs to be done and provides a certain amount of satisfaction.

Remember when I showed you the bathroom key and mentioned that I thought it would look much better on a three-strand line? Thank you Mr. Much More Patient for splicing one up for me. While he was in splicing mode he also made a little rope necklace for the key for our ship's clock.

The key before.

Skeleton key on a rope --The Impatient Gardener
Ahhh, that's much better.

Rope necklace for clock key -- The Impatient Gardener


Big projects will come in time. And so will painting. But hopefully not in too much time. Tick tock, tick tock.

So what about you? Do you have a long list of projects to get done in the dark days of winter?

P.S. Just for giggles I had to show you what emerged during a painting project Sunday night. I was using some paint from the paint closet that I haven't touched in I don't know how long. When I was stirring it up something emerged from the can. I pulled it out and lo and behold it was a tape measure. I don't know how or when it got in there, but now I know that I'm not making it up when I say that tape measures just go missing in our house.


Labels: