The Impatient Gardener

23 September 2016

FRIDAY FINDS

It's officially fall. I will allow myself to use the word now, but that doesn't mean I'm happy about it. But there's nothing to be done about it, so I might as well make the most of it and enjoy what really is a beautiful time of year (even if I spend it dreading what comes next).

Affiliate links may be used below. Thank you for supporting this blog!


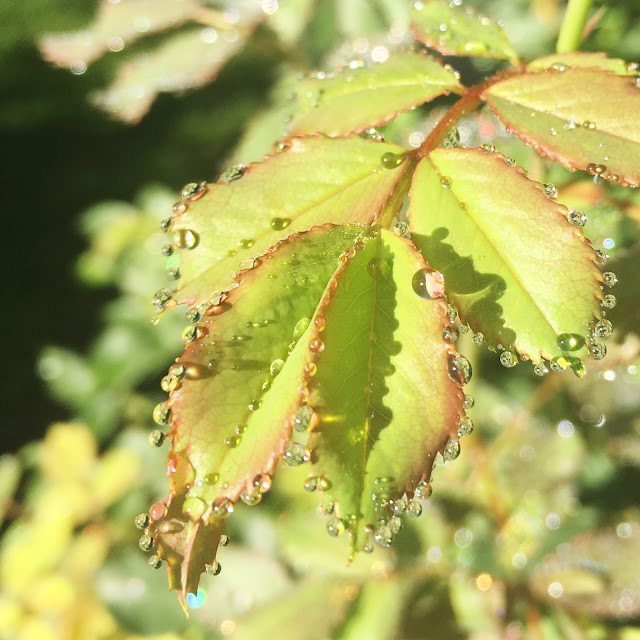
First, I wanted to share this photo I snapped on my way out the door the other day and shared on Instagram. My rose in a pot is putting out great new growth (so much so that I'm going to grow more roses in pots, because I'm a sucker like that), but I just loved how these fresh leaves looked with their little water droplet jewelry.

• • • • • • • • • • • • • • • • • • 

You know I'm a bit dahlia nutty, but growing them for show is an entirely different animal. Look at some of these utterly gorgeous dahlias Matt over at Growing with Plants shared.

• • • • • • • • • • • • • • • • • • 

Gardenista's Hardscaping 101 series is featuring bricks, which is an option I like more and more these days. In my dream vegetable garden I envision gray bricks set in a herringbone pattern leading to the bespoke greenhouse and running between the raised beds. Hey, a girl can dream, right?

• • • • • • • • • • • • • • • • • • 

Apparently the only closeup picture I have of our kitchen island. How is that possible?

Over at Thrifty Decor Chick, she's talking about different ways of finishing butcher block, but never mentions my favorite, which is just oiling it. I use this oil on our walnut kitchen island and I love it. It's super easy, holds up and, well, what else is there? The only down side is that any paper you set on it will pick up some oil if it's been oiled recently.

• • • • • • • • • • • • • • • • • • 

Dale Sievert spoke to our master gardener group last night and I was so enamored with the beautiful photos of moss gardens that he showed us that I immediately ran over to his blog to see more. Check it out but be prepared to consider going full moss in your garden. But think hard first. He told us that he spends 60 hours a week in his garden in spring and fall and about 25 hours a week during summer. In fall he rakes, then blows, then VACUUMS his garden so there is no debris left on the moss over winter.

• • • • • • • • • • • • • • • • • • 

On another note, since it's officially fall (and I swear the leaves on the trees started turning overnight, damn them) I need to ditch my unimaginative but  summer wardrobe (crop pants + solid T-shirt + sandals, literally every day) and get some clothes for fall. As I get older I find myself getting worse at cooking and dressing myself. I have no idea what that is about but I need some serious help to get my style in shape. I tried Stitch Fix and it was a complete disaster. Anybody have any good ideas for me of where I could get some help to boost my style?

• • • • • • • • • • • • • • • • • • 

That's it for this week! Hopefully the weather will cooperate to allow lots of time in the garden this weekend. What are you doing? Moving into full fall mode or holding out as long as you can? By the way, this was one of those random two-post Fridays. If you missed my post earlier today updating  you on my plan for the circle garden, you can find it here

Labels: , , , , ,

24 January 2014

A DIY magnetic chalkboard: Now you see it, now you don't

I have to apologize, you guys. My disorganized method of managing photos has struck again. I kick myself for this. I work with professional photographers at work every day and I know that they all have a method for cataloging every photo they download, so why I never started doing the same thing is a bit of a mystery.

I've been trying to write this post for well over a month now (the photos prove that) but I've been hunting for all the in-progress photos I dutifully took along the way so I could do a true tutorial. Well, I give up. I absolutely cannot find those photos on my computer or my external hard drive. 

 So, unfortunately you're going to have to live with just an after photo in this tutorial and trust me on the rest. I hereby promise to do a better job keeping track of my photos. Or better yet, finish projects in a more timely fashion so I don't lose them to begin with.

When we did the kitchen renovation, I couldn't wait to clean up the wall where the refrigerator was and part of that was creating the look of a built-in fridge that was just a regular standalone fridge.

Before there was this sort of strange half wall that didn't quite cover the fridge, so about a foot of the side of it stuck out. I hated the look but I loved the fact that it gave me a place to hang the stuff one needs to hang on their fridge: pictures of our nephews and niece, save-the-dates for upcoming events, the magnet your plumber gives you that comes in handy when a toilet is blowing up, that kind of stuff. 

The fridge wall before. You can see that even the counter-depth fridge stuck out from the cabinet surround, which was ugly, but gave us a little room on the side of the fridge to stick things.
As much as I loved the new look, I missed that spot. 

I didn't want to hang something just out in the kitchen. As much as I try, those types of spaces always end up cluttered and my goal for the kitchen has been to keep clutter to a minimum. I don't mind a little clutter in my life, but I love a clutter-free, almost sparse kitchen and creating that was one of the goals for the kitchen.
After, the fridge had a nice built-in look and the pantry didn't jut out into the room oddly, but I had nowhere to stick things that used to hang on the side of the fridge.

So I looked to the inside of the pantry door. And of course, I wanted it all: both a surface to write on and something magnetic to stick stuff on.


I started with a piece of galvanized sheet metal. You want to look for this in the plumber's section of your big box store as its intended purpose is to put behind pipes when soldering so you don't light the wall on fire. This is what it looks like. 


It cost me about $9. You can buy other metal that will do the job, but it's usually much more expensive and if you're covering it anyway, you don't need to get fancy.

I cut it to size using tin snips. I'm not going to tell you to wear gloves when you do this because a.) you already know that and b.) you won't anyway. And yes, I cut myself doing this.

After that I mounted it on what Home Depot calls a "project panel." It's only 1/8-inch thick but it provides enough rigidity to keep the metal from flopping around without adding too much weight or bulk. I used contact cement for this.

Then I painted it with two or three coats of chalkboard paint. Although the can suggested that chalkboard paint should be rolled, I had the best results when I brushed it on.

The hardest part of the whole project was creating a frame. Since this was done on the cheap, I certainly didn't want to have to go out and get a custom-made frame for this odd shaped thing, but my homemade attempts at creating a frame were, um, less than successful. Finally I went to my handy stash of balsa wood strips (last used for this project) and cut them to size. No miter joint here, just a regular old butt joint. I used a good amount of wood glue in the joint, wrapped in waxed paper (to keep the glue from attaching itself to the support pieces), used a piece of scrap wood on either side to stabilize it, and then clamped it for several hours. (Boy, a picture of that process sure would be nice, wouldn't it?)

Anyway, by the time the glue dried I had a very light and relatively delicate frame. I gave it a little sanding and quite paint job then glued it right onto the chalkboard, overlapping the frame onto the board by about a half inch on each side. 


Then I used some 3M vecro mounting strips to attach the whole thing to the inside of the pantry door. I used the strips on the backer board, rather than the frame, which is purely decorative. By cutting the backerboard and metal sheet the same size as the inset panel, the whole thing sat flush to the door, with the frame just extending about a quarter inch. 

I'm happy to report that the board fulfills both its chalkboard and magnetic functions perfectly (that little pad of paper on the bottom is on a magnetic clip), and I love that it can be out of sight when I don't need it but it's easy to get to when I want to.

Now I just need to work on my chalkboard art (not to mention my Happy New Year message).


Labels: , , ,

04 December 2013

Custom junk corralling

The blogosphere is absolutely filled with beautiful Christmas decorations and gift ideas right now. Am I the only person who isn't decorating yet? I just get so sick of all that stuff that I usually don't like to do much until about two weeks before Christmas.

Anyway, here's a blog post that has absolutely nothing to do with the holidays but a lot to do with keeping your sanity. You know what I'm talking about folks ... it's the damn junk drawer. 

I didn't even bother taking a before picture. You know what a horrible junk drawer looks like; I don't need to share my horror with you.

It's a bit sad that it has taken me this long to get the junk drawer organized after our kitchen renovation. It's just not one of those fun things to do and when the kitchen was all finished I just sort of threw all the stuff in it. When we could no longer open the drawer I figured it was time to do something about it. 

Let's just skip ahead to the pretty after picture, shall we? That way you can get all excited about doing it yourself.


Of course there are a million organizing systems out there for junk drawers, but there are two things wrong with them: 1. They consist of various compartments that do not necessarily fit snugly in your drawer so even after you install them, they slide around, and 2. After you add up all those little compartments they can be pretty expensive.

That's why I love this DIY custom organizing system. The only things you need to buy for this are the metal fittings that your compartment dividers slide in (I bought mine here) to and the wood strips for dividers (like this, although they come in multiple heights so if you have a shallow drawer you can buy the 3-inchers).

You can install this right into your drawer, but I didn't want to permanently commit to this layout, so I started by making a box frame to fit snugly inside the drawer. 

This wood couldn't be easier to work with. I used a chop saw to cut it but it is so lightweight and soft (for wood) that any kind of saw, including a plain old coping saw or handheld saw would cut it without much effort. 

Remember to factor in the width of the balsa (or basswood) on the two ends (it is a quarter-inch thick, so I subtracted a half inch from the width measurement) so you don't make your frame too large. I glued it with wood glue and then just tacked with staples. Normally I'd use brad nails, but I had the upholstery stapler handy so I just used that.


After that, you just have to decide what sort of compartments you want. For me, the only one that had to be a rather specific size was the one on the far right in the front. I wanted a place to put bills that wasn't out of the way so I'd forget them but kept them from sitting on the counter. So I figure out my length and then made a divider across the width of the drawer. 

The hardest part of this project (for me, anyway), is making sure to measure the same on both side so you don't end up with a divider that's all caddywompus. So I measured on each side and make a mark in the middle of where I wanted the metal bracket. There are four barbs on the bottom of each bracket, so I just made sure those were lined up on the measurement mark. The speed square (if you don't have one of these, get one. I use it all the time and it's just a chunk of plastic so it's cheap) came in very handy to make sure I was drawing straight lines when I was marking my measurements as well as marking my cuts.


When it comes time to pound in your brackets, it only takes a few taps with a hammer or rubber mallet. Make sure you use a scrap piece of the balsa wood as a tapping block or you will disfigure the bracket. Here you can see the scrap piece I used to tap in the bracket.


From there, you just keep dividing compartments as required. I did the front half of the drawer first and then did the back half. I had to take the dividers in and out several times to measure for adjoining compartments and install the brackets, but so long as you work a section at a time, it's really easy. 

And here's what it looked like when it was all installed (and before all the junk was back in it). I just put some shelf liner under it and slid the entire thing in the drawer.


The I used was 4 inches tall, which is a nice depth for the junk drawer because it keeps stuff from migrating from one compartment to another. I used the same system in the silverware drawer, but I cut down the wood to only be about 2.5 inches tall so it would be easier to reach in and grab utensils. We used the table saw for that, but again, a jig saw or something like that would also work fine.


I love how this DIY solution maximizing every inch of the drawer and that I could suit it specifically to our needs. Really, the most time consuming part was loading all the stuff back in and filtering out all of the things that shouldn't have been in the junk drawer in the first place.

So ... what's the state of your junk drawer?

Labels: , ,

14 November 2013

How to make a custom striped table runner

I found a great new list-keeping app for my iPhone a week or two ago. It's called Tick, and so far it's my favorite list-keeping app that I've tried, and believe me, I've tried many. You can customize the icon and color for each list. Right now I have the number 10 by the little icon of a house. That means I have 10 projects in my to-do list for stuff at home. And every one of those projects is a big, multistepped endeavor. That can get a bit overwhelming.

So it's nice when I can pump out a little project that is fun and makes me feel like I accomplished something without having to think about it too hard, and this one definitely falls under that category.


Now that we have the newly finished tabletop in the kitchen (and I'm loving it by the way), I wanted to bring a little bit of brightness to it in the form of a runner (I sort of love table runners) that I can leave on all the time.

I wanted something that would be casual and help tie in the white of the cabinets and trim with the gray (Edgecomb Gray) walls. Stripes to the rescue!

Now I should say that you can buy beautiful custom table runners on Etsy. But because they are made by artisans, they are priced as though they are made by artisans, appropriately so. Sometimes, though, that's not in the budget (or even called for, to be honest).

First of all, I think a table runner is probably very easy to make if you can sew in a straight line. I am severely challenged in the straight-line sewing department so I knew that trying to make my own would probably become yet one more "big" task that I dreaded doing. But I figured I could customize one that somebody else had made pretty easily.

I found the most basic white linen runner I could. Turns out it was way too long for my table, so I just hemmed it to the right size (no, the stitching is not super straight but who is really looking at the end of your runner?). I ironed it first, just to make sure to get all the creases out.

The runner started life as a perfectly fine but possibly a little boring plain white linen runner.

Then I just used painters tape of varying widths to tape off some stripes. I wanted a stripe in the center, so I folded the runner in half to find the center and went from there. After I had my first piece of tape down just to the right of the center, I just eyeballed it from there. I figured if any of my stripes were a little off I'd just say I was going for a more painterly look.

I did measure again to make sure my sets of stripes to the side were the same distance from the middle set of stripes, but from there it was more eyeballing.


Of course you have to make sure to press down the edges to avoid paint creepage.

From there, I just mixed up the color I wanted in Martha Stewart craft paint, which is also suitable for fabric. This is the same paint I used for the chairs in the living room and it has held up so well. For the runner, I watered down the paint quite a bit because I wanted to make sure to see the linen texture and I didn't want ridges where the paint hits the tape.


I used a cheap craft brush to brush on the paint after putting some newspaper under the runner in case any leaked through. Then I pulled the tape.


To set the paint, I used a hot iron on the reverse side and then for good measure, threw the runner into a hot dryer for a few minutes, which I've found helps the painted areas soften up a little.


I did get a little bit of seepage on a couple of the stripes where I didn't push the tape done enough, but it's pretty minor. I figure it makes it look handmade, right?
And that's it. The hemming took about four times as long as the taping and painting did and all told I bet this was a 45-minute project. There's nothing like a little immediate satisfaction.


Labels: , , , ,

05 November 2013

How to create a weathered wood finish

I showed you the new kitchen tabletop on Friday and promised a tutorial on Monday, so it only makes sense that you're seeing this on Tuesday (punctuality is not my strong suit).


This weathered wood finish is not something I recommend for someone who isn't prepared to roll with the punches a bit. The fact is, you just don't know how it's going to work on your piece. I think you have to be prepared with a backup plan if things don't go the way you thought they would. I think that could reasonably include applying a stain or whitewash or just painting the thing if things go awry.

That was a chance I was willing to take, as the alternative either way was just repainting it.

So I did a little test patch of stripper to see what the table looked like under there. DO NOT DO THIS. Or if you do, make it the smallest possible area you can. I did mine the size of a placemat and if you look hard on the finished table, you can still see it.


Few things are as satisfying as stripped paint waiting to be scraped off.

Now that we've got all the warnings out of the way, here's what I did.

I disconnected the table top from the legs, just because it was easier to manage this project outside for the messy bits. I applied Citristrip brand stripper. This is really the only stripper I'll use as the other stuff is just way too fumy and scary to me. But you still have to be careful with this citrus stuff. I got some on my sleeve and then pushed my sleeves up. Later on I felt this horrible burning on my arm and it turns out I gave myself a pretty good chemical burn (it's still a big scab on my arm). So be careful (and there's yet another warning).

Also, it's probably not the best idea to try to use stripper in the sun, but it worked pretty well. I actually applied it twice: Once to get the paint off and a second time to remove the rest of the stain that remained on the original piece.


After stripping it, I cleaning everything off with mineral spirits. I don't really recommend that because I think it made the table too greasy. Just spend the dough to buy the stripper wash.

Then I sanded with 220-grit sandpaper. I had to be really careful with this step because my table is covered in a maple veneer that is very thin. Too much sanding and I'd go right through the veneer and then you've pretty much ruined the table, I think. This was a really light sanding, just to smooth things out a bit and get off the last vestiges of stain. In retrospect, I think I would have been better off sanding with a coarser grit because maple is already a very tightly grained wood, and such a smooth finish sort of closed off the pores of the wood a little more than I would have liked, making it harder to get the driftwood solution to soak in.

Then I mixed up a very diluted batch of Driftwood Weathered Wood Finish. The directions call for one cup of water to one packet. I think I did at least three cups of water. I was going for a lighter color and I figured I could always apply a second coat to make it darker if need be.

After sanding, before applying the Driftwood Weathered Wood Finish (in the bowl).

This stuff instantly turns the water black so don't be shocked when that happens. Then I used a cheap foam brush to apply it, but it was a little weird that it didn't really soak in. I blame that on two things: sanding down too much and using the mineral spirits to clean off the excess stripper. But I just let it sort of sit on the table out in the sun (which is supposed to accelerate the effect) for a bit, dried it off and brought it back in. The directions say it can take up to 24 hours for the color to stop changing so then I just sat tight.

Overall I was pretty happy with the results, but there were still a lot of very warm-toned areas that I wasn't thrilled with and the whole thing was looking a bit splotchy. I thought about applying another coat of the driftwood finish, but I was afraid that would only make the difference between the grayer areas and the warmer areas that much more noticeable.

After the weathered wood finish dried, the table was looking a little splotchy and a bit too warm-toned.

So I tried spot sanding a little. I was interested to see that the driftwood finish really soaked in, so when I sanded it wasn't like I was starting with fresh wood. That's something to keep in mind if you decide to do this: I'm not sure going to back to fresh wood would be easy. By sanding the warmer-toned areas (undoubtedly spots that I didn't sand well enough originally) I was able to get it a bit blonder and take some of the red out.

After a bit of sanding it looked like this:


For awhile I thought about doing a very dilute coat of a gray stain over the table, but some very wise followers on Facebook told me it was time to stop and just walk away. It was a good reminder.

So then I got crazy and I wire brushed the whole table. Yep, that sounds as weird as it was, but I was trying to open up the pores of the wood so I could do sort of a limed effect with wax. This is where the type of wood limited me. If I were dealing with oak that would have totally worked and looked great. But maple has a very tight grain and trying to bring it out to be more pronounced is really hard.

I followed that up with a coat of liming wax. I bought some as a package with the weathered wood finish powder and didn't care for it at all. I found a lot of people online who swore by Briwax Liming Wax so if I were going to try this again, I think I'd try that. But the liming wax that I bought was hard as a rock and as far as I could tell, did absolutely nothing to provide that "limed" look. I even had to soften it in the microwave and it was extremely hard to work with.

I'm becoming a real fan of waxed finishes. I've had them on some furniture that I've purchased and used it when I redid our coffee table and I've been very happy with the durability of it. I also really like the low luster that it give after a good buffing and I knew I wouldn't have to worry about it yellowing or being too shiny like a polyurethane. After what that Polycrylic did to the original painted finish on the kitchen table I'm extremely hesitant to ever go near it (or anything like it) again.

I followed it up with several coats of Annie Sloan's Paste Wax. I love this wax so much. It is the consistency of whipped margarine and is extremely easy to work with. I also sprung for a waxing brush (I bought this one) and while I'm sure I could have applied it with a rag as I have in the past, I really enjoyed working with the brush and feel like it really made for a nice finish. Even though I've waxed stuff in the past, I searched online for a good tutorial to make sure I was doing it right. This video tutorial is great and I followed it to the letter (other than what to wash the brush in; I bought a bar of real lye soap which is fantastic for washing out brushes, although I wouldn't have it in the house if I had kids).

Toward the end I was getting mighty sick of buffing, so I had Mr. Much More Patient bring a buffer home from work one day and give it a good once over with that. I actually feel like the table got too shiny after we did that, but I know that waxed finishes tend to dull with time so I'm not worried about it.

I also gave the base a fresh coat of white paint (Benjamin Moore Cloud White to match all the other whites in the kitchen). I admit to a bit of laziness on this part of the project. I just sanded them down and gave them a really good cleaning and put a coat of paint over them. Since Polycrylic is water based I figured that a water-based paint would be OK to put straight over the top so long as I prepared the surface. And I didn't do any distressing, although I'm sure some will naturally occur.


This isn't a great picture, but it's the best angle from which to see the freshly painted base.

Since this became a very long post, I thought I'd just quickly summarize the steps I would do if I were to do this same project again (and skipping all the stuff I did that didn't help):

1. Strip the tabletop.
2. Clean off the excess stripper with a stripper wash.
3. Lightly sand the table.
4. Apply a coat of Driftwood Weathered Wood Finish.
5. Apply a second coat after 24 hours if needed (I did not).
6. Wait for the table to dry thoroughly and sand the entire thing to make it smooth and less splotchy.
7. Apply several thin coats of Annie Sloan paste wax.
8. Buff between each coat and especially at the end.
9. Wait for the wax to dry a few days before putting the table into heavy use.

It can be hard to tell true color on photos, but I'll leave you with this one to get an idea of whether I ended up with a true "driftwood" finish. I picked up these two bits of driftwood on the beach the other day and set them on the table when I was cleaning out my pockets. I had a hard time finding them at first.


Just to clarify, no products were provided to me for this project and of course all opinions, good and bad, are my own.

Labels: , , , , ,

01 November 2013

A new old-looking tabletop

I'm not sure I've ever done a project in which I had no real expectations for the outcome. That's just not the way I roll. So going into refinished the kitchen table with no real idea of what it would look like at the end was not something I undertook lightly.

You may recall that we purchased our kitchen table from the Restoration Hardware outlet. It was a pretty good deal because it had pretty bad damage on the corner. Turns out that was fine with me because I knew it was too big for our space and that we'd be cutting that part off.here.
You can read all about how we customized the table for our space

Originally I painted the entire thing, and you can read more about that process here. I finished it with Polycrylic, which is a water-based coating. I chose that after testing several products on scrap piece of wood. It was the only finish coat I could find that didn't make the paint crackle or yellow. Or so I thought. Within days of applying it, it turned yellow. It bugged me then, but then it got even worse. It yellowed even worse with age. It had to go.

My original intention was to just paint it white again. And then a couple weeks ago I saw this table online (for the life of me I can't find the link now but I'll keep looking) and my interest was piqued. But the big question was, could I make my maple veneer table that was currently white look anything like that.
Banquette eating area, vintage school charts  -- The Impatient Gardener
The kitchen with the white table.
The only difference in terms of a starting point between trying to do a weathered finish and repainting the table was that I'd have to strip it first. So I did a little tester of stripper to see what was hiding underneath (for instance, did I leave a bunch of swirl marks from sanding it originally?). And when the stripper did its thing, it looked fantastic. This had potential.

So here's where it ended up. What do you think?

Banquette eating area -- The Impatient Gardener
Refinished table.


While I liked the white table before, I'm loving this new look as well. More and more, I'm discovering that juxtaposition is my thing. I love a little bit of shiny and new mixed with vintage or weathered. It just works for me. So I like the fresh white table base with the weathered wood top, even if it doesn't really make sense.

Click here for a tutorial on how I did it.

You might notice the black furry thing under the table in those last pictures. That's Rita. There's a good chance she was stuck. Whatever the reason, it was clear to me she had no intention of moving.


Labels: , , , , ,

17 October 2013

Mid-project updates

I know that sometimes it seems like nothing is happening here in Impatient Gardener land. You don't hear from me for a few days (unless you follow me in Facebook or Instagram where I'm much more likely to post regular updates) and you assume I'm probably asleep on the couch with my laptop half on my face. You would be right a lot of the time.

But right now I have a bunch of projects in motion. The problem with projects, I'm finding, is that apparently they can take some time to finish. So instead of waiting what could realistically be months for the finished project (I literally have two big pieces of furniture in the basement that have been 80% finished for going on a year now), I thought I'd show you some of what's going on.

Probably the biggest project I've been working on is the kitchen table. Yep, longtime readers will recall when I did it the first time. I won't get in the why I'm redoing it right now, but suffice to say, something needed to be done.

This is what the table looked like until last Sunday.


Fast forward to this week. This is what the table looks like now (below, and keep in mind that the quality of the photos here is vastly different). I'm getting some positive comments on Facebook but there is work to be done. I'm probably going to take a wire brush to it to scuff it up (after I just got done sanding it by the way) and then use some liming wax. In any case, the final protective finish will be wax. Oh, and I'm repainting the legs too, but just the white that the rest of the kitchen is.


Meanwhile, the basement is full of orange. I don't think I've ever been so into orange before, but here I am with two different shades of orange going on furniture in the basement.


I've been working on redoing these cane chairs I bought two years ago on Craigslist and have gotten to the point where I'm on the last coat of paint, so it was time to double check to make sure I was happy with the color (oranges and reds, in my opinion, take at least three coats if not four to develop to the correct color). I brought one of the chairs up to the room where it's going and draped some of the fabric that I'm recovering the cushions in (yep ... I went for the most overused and expensive fabric you can find on the Internet; I can't help it, I adore it).


The color—Benjamin Moore Starburst Orange—is actually showing up a tad pinker than I expected, but I think once the finish goes gloss, which it is, the color will change a bit.

In other project news, I'm painting another ceiling (funny how I keep doing that even after swearing that I would never do that again). I've also determined that painting the garage is not going to happen this fall. The weather has turned and I don't want to take a chance of the paint job not working. By the way, thank you all for your nice comments on the garage project.

So that's what's happening in my world ... what do you think?

Labels: , , , ,

05 June 2013

The kitchen is finished! A look at the new digs

I am exceedingly happy to tell you that the kitchen is finished. OK, not finished, but finished ... for now. I need to touch up some paint (we came pretty close to slapping it on Memorial Day when we had family coming over for cocktails ... we finished in time but had to warm them not to touch the walls) and we have to put a trim piece under the window, but that's it.

It's hard to describe the look I was going for in the kitchen. I wanted it to fit with our 1938 cottage and not seem out of place, but I also wanted it to feel updated and maybe even a little modern. I definitely wanted it to feel clean (I like bathrooms and kitchens to feel clean almost to the point of spartan, but not quite).

I suppose you could call it transitional, but I sort of hate that label. I wanted a little bit of industrial edge (found mostly in the lighting), a little bit of classic (the cabinets), a little bit of historic (the cabinet glass and cabinet knobs) and a little bit modern (the counters and appliances) all with a handful of "warm" (the range hood and walnut island).

Of course it all took way longer than we had planned and there were some bits and pieces toward the end that just took awhile to finish up.

First ... a pretty picture to show you what it looks like now.


OK, that was your peek. But first let's take a look back to what it looked like before. I wish I had pictures from the REAL before, when we first bought the house, but I can't find any. But here's a little walk back in time.

BEFORE
Found one with the original vinyl floor. I washed that floor three times a day and it was never clean. Don't miss the stark white walls either. And in the lower right corner you can see how the old table really stuck out into the space.


This was after we put in the tile floor and replaced the appliances but before I painted the ceiling.

The ugliest light fixture ever.
A couple years ago after the light fixture was changed and the ceiling painted.


A very strange angle of what the eating area looked like before we put in the banquette.

AFTER


Walnut trim around the mantel hood. The panel above it opens up for additional storage as well.


What's new/changed
  1. New cabinets. We originally were going to reface the lowers and replace the uppers (so they would extend to the ceiling) but it turned out to cost just slightly more to do all new cabinets. The old cabinets were recycled to a friend so they didn't go to waste. We went with custom cabinets built by a fantastic local cabinet maker who also did the built-ins in our bedroom and the banquette bench. I can't tell you how lucky we are to have found a craftsman to work with on these projects who works so hard for us.
  2. New countertops. We went with quartz countertops. We wanted the low maintenance of quartz (no sealing, no etching, no staining, no worries) which we've loved in our upstairs bathroom. We ended up with Caesarstone only because that's the company that made the color we liked. I think most of the bigger brands of quartz (Caesarstone, Cambria, Hanstone, Silestone, etc. are created equally).
  3. A new sink. This was a big deal for Mr. Much More Patient, who is also the main dishwasher in the house. It's a huge stainless steel single bowl sink. Since we have no bathtub in the house I joke that if we ever had a kid, he or she could take a bath in the kitchen sink until about age 10. 
  4. New faucet and a new filtered water faucet.
  5. Overhead vent hood. We got a 36-inch insert and then the cabinet maker built the surround. We currently have a downdraft vent, but we didn't want to be tied to a specific range when it came time to replace the current range and very few companies make downdraft ranges. We are so happy we did this. It is so great to have a proper vent that works really, really well.
  6. Tile backsplash. This is the piece de resistance, at least for me. It's where this kitchen concept started and I think it's what ties it all together. It is 1-inch mother of pearl mosaic tile with bright white grout. I originally saw it in Coastal Living magazine and contacted the tile store listed in the article's sources and actually purchased it through them, even though the store was in Key West, Florida.
  7. We removed the small vertical wall by the fridge that originally enclosed the washer and dryer. We moved the laundry facilities to the basement several years ago and used that area as a pantry, but the wall really stuck out into the space.
  8. We added a garbage disposal. We compost everything we can but I really appreciate not having to clean out the basket strainer. We installed an air switch in the counter to control it which is totally slick.
  9. A new light over the island. The old one was a little too country for the new kitchen. I also spray painted the light over the sink black. I felt like the black from the other side of the room needed to migrate a little and the white light was getting lost in between the taller cabinets.
  10. I repainted the ceiling using semi-gloss paint, which was totally worth the pain in the neck. The walls also got repainted in Edgecomb Gray. I loved the Revere Pewter and still love the color in our bedroom but I felt like it was too dark with the tile.


What stayed the same

We didn't change the floor (tiled about six or seven years ago) or replace any appliances, all of which we've replaced since we bought the house 11 years ago. The range is probably 10 years old and the fridge and dishwasher are probably about 7 years old or so. They all work fine (and I hope they continue to for many years to come).

Nothing in the eating area of the kitchen changed, recently anyway.

Info and sources
  • Cabinets: Custom, painted Benjamin Moore Cloud White
  • Countertops: Caesarstone Eggshell (aka Osprey)
  • Hardware: Emtek Georgetown 1.25-inch glass knob and Restoration Hardware Aubrey pulls in polished nickel
  • Vent hood: Kobe 36-inch insert (comes with a remote, too)
  • Backsplash tile: Mother of pearl 1-inch mosiac tile purchased from Key West Tile. Similar (or possibly the same) tile here.
  • Cabinet glass: Bendheim Glass: Soft-seeded mouth blown glass (a splurge but so worth it)
  • Thomas O'Brien Large Hicks pendant in polished nickel
  • Ceiling paint: Benjamin Moore Cloud White (semi-gloss)
  • Wall color: Benjamin Moore Edgecomb Gray
  • Sink: 32-inch single-bowl Kraus sink (purchased during a killer Black Friday sale through a site called Express Decor. I think it was less than $250, which is a pretty great price for a 16-gauge stainless steel sink).
  • Faucet: Hansgrohe Talis S purchased through Amazon. DO NOT buy from Home Perfect even though they appear to have the best price. That turned out to be a huge nightmare and I had to dispute the charges with my credit card company and ended up buying the faucet from Amazon for about $15 more.

Labels: , ,