The Impatient Gardener: February 2014

28 February 2014

Feature Friday: A famous designer's own garden

 There aren't a lot of garden designers who people know by name. There are even fewer who people who don't garden know by name. Arne Maynard is one of them. Thanks to articles in Vogue, Town and Country, Elle Decor, the New York Times and many others, Maynard is known to a lot of non-gardeners as well.

I love looking at garden designers own gardens. Maynard's own Allt-y-bela in Wales combines so many interesting garden styles.

Can you even imagine driving up to a house and seeing this?

Tom Mannion photo / NYT
An orange house would certainly not be my first choice, but when I see it here, I can't imagine a more perfect color for this landscape.


The herb garden is surrounded by espalier crab apples and he has a lot of topiary shrubs on the property.


Check out how stunning those topiaries look in fall.


A maze of pruned copper beech shrubs makes for a dark path to this urn.


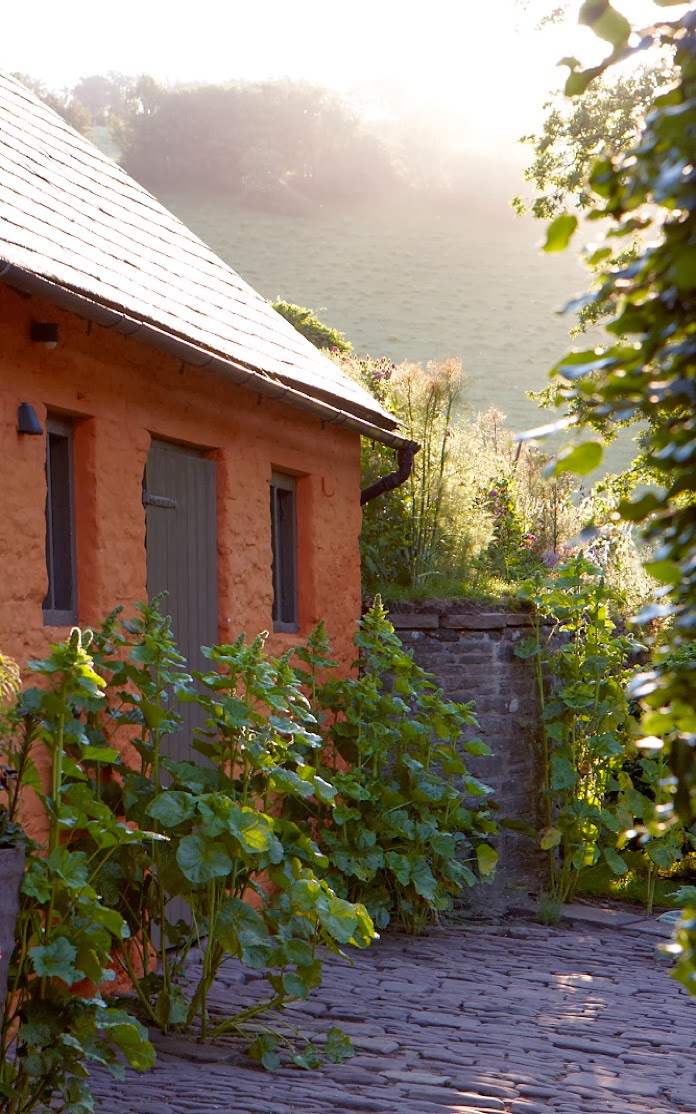
There are less formal areas as well. I don't think it would be a proper English garden without some hollyhocks. Don't you just love how these are sort of popping up out of that cobblestone walkway? I wish any hollyhocks I grew were so determined.


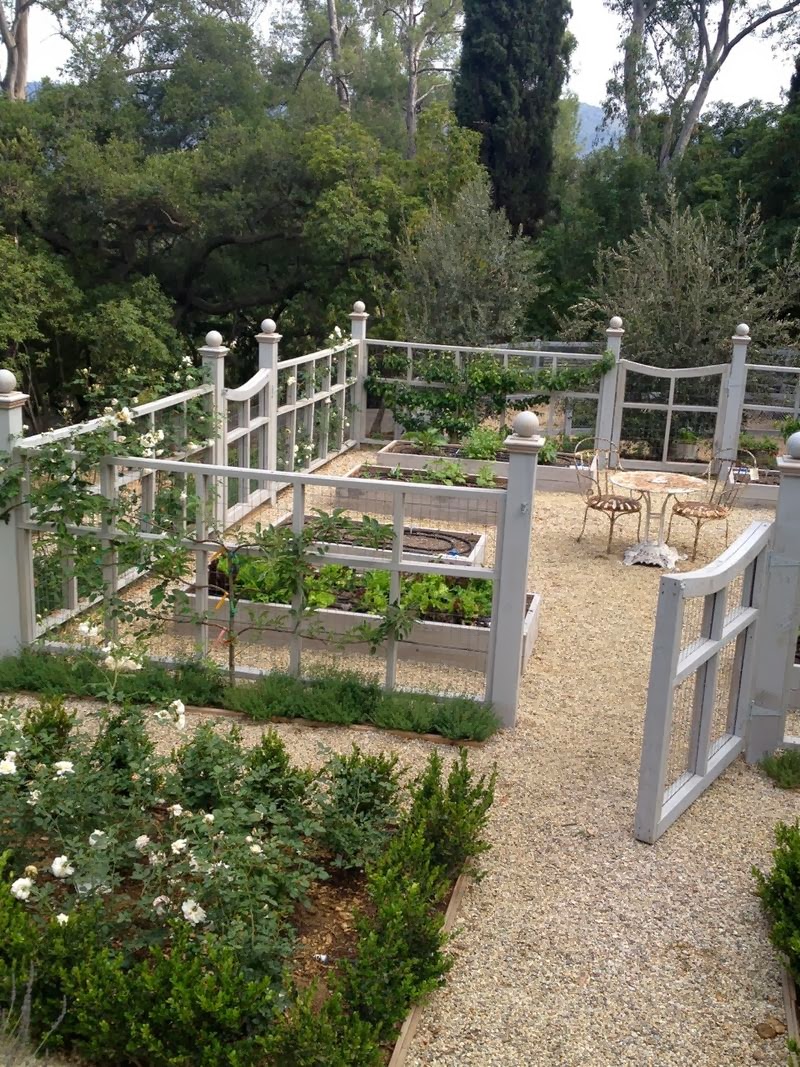
And check out his potager. I love how the rhubarb on the outside of the waddled fence softens it. Rhubarb is such a great plant structurally speaking (to say nothing of the fact that I love to eat it).

Tom Mannion / Gardenista photo

This last picture is actually from his previous garden at Guanock Hose, but I couldn't not include it. It is so fabulous.


There are no shortage of places to see examples of other gardens that Maynard has designed, but a good place to start is his website. He even offers (very expensive) garden design courses in his own gardens. Can you imagine how great that would be? 

Here's a description of the courses (which are offered over four days spanning four months, so I guess you'd have to pick and choose if you were to travel a great distance to attend):

On each of our days we'll be looking first at inspirational images of gardens in the season ahead, and then analyze what we need to do to achieve it. We'll look in detail at all the behind-the-scenes jobs that are so important to the finished look of the garden. It will be a mix of practical demonstrations and inspirational planting and design ideas.

Labels:

27 February 2014

A little of this, a bit of that

This week I find myself in one of those places where I have a lot of things have finished but nothing really to show for it. And that's how you end up with blog post about everything and nothing at the same time.

My parents are currently soaking up a bit of sunshine in Florida and were nice enough to send back photos of a couple of pergolas they saw on garages there for inspiration for me. What is sort of funny is that the second I saw the first picture I knew that I'd admired that pergola in person before. I know exactly where that house is and I bet I even took a picture of the last time we were down there three years ago or so. And now that the I think about it, I bet that house is what started my love of pergolas on garages.


In addition to the pergola, check out the great arbor gate through the perfectly clipped hedge. I love it.

This one is on a different house, but check out that climbing rose! It's actually a bit too vigorous for my taste. I think I'd rather see it thinned out because it sort of has a unibrow look to it. That's not a problem I'll have on my garage pergola, as I'm quite sure absolutely nothing will grow on it in the deep shade there.

Now I'm even more excited to get that thing up, although realistically, there's a fair amount of things that need to be done to the garage first, including painting it (which is completely weather dependent and that is a depressing thought) and getting the new roof installed (the contractor / friend / neighbor who is doing the work for us took a really scary fall off a very tall roof right before Christmas so even though he's fine now, we—and his wife, I would guess—aren't allowing him up there until the last vestiges of snow are gone and it's nice and dry). My intention is to have all the parts cut and stained so that when all of that other stuff is done the pergola is ready to go up.

I already have the three brackets that will hold it up. They are in the basement and have been primed (believe it or not, you have to prime before you apply a solid stain; I still don't really get how it's different from paint but it worked like a charm on our deck so I don't question it). I won't lie to you: I ordered them well ahead of when I had to so that I could be financially committed enough to know that this project would actually happen. Projects that exist only in theory have a way of disappearing when other things pop up and I've found that if you do just a little bit of them (and it's helpful if it's the most expensive part of them), it's a good way to ensure that they are finished, particularly when someone else involved in it (say, um, your spouse) isn't necessary that on board with the project.

The next step is to buy the boards and cut the end detail on them with a jigsaw. But first I need to clear out a little room in the basement.

And that's what I've been working on a lot lately. Mr. Much More Patient's birthday is next week and I could think of nothing that would make him happier than a clutter-free, clean and organized workshop area in the basement (he doesn't read the blog so I think I'm safe in spilling the beans here; in fact no one in my family reads the blog except for my sister-in-law, so hi G!). I've been decluttering and even doing some painting for a week now. I'm not sure if it's good or bad that he hasn't noticed any of that. I have some bigger things planned that I'll be installing over the weekend as well. I really hope he likes it because he is very difficult to shop for.

As part of that effort, I've also been working on finally finishing up this dresser. I asked you for opinions on it more than a year ago, but before that, it sat in the garage for a couple of years. I was almost finished with it last year but then it got pushed aside, stuff got piled on it and I ended up having to repaint it. I just have a couple touch-ups to do on that and then that's finished and ready to show you too! I'm loving it so far. In this picture you can see a little sneak preview of the before (on the bottom) and after (on top) of the drawer color.


And completely unrelated to any of that is my strong desire to start putting a new garden design on paper. Redoing the awkward mini garden by the garage has been on the agenda for a long time, but now that sprucing up the garage is definitely happening it seems logical that I fix that garden this spring too. I originally planted that area to screen the horrible propane tank, but a few years ago we switched to natural gas (thank goodness, if you've heard about the propane shortages and the cost skyrocketing to upwards of $7 per gallon in some places) and thankfully got rid of that tank.


This scraggly mess of a garden is due for some sprucing up.
I was inspired by this post the other day and it has me thinking about the back yard. I almost always think of the garden as the positive space (and by the way, I am of the opinion that that's not always wrong, depending on the garden and the site), but in the case of the back yard, it might be more striking to think of the lawn as the positive space with the gardens around it. Anyway, it's just something I'm playing around with in my head and I hope to put some of it on paper this weekend.

The garden in question is to the left of the garage in the photo below. See how I've created "negative" space there? I need to play around with it on paper to get a feel for what I might do there to fix that situation.


Anyway, that's what's happening here. Make sure to come back tomorrow for another Feature Friday on a really great garden. I think you're going to love it.

Labels: , ,

24 February 2014

Smooth operator

I am basking in the glow of a finished hallway, folks. After a weekend of painting and a few finishing touches, the hallway is looking so much better.

Smooth wall, relocated thermostat, new light, lots of paint

It was a weekend of many projects (I hope to show you the others soon), but I felt like I was running from one thing to the next. At one point I had four paintbrushes drying in the sink. The priority, though, was the hallway. Sometimes you just need to finish something up to cross it off the list, you know?

You would think a 6-foot hallway wouldn't take long to spruce up, wouldn't you? But with five doors and six doorways there was so much trim to be painted. And trim takes a long time to paint.

But let's get to the fun part. Here's what it looked like when all this started.

Hallway before

And here's what it looks like now.

Fixed up hallway, smooth walls, painted


Here's what went into it, in the (somewhat nonsensical) order we did it in:


  1. Sanded and painted the wood plant ceiling.
  2. Replaced the light.
  3. Sanded the texture off the walls.
  4. Sanded all the trim.
  5. Removed the closet doors to paint them in the basement.
  6. Did a final scraping on the walls to get the areas the sander missed.
  7. Primed the trim and wainscotting.
  8. Painted the wainscotting (Benjamin Moore Gray Husky).
  9. Moved and replaced the thermostat.
  10. Skim coated the walls.
  11. Primed and painted the walls (BM Mascarpone in matte finish).
  12. Painted the trim (BM Mascarpone in satin finish).
  13. Hung up a piece of art, sat back and gave myself a big high five.

I wouldn't mind installing some beefier crown molding like we have in the kitchen, but I'm still smarting from our epic crown molding failure and I'm not ready to go down that road again. Replacing the doorknobs is also on the agenda, but all in due time. I have the glass doorknobs from my grandmother's house but retrofitting pre-drilled doors with antique door hardware is remarkably difficult, not to mention expensive. We did replace the kitchen doorknob with one of the antique knobs. When we redid the upstairs we put in reproductions and I'd love all the doorknobs in the house to match someday. 

Antique round glass doorknob
Antique glass knob on the kitchen door. (Can you see me taking the picture?)

But those are minor details. For now I'm just enjoying the "new" hallway. In fact, I'm finding excuses to linger there a little bit. Perhaps the biggest compliment came from Mr. Much More Patient who, when he came home to find the hallway finished, said, "I should never doubt you." Aw, thanks honey. Wait, what?

Labels: , ,

21 February 2014

Feature Friday: A gorgeous potager

Boy, do I have gardening on the brain lately. March is such a cruel month because everything tells us it should be spring but for so many of us it is still very much winter. The garden design series I did a couple weeks ago was fun so why not continue the theme with some more looks at great gardens.

Potager garden
Brooke Giannetti photo. All photos used with permission.

This fabulous potager garden was designed by Brooke and Steve Giannetti, who apparently are masters of everything related to design.

Beautiful fenced-in vegetable garden

It appeals to the sense of order I like in vegetable gardens, but what really has me over the moon is that fence. It is so perfect in every way, right down to the finish (Super Deck "Weathered Wood" stain).


The fact that they have espalier apple trees growing on it, only makes me love that fence that much more.


If this were my garden I would change a couple things. Because I'm constantly clamoring for more space to plant, I would either make the raised beds bigger or add more. Also, with a space this beautiful, I think I would actually turn it into an entertaining space. Can't you just imagine a rustic table and chairs plunked in the middle where you'd serve a great dinner? OK, maybe that's not the most practical pipe dream, but I can assure you, I'd be having cocktails out there.

I think I love the "back door" entrance even more than the front. Those stairs are so charming (but of course you need the level entrance in the front to get a wheelbarrow in there) and I love how the rose climbs around the corner.

Entrance to potager garden with climbing rose

Yes, I could live with this garden.

Read all about the design process and see more pictures over on Brooke's blog. Don't miss a peek at her mind-blowingly fabulous house while you're there too.


Labels: , , ,

20 February 2014

How to skim coat a lumpy wall

If you've been following the progress of removing the wall texture in our small hallway, you've probably figure out by now that the remaining texture in the house (in the downstairs bathroom and the den) will be professionally removed. This was a messy and time-intensive project. Don't get me wrong, I'm happy that texture is not in my face every time I walk out of the kitchen, but we'll be saving our pennies to hire a pro to remove and replace the drywall for the other rooms.

Here's the semi-before picture that shows the evil texture.
This was my first attempt at skim coating, so I started where all good DIY projects start: Google. I watched a bunch of Youtube videos that were at least somewhat helpful and then I went for it. Rather than rehash everything that people who know more about it than I do have said about it, here are some of the tutorials I referenced. And below I'll tell you how I didn't do what they told me to do.

Sawdust Girl's tutorial
Ugly Duckling House tutorial
SF Gate tutorial

We started with a relatively flat wall, but it was far from perfect. Between various sanders and the paint scraper (by the way, the scraper worked much better and was far less messy than the sander so if I were doing this again—and I'm not— I'd have started with the scraper), we were able to remove most of the texture. Unfortunately I sanded a bit too much in some spots, sanding off the paper layer of the drywall underneath. That was a bit messy.

Anyway, that was all cleaned off and vacuumed (get yourself a drywall bag for your shop vac). Some of the tutorials I read said to prime the wall with a sealing primer before I did anything else. I couldn't find any real reason for this but I did it anyway. I figured it would help seal up some of those frayed bits of drywall I had pulled up with aggressive sanding and possibly protect the wall board from moisture since I planned on using a pretty wet mix. Later I realized this might have only applied to people who had removed wallpaper  and had to seal in any remaining wallpaper paste. Basically, I'm not sure if you need to take this step, but I was in the better-safe-than-sorry camp.

I used just less than a quart of Zinsser's Cover Stain primer. It is oil-based (so a pain to clean up your brushes) but it dries in 30 minutes, which is nice because you can get going on the next step right away.

I used lightweight joint compound for my skim coating. I can't tell you why. Some tutorials suggested it, others didn't, but it sounded good to me.

For the first coat (I ended up doing four), I mixed it up to be very thin, which seemed to be a running theme among the tutorials I watched or read. Then I applied it with a paint roller and smoothed it with this magical tool called a Magic Trowel from Sherwin-Williams. It cost $25 but I think it was key to this turning out OK and I highly recommend seeking one out if you're going to be doing any skim coating.

That first coat didn't do much. Frankly, my walls just weren't very smooth and needed a bit more filling than such thing layers would provide. If I kept applying such thin layers I would have had to do about 10 layers. That wasn't going to happen.

The next layer was much thicker. I still watered down the joint compound, mixing it with a drill mixer attachment, but this was significantly pastier than the first coat. I could scoop some on a trowel and it wouldn't fall off immediately. I scraped that on the walls, attempting to fill in some of the low areas. This is where I noticed an immediate improvement in the wall.

I did the first two coats on one day, putting a big fan on them to dry them completely. The next day I came back and did two more coats: another thicker one followed by a very thin one. By this point I was really sick of messing up more stuff (because you can't rinse out your stuff down the sink so I was spending a lot of time in a snowbank trying to clean my bucket, etc.), so I skipped the paint roller application process. And that was really messy. Let's just say it was a good thing that I  thoroughly covered the floor and all the molding. That stuff was everywhere. The good news about joint compound is that it wipes off easily if it's still wet and sands off without much work if it's dry.

When all four coats were dry, I sanded everything just to make it as smooth as possible, vacuumed off all the dust, and primed again, this time with Benjamin Moore's latex Fresh Start (which is my favorite primer for typical applications). Then I followed it all up with the same paint that's on our living room walls: BM's Mascarpone in a matte finish.

So how did it turn out? Well, see for yourself.

How to skim coat walls
See how it's a bit bumpy on the bottom?
How to skim coat walls
If you need a little view of how far we've come, check out the ceiling (the CEILING, for crying out loud) in the den in the background of the picture.

I think we can agree it's not perfect. I think I'd also say it's one million times better than it was before.

It's smooth but not flat if that makes sense. There are definitely some lumps and bumps. Until I hang up a bit piece of art to cover them I'm calling it "character." I've inhaled a lot of drywall dust lately folks, just go with it.
how to skim coat walls

You'll note that the new thermostat, which is like crack for my gadget-loving soul (I have checked the temperature in my house from my phone approximately 15 times today in case you were wondering), has been mounted and it's not in the middle of the wall. Hooray!

So that's where the big hallway project is for now. I have to finish painting the trim (there is so much trim in this stupid little hallway!) and then it's onto the next project.

Labels: ,

18 February 2014

An unfortunate case of the munchies in my yard

The world outside my door appears to be frozen. Certainly nothing is growing, but I didn't expect things to be shrinking. Sadly, there are a lot of things shrinking in my yard.

The deer are starving. This winter has been so snowy and so cold with almost no relent (we're hoping for above-freezing temperatures this week which would be good for the soul and maybe, just maybe, decrease the size of the snow piles a little) that their food sources are buried or gone altogether.

Like most gardeners, I don't have a particularly good relationship with the deer, but I can't stand to see any animal suffer. What is concerning is that the size of the herds we are seeing are so much larger than in past years. Either the deer that usually hang out in the state park by our house are moving out in search of food or there are just a lot more deer. I fear it's the latter.

Not only are the deer getting even more bold (you would think the 275 pounds of dogs that live at my house would have some effect, but the deer practically laugh at them), they are eating whatever they can reach.

Unfortunately the main targets in our yard were the six arborvitaes we planted to screen the neighbor's house after we cleaned up a few dead trees in the woods. We bought Western arborvitae (Thuja plicata) Spring Grove in part because a neighbor planted several of them a few years ago and they grew quickly and were never bothered by deer even though they were planted along the road where the deer frequently stroll.

I've learned my lesson about "deer resistant" plants many times before, but I never even thought of protecting our trees for winter because they've never been touched by deer before. Usually, if the deer are going to make a meal out of something, they do it pretty early on in its time in our yard.


But now, all six of our Spring Grove arborvitaes have been "lollipopped." That is, the only foliage that remains is the top 18 inches or so. In my experience, the bottom never regrows, but the tree will probably live, but only grow foliage from the level it's at now and up. That isn't so good for when you're trying to block the view from your neighbor's kitchen window.

I'm not alone in this. The aforementioned neighbor with several Spring Groves that rapidly grew to about 20 feet tall suffered the same fate. The bottom 6 feet of his trees have been stripped.

The deer are munching on other things as well. Nothing within their reach is safe. The dwarf apple tree buried in a snow bank has ragged ends on every small branch, all nipped by deer. The same goes for the Limelight hydrangea in front (I'm not worried about this as it's destined for pruning anyway). The damage around the yard is extensive and is only likely to get worse.

That ragged end on the branch is a sure sign that a deer has been sampling.
By they way, I know so many people are buried under piles of snow so you probably don't need to see pictures of more snow. Too bad, you're getting some anyway.

These were taken Sunday, before another 6 inches fell Monday (and proceeded to blow into giant drifts). Testing paint samples on the front of the garage in fall sure looks like a great idea now, doesn't it? No one can say I haven't given the color a great deal of thought, though.


My poor meatball boxwood always gets crumpled in winter. It's hiding under there somewhere. 


Hard to believe this is what it looked like under that snow pile about 6 months ago, isn't it?


Have you noticed the wildlife in your area getting a big desperate with the crazy winter that so many of us are having this year?

Labels: , , ,

14 February 2014

Oops, I broke that? Aw, shucks. :)

First off, thanks for all the thoughtful comments on the ugly bathroom post. You guys all had great ideas for further improvements in there on the cheap and I'll definitely be putting some of them to good use.

OK, time to fess up. Who has ever "fixed" something with the secret hope that you actually make it worse and you have to fix it for real?

I have never done this consciously, but I will admit that there have been times when I've not been too upset that my DIY fail ended up being what I really wanted in the first place.

Remember the wall sanding operation that I took on in the hallway to get rid of the hideous texture a few weeks ago? Well, that's still going on (the last phase of chipping and smoothing before skim coating can begin) but one small improvement has taken place that I am very excited about.

The thermostat was, for some reason, put smack dab in the middle of the one large wall in that hallway. It has irritated me to no end because I always thought that would be the perfect place to hang a nice-sized piece of art.

So I asked Mr. Much More Patient, who handles all DIY projects related to electricity in our house, if he could please move over a bit. I'd love to offer you a tutorial on how he did that but here's how it would read:
  1. Go to Home Depot and buy a big spool of some plastic-coated wire. The brown one. 
  2. Drill a small hole above the light switch (with the knowledge that the switch must be attached to a stud so therefore there's a stud there). 
  3. Remove the vent cover and peer up into the wall with a flashlight, noting that previous owners used 2-inch long nails to fasten the wainscotting to the wall and rarely hit a stud.
  4. Try to feed wire down the hole you just drilled and get frustrated when it gets caught on the electrical line until clever wife (that's me) suggests using a wire hanger to reach in there and grab it.
  5. Feed wire down the side of the vent to the basement.
  6. Then do something in the basement for awhile that I presume involves hooking up wires to the furnace but I don't really know.
Anyway, in the process of moving the location of the thermostat he opened up the old one and about 14 pounds of drywall dust poured out. As it turns out, drywall dust is not good for devices with wires. Cleaning that thing out ended up killing it.


Because like much of the rest of the country it's freezing here, having a non-functioning thermostat is not an option, Mr. MMP had to run to the hardware store for the cheapest thermostat he could find and I had to get on the computer and order up something we've been wanting for awhile: a Nest thermostat.

Poor little Nest thermostat having to live in it's box for another week or so.


The Nest appeals to the gadget geek in me but it's also supposed to help you save quite a bit on your heating and cooling bills. The reviewer on Engadget tracked his bill over a year with the Nest and said he saved $70 even though he had already been using a programmable thermostat.

The Nest arrived the other day but Mr. MMP said we're not allowed to put it up until we're done skim coating the wall. So for the time being the cheapie is up in the old place but the wires are all run for the new location.

Speaking of the wall, here's a peek at what it is looking like now. I actually took this picture (complete with hideous sconce) for the bathroom post the other day, but it's a good look at the hallway on the right, juxtaposed with the wall texture in the bathroom, which is what we removed in the hallway. The new location of the thermostat is over that light switch.


You'll notice that I've painted the wainscotting, and we've finished scraping and sanding down the walls, so this weekend I'll start the skim-coating. 

One more thing: I'm sure a bunch of you are bound to point out that it is not a good idea to have the thermostat directly over a vent. I agree. Since that vent is quite large (those old-fashioned vents are actually one of the more charming features in our house), it's actually under the original thermostat location too, and there's really no where else to put it. Also, we keep that vent closed most of the time anyway (we don't really need to heat our hallway). It's not perfect, but it'll work.

So yeah, I may have accidentally broken the old thermostat by not protecting it when I was sanding, but in the end I'm going to have the thermostat I wanted in the place I wanted. Tell me that's not a win.


Labels: , ,

12 February 2014

The ugliest room in my house & randomly painting things

It never ceases to amaze me how one image can spur me in a direction I never realized I wanted to go in. A couple years ago it happened with a photo of a door painted black. Although I had never really given it much thought before, four hours later I was painting our back door black. I still love it.

And so it was with this picture.

From Pinterest

It's not a particularly striking image but for whatever reason it immediately caught my eye. And in seconds I was considering doing something that had never crossed my mind before: painting the vanity in the downstairs bathroom navy blue.

I have never been one for temporary fixes when it comes to renovating spaces. That's why the downstairs bathroom, arguably the ugliest space in the entire house and the space we declared "the first thing that was getting fixed" when we bought the house still looks exactly like it did more than 11 years ago when we bought this place.

(WARNING: You are about to see one of the few spaces in my house that I deem to be too ugly for publication on the blog. You may choose to shield your eyes.)


Let's be honest here: It is a hideous room. There is an awful gold shower surround, badly frosted sliding doors opening to a fiberglass overly formed shower insert with a seat (am I weird for being slightly grossed out by the thought of sitting in the shower) and a pink laminate countertop on top of a pickled pink vanity. The vinyl flooring isn't great but it's not horrible, but this room has the dreaded wall texture and lucky me, it was applied AROUND the mirror and lights, meaning that none of that can be changed so long as that texture is there.

The room needs to be gutted. I have long wanted to rip out that shower insert and certainly the surround, but what would go there is sort of up in the air. I always assumed it would be a bathtub, but that's because I assumed there would be kids who would need a bathtub. That no longer seems likely but it might be nice to have one for soaking the occasional plant or just for resale (not that that's really a factor in any of our decisions). But there's no doubt about it, most adults prefer a shower they can step into instead of over, so if this is just meant to be a guest bathroom, then keeping it a shower might be more prudent.

We have no plans to take on this bathroom renovation soon. The upstairs and kitchen remodel are a little too fresh in our minds to take on another major project (please note, I also said we weren't doing the kitchen anytime soon and then just a few months later we did it anyway). But I'll be honest, it's starting to get embarassing to have to direct guests to that ugly bathroom.

The masters of make-do decorating are John and Sherry Petersik at Young House Love. Their make-do solutions never look like they are temporary and it appears to help them from losing their mind while they bide their time or save their money until they can redo a space exactly the way they want. Personally, I've always had a hard time spending money or time on something that's not really what I want.

But I'm starting to think that this disaster of a bathroom might be a place to try a bit of a temporary solution. Obviously the key to "temporary" upgrades is to keep the spending at a minimum. For me, that means paint.


So I painted the vanity. Twice, actually, because Hudson Bay, which I love on the walls of my office, was just a tad too slate-ish. So I got a can of Old Navy in semigloss. The Old Navy was the right call, but I think I would have been happier with it in satin. (Does anyone else struggle with paint sheens as much as I do?)

Hudson Bay on the left (already sanded) and Old Navy on the right.

To be honest, I'm not thrilled with how it turned out. I don't think it's worse than what was there, but it looks a lot like a person who hated their bathroom and decidedly randomly to do something to change it and painted the vanity. Funny how that turned out, since that's exactly what happened. I also bought some cheap hardware from Home Depot. I got a brushed chrome finish toilet paper holder and towel holder to replace the gross old shiny fake brass ones. Now I have four metals in this tiny space: icky, shiny 1980s brass on the doorknobs, shower and towel bar behind the door; chrome on the faucet and vanity knobs; brushed chrome on the towel ring and toilet paper holder; and sort of a pewter-type color on the light fixtures. It's really bad.


I think painting the wainscotting in the room would help a lot, as well as repainting all the peeling trim, and if I feel like investing more time in this room, that will be the next step. Or maybe I'll just start hating it so much that I take a sledgehammer to it some day.

Everybody has a room like this, right? Please tell me you do.


Labels: , ,

10 February 2014

What kind of garden do you (and I) have?

Now that I’ve run through some of the many styles of gardens, the natural question is, “What kind of garden do I have?”

I think for me it’s safe to say that, strictly speaking, I have none the types of gardens I’ve talked about. And I bet that’s true for most of you. I think most gardeners tend to create what they naturally love, rather than strictly stick to a particular style. The exception to this would probably be people with houses that dictate a particular style.

What kind of garden style do you see here (other than rather disheveled with the paddleboard in the middle of the lawn)? Certainly cottage, but maybe a squinch of modern?

I have a friend who wanted to create a garden in her yard shortly after she was married and asked me for some tips. When I asked her what kind of garden she liked, her main criteria was that “None of the plants touched.” She couldn’t handle the somewhat disorganized nature of a cottage garden but she didn’t want the maintenance of a more formal space either. (As it turned out the marriage only lasted one gardening season so the no-plants-touching-garden never came to be.)

Until I did that post the other day on cottage gardens, I would have told you that’s what I have. But even I got a little shaky looking at all those intermingled plants. I’m no neat freak, and I will take asymmetry over symmetry any day, but when I looked at most of those pictures I thought: 1.) Eek, get your pruners out! 2.) I bet there are millions of snakes hiding in there. 3.) Too much! It’s all too much!


I pointed out that one of the more organized garden photos (above) was one of my favorites. And I know why. Because it’s informal in its plant choices but the repetition creates order that I, apparently, crave.


This photo from last year shows the vegetable gardening area of my yard. With vegetable gardens, especially, I seem to crave order. I'd love to build a fence around it and put in a couple more raised beds to create sort of a casual parterre garden (if such a thing is even possible).

I loved the comments I received after featuring different garden types. Some people were dying to get away from the angular nature of modern and formal gardens, while others, I suspect, felt like they needed to shower after looking at the cottage garden pictures. 

I feel like this area has just a bit of Japanese garden feel to it. With the manicured boxwood and and the rocks, it certainly doesn't feel cottagey to me.
That’s why I love looking at other people’s gardens. I think they say so much about the gardener. They are such a personal expression of who we are. 

There is a lot of “cottage” in my garden. I like plants and a lot of them. But even reviewing pictures of my garden from last year, I'm not entirely happy with what I'm seeing. I think I would like a bit more definition without being militant about it.


I've always loved this picture from my garden because I think it's a nice plant pairing, but this certainly speaks to the "cottage" side of my garden. Even the plants themselves feel informal as they sort of half flop over the patio.

I think that's the thing about gardens for me: Much like interiors, I wouldn't want to live with the same design forever. So my garden continues to be a work in progress. Where it leans cottage now, I'd like to balance that out with a few other styles. I think you can mix and match most styles in the same yard, so long as you have repeating elements that tie them together.

As my garden fills up with plants, it's not so much about the quantity anymore, but more about the design. I like to think of it as the progression of a gardener.

So what kind of garden do you have? And what kind would you like to have?


Labels: , ,