The Impatient Gardener: October 2016

31 October 2016

HEELING IN PLANTS: A FALL TRADITION THAT BUYS SOME TIME

On Sunday I cut what I think will probably be the last bouquet of flowers from the garden this year. I thought it seemed late, so I looked back at last year and noticed that our first frost was on October 18. We haven't had one yet and the forecast for tomorrow is 70 degrees. I think the flowers are just pooped out from producing for so long.

The Cafe au Lait dahlias have all been shades of cream since the weather turned cooler. The foliage is Bergaarten sage, which I grew as a foliage plant in the patio bed this summer. 

We set the clocks back this coming weekend in what is becoming a completely ridiculous tradition of daylight savings time (or the end of daylight savings time ... I never know when we're on it and when we're not). I was very aware of the impending afternoon darkness (although some sun in the morning will sure make getting up easier) when I was working in the garden over the weekend. I feel like there is so much to be done but I'm feeling no enthusiasm for any of it. I don't find the garden chores that must be done in autumn to be at all joyful. 

One of my fall garden chores has become something of a tradition: heeling in pots for winter. In the beginning I had to do this because I had plants sitting around that hadn't yet found a home. These days I mostly deal with plants that I'm intentionally growing out in pots until they get big enough to plant out or perennials I've divided and potted up for our master gardener plant sale next spring. This year I am heeling in about 30 one-gallon or larger pots.

There's nothing fancy about heeling in plants in pots: dig a hole and stick them in. A little more soil should be added and then the whole thing will be topped off with a thick layer of mulched leaves.

The fenced-in raised vegetable garden is perfect for this. The beds have been cleaned out and I won't need them again until it's time to unearth the pots. And I won't have to worry about hungry deer browsing on any exposed stems thanks to the fence.

Walking onions, hostas, boxwood and willow are all spending the winter in pots. 

There's no science to this. For me it's a quick and dirty job: dig a trench, put pots in, push back soil and repeat. Next weekend I'll mulch leaves and cover the entire bed in a very thick layer of finely chopped leaves. These can be moved to the compost or just mixed into the beds in spring. 

The fenced-in raised veggie garden is the perfect spot to overwinter all of these plants in progress.

It's rare that I lose a plant using this process, which I most certainly would if I just left them unprotected in their pots. And it's become a bit of a spring ritual to unearth the pots. And that's a project I enjoy much more. 


Labels: ,

29 October 2016

HOW TO USE A BULB AUGER (AND PLANT BULBS IN MINUTES)

Last spring Mr. Much More Patient looked out the window at our still-gray landscape and asked why we didn't have more daffodils. They are a good bulb to grow here because no critters will touch them. Still, I don't want to add too many more to the gardens, as keeping them healthy requires leaving the foliage standing to die back naturally, and I don't love that look in my garden. (In fact I often cut off the leaves before I should, knowing full well this will affect their life span.) But we do have a lot of wooded areas that are quite bright in spring and would look lovely with some color. And I'd never have to worry about the foliage looking tatty.

So I told Mr. Much More Patient we could have mass quantities of daffodils if he didn't balk at the cost and would agree to help plant them.

And that's how we ended up planting 400 daffodils this week.


When I'm planting daffodils in the garden proper, I like to dig big holes and plant them en masse, but that approach wouldn't work well for the woods. For one, there are a lot of roots around and digging big holes is not easily done. I also bought varieties that are supposed to naturalize (i.e. multiply) more easily, so wanted to give them enough room to do their thing in the future. That meant planting them individually and there is no better way to do that than with a bulb auger.

Think of a bulb auger as a really big drill bit for a power drill. They come in different lengths, but most seem to be in the 24-inch range. In my opinion, bigger is better because that means less bending over. It does take a little practice to get the hang of the auger though, so here are a few tips to make sure you don't spin your hand off.

Set the drill torque on the drill setting and on a lower speed if you have a variable-speed drill. 

Put the auger in the drill the same way you'd fit in any drill or screwdriver bit. Then you want to turn the torque setting to the drill setting. If you have a drill with multiple speeds, put in on a lower speed setting. Our Milwaukee drill has two speeds and we run it on the slower speed for this.

Drilling a hole with a bulb auger is not the same as drilling a hole in a piece of wood, where you generally want to keep pushing. If you push like heck when you drill a hole in the dirt at some point the dirt (or more likely the roots, rock or something under the soil) is going to win and the auger will stop spinning but your arm won't. I'm not kidding ... your arm keeps spinning. And it hurts. This is why you want it on a lower speed.

In order to avoid that, work the auger up and down as you drill, gradually working it down into the soil. If it does get stuck, don't try to push through it. Reverse the drill, back up a little and then start working up and down again until you've got the hole drilled to the depth you want (about 6 to 8 inches for daffodils, but they aren't overly fussy).

Here's a quick video of the technique. I should add that this soil was in an area where we added quite a bit of soil so it was pretty fluffy (and already mulched with leaves; we were just adding a few bulbs to those we had planted a few days earlier), so it was pretty easy going. You may need two hands on the drill for a lot of conditions and I'd advise two-handing it until you know what you're dealing with.


Doing the up and down motion leaves a lovely little pile of soil around each hole, so it's easy to refill after you put a bulb in the hole. One note: We noticed that we were using up the batteries on the drill quickly when we were whipping through holes so quickly. We went through a battery about every 100 holes. So make sure you have a fully charged battery and if you have a spare battery make sure that's good to go too.

Working with two people we were able to crank out those bulbs in no time, probably about an hour total. Mr. Much More Patient was on drill duty and I plunked the bulbs in the holes and covered  them as I went. I found it was much easier to dump the bulbs into a trug rather than try to fish them out of a bag every time.

There's plenty of time to plant bulbs still. In fact you can pretty much do it as long as you can get in the ground, but planting bulbs in really cold ground, when it's really cold outside, can't be much fun.

If you're in the market for a bulb auger, here are a few to check out.

Affiliate links follow. Thanks for supporting this blog!


Labels: , , ,

28 October 2016

FRIDAY FINDS

You can tell that it's fall and people are starting to move inside because there's been some great stuff on the Internet this week. Before I dig in, a quick programming note: I mentioned bulb augers (that's an affiliate link) the other day and I realized, while in the throes of mass planting the other night, that a little bit of instruction can help, and probably save your wrist. I'm hoping to get a post about that up later today or tomorrow, so check back for that.

OK, let's get into some Internet goodies.

The design of Linda and Mark's garden is largely dependent on an amazing web of paths, all very much designed in a specific manner. Their planning paid off so well. Each Little World photo

My favorite posts of the week, by far, are from my friend Linda at Each Little World. She's been reviewing her garden journey through the creation of gardens past and I find it fascinating. Check out her posts on the garden at her first house and the creation of the garden she and Mark currently tend to.

Good eye candy on poured concrete applications in gardens.

This kind of thing comes easy to some people, but it's the sort of step-by-step that I need. Right after reading this, I ordered a tray for the coffee table.

I love me a good source guide.

I hate pumpkin pie (yes, Stephen, I'm one of those people). But because I trust Stephen in all things Thanksgiving, I may give this Not Barfy Pumpkin Pie a shot.

Flower Patch Farmhouse photo

Do you have a Thanksgiving cactus or a Christmas cactus? Truth be told I never thought much about the difference.

It's gotten chilly here and the wind has kicked up so leaves are falling like crazy. My weekend will certainly include some quality time with leaves, but also all the other fall garden-related tasks that I need to keep plodding away on. We still haven't had a frost, so I've not been able to dig dahlia tubers yet, but that is hanging out there as a big project on the horizon. What's on your agenda this weekend?


SaveSave

Labels: , ,

24 October 2016

WEEKEND PROGRESS

We were blessed with yet another gorgeous autumn weekend here. I can't say enough about how wonderful the weather has been for most of this year, but I feel like we deserve it after two really cruddy years. I'm still gardening in shorts most of the time and I can't think that's common for this time of year at all.

In an effort to keep you up to date with the oval circle garden progress, I thought I'd just give you a quick peek at what was happening this weekend. Frankly, I'm in full-on scramble mode, so I've not been taking much time to take pictures (or do anything else, like clean my house), but I did snap a few here and there.

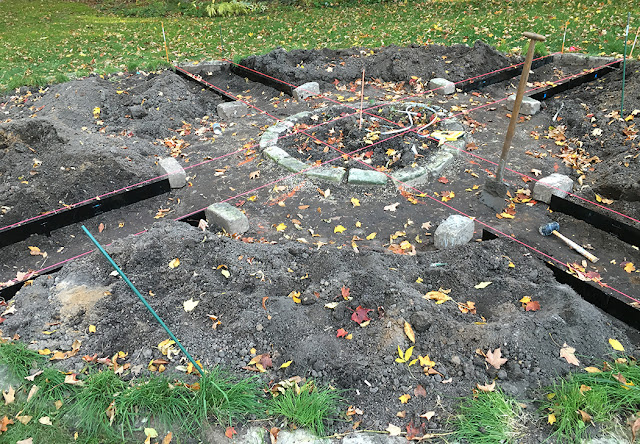
You can see how the paths are coming together here. The random cobblestones more or less show where the inner circle path will be.

The big project in the ongoing circle garden ordeal was to install the metal edging. As I mentioned, I found it at Lowe's for about $10 per 8-foot piece. I bought extra stakes that are a foot long and really much better than the ones that come with the edging. I didn't really even bother with those. I have also ordered some end stakes for the inside ends, but those should be easy to put in.

From this angle you can see that the two side segments are going to be quite small. I may have to alter the design to accommodate that.

Mr. Much More Patient was in charge of cutting using a jigsaw with a blade for cutting metal and I handled the rest. The process wasn't difficult .... just a matter of leveling each piece from end to end and then with its partner on the other side of the path. I didn't bother with leveling each path's edging to the other paths. That would be impossible and the gravel will accommodate small changes in level.

The next step will be to install the paver base and the gravel, but first I have to dig the inner path around the circle down a little bit.

As the paths become more real, I'm seeing that the side segments are quite small, which may require some changes to the design. Fortunately I have all winter to think about that.

I also spent a little time this weekend being thankful for whoever invented the bulb auger. Last spring Mr. MMP said he'd love to see the woods full of daffodils, and I told him that was no problem so long as he would help plant them. With him running the auger and me putting the bulbs in and covering them over, we cranked through 200 bulbs in less than half an hour. Earlier in the day I planted 45 alliums in an hour and a half using a traditional bulb planter. Clearly the auger is the way to go.

And the last exciting tidbit from the weekend is a find that I'm super excited about. I've been so thrilled with how the rose I'm growing in a container is performing that I decided I'd like to grow a few more that way. My plan is to put them on the corners of the driveway apron where it meets the patio, but of course this requires a pair of matching containers of some size.

Here's the pair of planters I snatched up at a great price. I'll need to change the color though.

Although I went to the Restoration Hardware outlet store looking for a bed (I really want an upholstered bed, but that is really another issue all together), I swung by their outdoor area and saw a matching pair of their Adamo cast stone planters in the medium (24-inch) size. These babies go for $369 each on the website (really, RH? You need to get real with your pricing!), but they were marked down to $100 each at the outlet, plus there was an additional 30% off of everything that day, making them just $70 each. The color, called Honey Lemon, is sort of a light buff color and not my favorite at all, but I think I'll be able to stain them a gray color. I can't tell you what a relief it is to have found these at a great price. I struggle each year to find good containers and I feel like I often overspend. I'm envisioning a white rose in each pot with annuals around the edge.


Oh, and my favorite maple tree is starting to put on a show. I shared this photo on Instagram because even people who aren't too happy about autumn, like me, can appreciate that kind of beauty.


Labels: , , , , ,

21 October 2016

FRIDAY FINDS

Some weeks Friday it feels even better than usual when Friday rolls around. So it goes this week.

Some affiliate links may be used. This means that if you buy what I link to, I may get a small percentage of the purchase price. This helps support this blog and I very much appreciate it!

Before we kick off into Friday Finds, I wanted to tell you that Sharon was the lucky winner of the Daring Forms Allium collection from Longfield Gardens. Thanks to all of you who entered!

And with that, let's get on to what I'm digging on the Interwebs this week.

Deborah Silver does it again. This redesign of a driveway and stunningly mature-looking landscape is so simple but so spot on. How does she do it?

In case you find yourself with a bunch of green tomatoes (I wish! I had such tomato issues this year), here's what you should do with them.

Creative Vegetable Gardener photo
It's garlic planting time! Here's what kind you should be planting this year.

I'm a sucker for a good source roundup. I sort of collect them on Pinterest. Here's one on exterior lighting.

Available from The Purse Co. on Etsy.

I'm not a purse person, but I like to carry a small wristlet with the necessities in it. Every three years or so I wear one out and I go on a hunt for a new one. I love shopping at Etsy for these things because it's unlikely I'll see the same bag elsewhere. I just ordered this leather wristlet last week.


I'm obsessed with these food designs (I don't know what else to call this amazingness) from an Australian company called Your Platter Matters. Take your basic cheese platter and multiply it by the entire table. The pricing is by size: $389 AUS for a square meter. How cool is that? Check out their Instagram feed. I want to have a party just to try this. Of course it would take me five hours to do and by then everything would be uncomfortably warm.


One last thing:While I was shopping on Etsy, I came across this box. This cracks me up because for years one just like this (with the name of the county I grew up in) sat in our garage and was used for newspaper recycling. I wonder if it's still kicking around my parents' house.


Have a great weekend!

Labels: , ,

19 October 2016

THE PATH-MAKING MISTAKES I MADE THAT YOU SHOULDN'T

One thing that can be said for sort of tedious gardening tasks such as weeding or moving mass quantities of soil is that it gives you a lot of time to think. And over the last several weekends of working in the oval circle garden I've spent a lot of time reflecting on the mistakes I made there.

It was the first garden I designed from scratch so I give myself a big pass on a lot of things that went wrong there. It was also the first time I built paths, and more than anything else that I've learned from my mistakes in that garden, I learned a lot about how not to build paths.

So I'm going to save you from the anguish of a poorly constructed garden path and tell you exactly what you SHOULDN'T do.

The oval circle garden was cursed with poor design decisions from the get-go. The 16-paths were way too small and oddly curved when they didn't need to be.

1. DON'T SKIMP ON THE SIZE

This is a relatively small garden and when I created it, I was concerned I wouldn't have enough room for plants, so downsized the paths, to a paltry 16 inches wide. I suspect that I was also trying to save some money on the hardscaping. In general, a path meant for one person should be a minimum of 24 inches wide. If two people are meant to walk together or it's a longer path, go wider: 4 feet at a minimum.

Skinny paths not only just feel wrong, they also look wrong and nothing else will feel right when the hardscaping sets the wrong tone.

2. DON'T CURVE FOR NO REASON
I'm a sucker for meandering curves on a path, but they should make sense. The path should curve because it has to to get around an obstruction. When I made the path to the garage, I installed gardens that forced the path to curve, which might be cheating, but it's a chicken and egg thing. When I did the paths in the original oval circle garden, I thought that curved paths would keep it from being too formal. For two of the three, it worked, partly because the curve was gentle enough that you could still walk straight. But the third path had an odd, too-sharp curve in it that was all wrong.

This is the remnants of the landscape fabric I pulled out of the garden. Yuck.
3. NEVER, EVER USE LANDSCAPE FABRIC

Some people are going to think this advice is crazy. In fact, the internet thinks this advice is crazy. If you do a Google search for how to build a path, nine times out of 10, the instructions will tell you to put down landscaping fabric. And yet, many landscape professionals never put it down.

Landscape fabric is great for a year, maybe two. You'll be applauding how well it has kept weeds out of your paths. But paths, especially gravel paths, get dirty. Soil falls in, blows in or is tracked in and then is trapped on top of the fabric. This creates an environment that is very hospitable to nasty little weed seeds, which sprout. And unless you are a gardener out there every other day on your hands and knees pulling all these little sprouts (you're not), they get away from you. And then they send down roots THROUGH the landscape fabric, which makes it impossible to pull them out. Worse yet, it has a way of emerging in places you don't want it to.
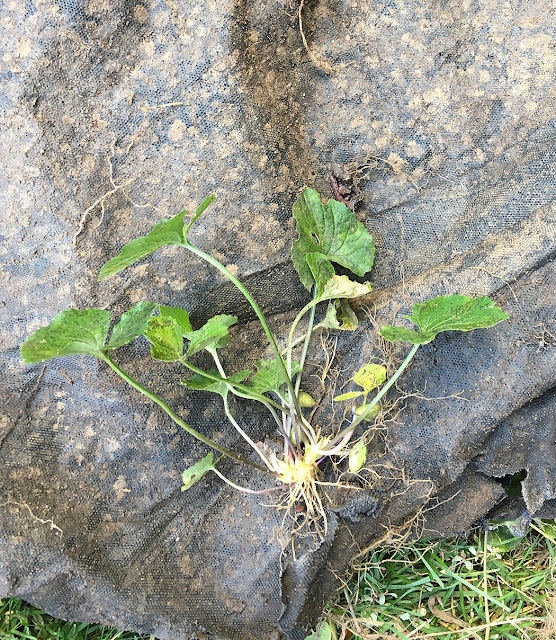
A wild violet was one of many weeds embedded in the landscape fabric when I pulled it out. The roots extended underneath and were also intertwined in the fabric itself. DON'T DO IT!

Then, when you finally decide you just want to get rid of the damn fabric, you can't pull it up because you've got gravel or stone on top of it.

For the new paths, I plan to take the same approach that I did when I built the path to the garage. I'll lay down a couple inches of compacted paver base (finally crushed stone), which is in itself an inhospitable place for anything to grow. Then I'll lay down a couple inches of gravel on top of it. Yes, soil will still get in there, but when weeds do show up, I'll be able to dig them out properly, or, even better, hit them with the weed torch with no fear of lighting a giant chunk of landscape fabric on which I may be standing on fire.

Friends don't let friends use landscape fabric. Be a good friend.

Once I removed most of the pea gravel, the metal edging was still in place, but you can see that the soil was backfilled right up to the top edge of it. This just meant more soil crept over the edge into the gravel. 
4. DON'T DISRESPECT YOUR EDGES
When I made the paths on this garden the first time, I installed metal edging, although this same mistake can be made with every other kind of edging. Back then, I backfilled soil right up to the top of the edging. Then, on the other side, I backfilled gravel damn near to the top. As you can imagine, there was plenty of soil that ended up in the gravel and vice versa. Keep materials below the top of edging to make sure they stay where they should.

With the gravel dug out, even though I backfilled too high on the metal edging, 13 or more years after I installed the metal edging, you can see that it was still doing it's job (there's still some on the right side of the path) before I pulled it out.
AND ONE DO

There are a lot of options for edging materials to divide a path from the grass or a garden, but I've been thrilled with how metal edging has worked out. Generally, I prefer steel over aluminum and a 4-inch tall edge over a less expensive 3-inch edge. It can make a perfectly straight path or a curved path with no breaks. Because it is so thin, dark colors such as black and brown blend in well. Unfinished steel edging will gradually rust which is a lovely affect as well.

Of course this comes at a price. It's not cheap and shipping can cost more than the edging itself. I was all set to order this edging until I found out it would cost about $150 (more than the cost of the edging) to get to my house. Fortunately it turns out that Lowe's has the same edging in a slightly shorter size so I can drive to store and get it.

Even though it's not cheap, at least when compared to plastic edging (no, no, no) or bender board, it's still on par with or less than any kind of stone treatment. And it's certainly easier and faster to install, all of which makes using metal edging a big DO for me.

Labels: , , ,

18 October 2016

DIGGING MACHINE

Progress continues on the renovation of the oval circle garden but I won't lie, I'm getting nervous about how slowly it's going. I spent a good part of last weekend working on it and have gotten it to the point where I'm waiting for materials before I can move on. My goal is to have all of the hardscaping finished before the snow flies so I'm feeling better about reaching that now.

When we last checked in on what was happening, we had spent a ton of time marking everything out. I'll just tell you again, my advice is to not make an oval anything. Circles are easy: Stick a stake in the center and run a measuring tape from there. But ovals, especially this one, which is not perfect, is much more difficult to get everything even. And since this is meant to be a very symmetrical design, that's an issue. My hope is that it will be close enough that no one will notice a few math errors here and there.

The paths had been 16 inches wide, which was way too narrow. I'm widening them all to 24 inches. Here's the inner circle with the path marked out. The perspective makes it look quite large, but for reference that inner circle is 5 feet in diameter.

Since we marked everything, I've been painstakingly forking over the whole thing. I had previously moved out all the plants except for a few in the center, and relocated a bunch of the chives for the hedge to a section. Once that was finished I attempted to get rid of every weed root I could. A few years ago I battled a particularly nasty weed called Campanula rapunculoides, aka creeping bellflower.  It was particularly bad in one section of the garden so I pulled out all the plants and brushed Roundup on every little leaf of it, repeated the process a week or so later, then waited several weeks before replanting. It worked quite well, but there are a few little spots where it still pops up. It was the first time I'd ever used a herbicide in any part of my garden, but desperate times call for desperate measures. 

The other weed—and I'm prepared to take some heat for using that term—that is problematic there is lily of the valley. It came with the garden and I sort of liked it. In fact I quite like lily of the valley in the right place and in small quantities. But the nature of lily of the valley is that where it is happy, there will be more. And it is happy in a lot of places. 

Lily of the valley and I are no longer on speaking terms. This is just a very small sample of all of the roots I dug up.

I pulled out lily of the valley roots by the wheelbarrow full. No lie. I knew it was rampant there, but I had no idea it was that bad. I'm certain I didn't get it all and the fight will continue.

As I grumbled about the stupid weed situation, I made two interesting observations. The first was the health of the soil in that garden. It is a lovely texture: not too sandy (a concern here), not full of clay (believe it or not, also a concern, from where soil had been brought in over the years, and full of worms (I take large quantities of worms in my garden as Mother Nature's atta-girl). I worked on the soil in that garden over the years, adding compost, mulching and, frankly, not doing much else, which in my opinion is better than a lot of disturbance. The other thing I noticed was that all that forking over was creating a lot of very fluffy soil. 

After two days of digging, the tools were strewn everywhere and huge piles of soil were mounded up. It's crazy to think that all that soil fit in there before!

With that rather laborious, not to mention boring, process finished, I started digging the new paths. As you might imagine, this displaced a significant amount of soil in the process as well. By the time I was finished it looked like a backhoe had been busy. I know a lot of soil will natural compress in time, but some of it has to go, so now the next step will be to do a bit of soil relocation. That's no problem here: there is always an area that needs a little soil. 

There is a small amount of digging left to do. The area around the inner circle, needs to be dug down a bit more. Unfortunately it is very compacted there from the path that had been there and I just didn't have it in me to tackle that. 

The next step will be to install metal edging along the paths, then replace the cobblestones along the inside edge of each segment. After that it's time for paver base and gravel. Like I said, the clock is ticking. 

Two parting notes: 
  1. Make sure to enter to win a fabulous collection of alliums from Longfield Gardens.
  2. When I needed a break from digging dirt, I found this picture on Pinterest:
So of course I went out and tried to French braid some grass. I'm not sure if what I did counts as a Pinterest fail, but let's just say the effect is somewhat different. In my defense, the picture is of a nice green Miscanthus and my Korean feather reed grass is getting pretty crispy. I will say, though, that the alternative was just cutting it off because it was flopping everywhere and irritating me, so at least now it's reined in a bit. 


SaveSave

Labels: , ,

13 October 2016

THE ALMIGHTY ALLIUM + A GIVEAWAY

I remember the first time I took notice of an allium. It was on Mackinac Island where a side garden at the Hotel Iroquois was planted with what must have been hundreds of Globemaster alliums, with 8-inch (or better) flowers standing proud. It was stunning.

When I think of punctuation in a garden my first thought is always to alliums. They serve as a literal exclamation point and manage to provide a certain amount of structure in even the most casual of gardens. In fact, that's where I tend to like them best because the juxtaposition of style and form is the most dramatic.

I wasn't the least bit surprised when I saw that the National Garden Bureau named 2016 the "Year of the Allium," essentially naming it their favorite bulb of the year. With so many varieties I can't think of a reason why you wouldn't have some. OK, some varieties (Allium spaerocephalon, aka Drumstick allium comes to mind) have a tendency to be somewhat prolific reseeders, but I've never found this to be a bad thing. I wish more varieties did that in my garden!

Purple Sensation allium has large, sort of fluffy flowers. Longfield Gardens photo

For as pretty as they are, if it weren't for one major benefit of alliums, I'd never grow them. As members of the onion family, they are critter (deer, squirrel, vole, you name it) resistant. I long ago gave up on tulips because no sooner would they bloom than a rabbit or deer would snag the flower (or worse, chew down the leaves to nibs before a flower even had a chance). When it comes to bulbs, I only grow those not targeted by wildlife and alliums certainly fit that bill.

Over the past several months several garden designers and bloggers have worked with Longfield Gardens to create custom collections of alliums. I've been enjoying following these, but was particularly taken with Nick McCullough's designs. Instead of thinking of bulbs after the rest of a perennial garden is established, he created a design that incorporates them from the get-go. I love this idea (and this is why he's a professional garden designer and I'm not), but I'm also thankful that alliums are so easy to incorporate into an existing garden design.

Mount Everest is a large white allium that's a nice change from the usual purple but also looks great intermixed with other varieties of alliums. Longfield Gardens photo
That's what I plan to do with most of the Daring Forms collection from Longfield. More than most years, I took note of holes in my plantings that needed a little something else. I'll plant the Gladiator alliums (one of the big daddy varieties) are going in the garden by the garage, because they are just what is needed to draw your eye there in the early summer when most of that garden is green. Purple Sensation alliums have a fluffier flower (to my eye, anyway) that I think will be better appreciated up close, so I'm going to plant those in the gardens that flank the patio. And the stunning Mount Everest alliums, a lovely, moderately tall white variety, is going to go in the newly redesigned oval circle garden.

Gladiator is one of the biggest alliums. Longfield Gardens photo
We've had a warm fall here so I've been holding off on planting the bulbs that Longfield Gardens sent for me to try. That's no problem, as alliums will do just fine waiting a bit so long as you store them in a cool, dark and dry spot. You can plant bulbs until the ground is frozen, so even though the oval circle garden is nowhere near ready for bulbs, I'll still have plenty of time to get the Mount Everest bulbs in for a great display next year.


The allium collections come packed with each variety in a different, clearly labeled bag. That's where they'll stay until I plant them as all alliums bulbs look pretty much alike. The bottom photo is me holding the bag of Mount Everest bulbs to give you an idea of their size. 

In addition to sending me one of the Daring Forms collection to try, Longfield Gardens is also giving one lucky reader of this blog their own Daring Forms collection. Use the widget below to enter. Longfield is also offering 20% of your first order using the code LFG20.

Longfield Gardens allium giveaway

Labels: , ,

HOW THE GARAGE DOORS CAME TO BE

Thanks so much for all of the nice comments and feedback on our gradual garage upgrade.

I didn't even to get into the other benefits of the new doors the other day. Until we got the new doors we only had one automatic opener, which Mr. Much More Patient graciously let me use. That meant that he had to manually open his door. That's not the end of the world, but in the middle of winter I can imagine it wasn't a lot of fun to park the car, get out and open the door. And he never closed the door in the morning when he left (I wouldn't have either, to be fair).

The finished garage, complete with new doors. 

I actually got him a garage door opener for his birthday one year. Well, I tried to. I did one of those certificates to which he said, "I don't need that," and it never happened.

A broken cable on one of the doors is actually what instigated pulling the trigger on new garage doors now. The garage door guy fixed the cable for no charge at the same time he gave us a quote on doors and new openers.

So it turns out that garage doors, particularly nice ones, are not inexpensive. It's one of those things that you have no idea what they cost until you need them. The first quote we got was for pretty basic doors, but I only wanted to replace the doors if we could afford carriage-style doors. The quote we got was for Clopay doors, which I quickly discovered is pretty much the major manufacturer of garage doors.

Upgrading to a carriage-style door, even one that wasn't as well insulated as the more basic doors we had originally been quoted, bumped the price for two doors up by almost $1,000 doors. Ouch. One thing I learned is that garage doors are definitely something to shop around a bit for. I used a local independent garage door installer and his price was significantly lower than the same doors installed from Home Depot and another larger company.

These are the three window options we chose from, drawn up on the visualizer tool on Clopay's website. We ended up going with the first option.

Once I knew we were going for the carriage style doors, I used the garage door builder tool on Clopay's website to play around with the options. This is something I often do myself with my crude Photoshop skills, so I was pretty happy to be able to easily do it. When I decided how many panels I wanted and what style (I liked vertical panels over an X-shape design), I could swap out various window styles. You might have caught this exercise on the Facebook page where I asked people to weigh in on what they liked best. There was no consensus so I took that to mean I couldn't go wrong regardless of what I chose.

We got doors from the Grand Harbor line. I liked the window options better in the next line up (the Coachman), but the price difference was huge. Since our garage is unheated, we had the luxury of being able to save a few bucks with uninsulated doors. The trim on the doors that give them the carriage door look are composite on top of steel.

All the pretty stuff is great, but the openers (Liftmaster) are fantastic too. I actually didn't realize that it was possible to open a garage door without it screeching and shuddering on the way up. And the remotes work from far enough away that we can open the doors from the house if we're so inclined.

There was one little hitch that I had a feeling would happen. Clopay's standard white color was a bit grayer than the white trim paint we had on the garage. The trim paint was a poor match to Ben Moore's Simply White and it was definitely on the yellow side. Fortunately Sherwin-Williams stores can match Clopay's paint colors, so I picked up a gallon and did one quick coat on the trim around the doors to make the color match better and now my overly fussy eye for whites is satisfied.

I can't tell you how fun it is to push that button every day!

Note: Just to be clear, we bought the doors ourselves and received no compensation from Clopay for this post. I just wanted to share our experience with you guys. 


SaveSave

Labels: , , ,

05 October 2016

A BEFORE AND AFTER 3 YEARS IN THE MAKING

I'm not one to draw projects out. When I get set on doing something I like to focus on it like a laser and pound it out until it's finished. I'd rather wait until I can do all of it exactly the way I want to than take it by bits and pieces or settle for something I don't really love because what I really, really want isn't in the budget at that time.

But for various reasons, that approach wouldn't have worked when it came to dealing with our garage. Never a very good looking building, we toyed with the idea of tearing it down completely for a time. But when it became clear that really wasn't in the budget, we set to improving it little by little over the past few years.

Last week we put what is hopefully the last major finishing touch on the garage that has helped take it from a pretty pathetic looking structure that you'd be hesitant to park your car in, to something that I think looks far more charming than it really is.

October 2013
 

It all started three years ago almost to the day when out of seemingly nowhere, I decided I was sick of looking at a wreck of a garage, especially after we did so much work to renovate the house.

April 2014

The following spring very little progress had been made, but I satisfied my urge to do well, anything, by painting the door Benjamin Moore Wythe Blue, a color I'd been dying to use somewhere.

Later that spring we had the garage reroofed (which I can find no photos of) and that helped the look of the whole thing tremendously. We also got the driveway paved, which wasn't really on my radar but was something that Mr. Much Patient had pushed for for a long time (and in retrospect it was a good call).

July 2014

A few months later we hired a painter to paint the garage. At first I wasn't sure I loved the color (Benjamin Moore Ozark Shadows with Simply White trim), but you great blog readers encouraged me to live with it a little and that's a good thing because now I quite like it. At this point I was feeling like it was looking much better but still a bit plain.

July 2014

Then we stuck a new light on it. A really small change but certainly another little improvement.

April 2015

It sat like that for several months until the following spring when we built a small pergola on it to match the pergola on our deck. Of course Mr. Much More Patient still doesn't understand what the point of it is (answer: to look pretty, obviously), but I love it.

July 2015

Later last summer I decided that the Wythe Blue was never really right and I repainted the door Benjamin Moore New York State of Mind. Ah ... that's much better.

July 2016

This spring I bought a new planter for near the garage and slid the boxwood between the doors.


And then last week we finally did what I've been waiting ages for: We replaced those ugly, dented garage doors. I'll write a full post about that process (we did not install them ourselves) soon. For now, I'm just basking in the beauty of a garage that somehow went from pretty horrible, to pretty darn good. Fixing it up over three years never would have been my choice, but it actually worked out OK, and by spreading the cost over several years it doesn't seem like nearly such a big hit.

It's funny, since it took so long to get to this point it doesn't feel like it really changed that much, but check out this before and after.


Yep, that looks just a little better. And having two garage doors that work isn't so bad either.

Labels: , , , , , ,

04 October 2016

A CHIVE CONVENTION

I didn't have much time to work in the yard last weekend, which is sad indeed. It has been raining here for days and days and there were other projects that took precedence (which you're about to hear about).

The few hours that I did have for garden time were dedicated to working on the oval circle garden update. Mr. Much More Patient and I spend almost two hours laying out the whole plan. Since it's meant to be symmetrical, being precise was important. But precision in an oval is difficult, especially when the original oval wasn't perfectly precise.

You can see the layout for one of the paths marked by yellow paint. It continues across the center of the garden. 

We spent hours with a tape measure, stake and landscape marking paint drawing lines and dots, to the point where we forget which dot was which. (Not to self, always have at least two colors of landscape paint for these projects).

We got it all laid out and later I came back to start moving things around. The first step was heeling in all the chives from the areas that will be changed. For the most part, the outer rim of chives can stay where it is, but those along the paths had to be moved. Since I knew where the new paths are going to be, I forked over a segment between them, doing my best to root out any weeds and then just heeled in chives from other areas. The soil in that segment of the garden, which was originally used for tomatoes, is so lovely to work in, it really wasn't difficult to do. Then I started popping out the cobblestones on the inner ring of each segment.

Chives moved and new paths marked. Good thing we also marked the grass or the lines would have been lost when I dug out the chives.

I'll be widening the paths from the existing 16 inches to a much more realistic 24 inches, so there's a fair amount of moving to be done.

As I took out some cobblestones I came across the dreaded landscape fabric. Yep, I put that nasty stuff down under the pea gravel paths and that was all well and good until weeds started growing in the paths a few years later. I'm wondering now if that fabric will make pulling up the pea gravel easier or more aggravating. I'll find out soon enough.

A funny little garden full of tufts of chives.

Still lots of cobblestones to move and then that nasty pea gravel to deal with. As usual this project is progressing a snail's pace, but there's nothing to be done but keep on plugging away.

Labels: , , ,

03 October 2016

MONDAY MUSINGS

I'm sure you're confused about what Monday Musings are. Well, they are Friday Finds when you were too busy on Friday to do Friday Finds but didn't want to wait a whole week to share some goodies. And god forbid I not use alliteration in a headline.

I decorated the house for fall.


Yep, that's it. I've never been much a theme decorator beyond Christmas. I hate storing decorations. Decor that can go in the compost pile suits me well.

Some affiliate links have been used below. Thanks for your support of this blog!

Margaret Roach has an excellent post/podcast on the proper way to plant trees. A lot of the thinking on this has changed in recent years and I find myself frequently in the position of defending the "new way" of planting trees and shrubs.

Few people are fortunate enough to have big windows in their basements, but even without them this space would be pretty darn fab.

I've been listening to Monty Don ("Gardeners' World" presenter and Britain's favorite gardener, or so they say) narrate his new book Nigel: My Family and Other Dogs. Monty is quite a talented writer and I thoroughly enjoyed hearing him narrate this book, which is rarely how I feel about author-narrated audio books. It is about the dogs he's shared his life with and quite a bit about his garden as well. In it, he works his way through the life and times of most of the dogs he's shared his life with, which means it also deals with their deaths and shed tears more than a few times while listening. If you're a dog lover you will too, but with such an enjoyable read/listen, it's worth it. I highly recommend it, especially if you're a gardener who happens to share their life with dogs.

I struggle with hair products but have settled more or less into a few things that work for me. But I was struggling to find something to use occasionally as a clarifying product. After reading a lot of good reviews I gave this "purifying scrub" a try. It's got a weird texture (like a body scrub), but it does lather up and my hair has never felt cleaner. My stylist has been encouraging me to stop washing my hair every day, and I try, but I don't love it. With this there was absolutely no need to wash my hair the next day. This stuff is crazy expensive but you don't need much and it is so worth it.

Our downstairs bathroom vanity. 

This is a pretty amazing round up of bathroom vanities. I hope to never need one again, but something like this sure would have come in handy when we were redoing our bathroom. In the end, Mr. Much More Patient helped build one custom because we had to keep it very shallow.


Labels: , ,