The Impatient Gardener

29 December 2016

BEST OF THE YEAR

I always enjoy looking back at the year and seeing what posts were the most popular on the blog. So without any further adeiu, here are the top 10.


10. I shared my favorite new plant of the summer.


•  •  •  •  •  •  •  • 

9. After a tough election season, apparently I wasn't the only one who took solace in beautiful gardens.

•  •  •  •  •  •  •  • 

8. The outcome of my free-stuff-only winter container challenge was popular.


•  •  •  •  •  •  •  • 

7. Great new shrubs for 2016


•  •  •  •  •  •  •  • 


•  •  •  •  •  •  •  • 

5. 10 spring jobs to get your garden in gear.


•  •  •  •  •  •  •  • 

4. Garden bloggers shared their favorite perennials.


•  •  •  •  •  •  •  • 

3. It was three years in the making, but the garage renovation turned out great.


•  •  •  •  •  •  •  • 

2.  Great new plants for 2016: Perennials edition


•  •  •  •  •  •  •  • 

1. The final reveal of the downstairs bathroom renovation that we did as part of the One Room Challenge (still pre-sink ... I need to update those photos!)


Thanks for reading all year! I appreciate you all.


Labels: , , , , , ,

13 October 2016

HOW THE GARAGE DOORS CAME TO BE

Thanks so much for all of the nice comments and feedback on our gradual garage upgrade.

I didn't even to get into the other benefits of the new doors the other day. Until we got the new doors we only had one automatic opener, which Mr. Much More Patient graciously let me use. That meant that he had to manually open his door. That's not the end of the world, but in the middle of winter I can imagine it wasn't a lot of fun to park the car, get out and open the door. And he never closed the door in the morning when he left (I wouldn't have either, to be fair).

The finished garage, complete with new doors. 

I actually got him a garage door opener for his birthday one year. Well, I tried to. I did one of those certificates to which he said, "I don't need that," and it never happened.

A broken cable on one of the doors is actually what instigated pulling the trigger on new garage doors now. The garage door guy fixed the cable for no charge at the same time he gave us a quote on doors and new openers.

So it turns out that garage doors, particularly nice ones, are not inexpensive. It's one of those things that you have no idea what they cost until you need them. The first quote we got was for pretty basic doors, but I only wanted to replace the doors if we could afford carriage-style doors. The quote we got was for Clopay doors, which I quickly discovered is pretty much the major manufacturer of garage doors.

Upgrading to a carriage-style door, even one that wasn't as well insulated as the more basic doors we had originally been quoted, bumped the price for two doors up by almost $1,000 doors. Ouch. One thing I learned is that garage doors are definitely something to shop around a bit for. I used a local independent garage door installer and his price was significantly lower than the same doors installed from Home Depot and another larger company.

These are the three window options we chose from, drawn up on the visualizer tool on Clopay's website. We ended up going with the first option.

Once I knew we were going for the carriage style doors, I used the garage door builder tool on Clopay's website to play around with the options. This is something I often do myself with my crude Photoshop skills, so I was pretty happy to be able to easily do it. When I decided how many panels I wanted and what style (I liked vertical panels over an X-shape design), I could swap out various window styles. You might have caught this exercise on the Facebook page where I asked people to weigh in on what they liked best. There was no consensus so I took that to mean I couldn't go wrong regardless of what I chose.

We got doors from the Grand Harbor line. I liked the window options better in the next line up (the Coachman), but the price difference was huge. Since our garage is unheated, we had the luxury of being able to save a few bucks with uninsulated doors. The trim on the doors that give them the carriage door look are composite on top of steel.

All the pretty stuff is great, but the openers (Liftmaster) are fantastic too. I actually didn't realize that it was possible to open a garage door without it screeching and shuddering on the way up. And the remotes work from far enough away that we can open the doors from the house if we're so inclined.

There was one little hitch that I had a feeling would happen. Clopay's standard white color was a bit grayer than the white trim paint we had on the garage. The trim paint was a poor match to Ben Moore's Simply White and it was definitely on the yellow side. Fortunately Sherwin-Williams stores can match Clopay's paint colors, so I picked up a gallon and did one quick coat on the trim around the doors to make the color match better and now my overly fussy eye for whites is satisfied.

I can't tell you how fun it is to push that button every day!

Note: Just to be clear, we bought the doors ourselves and received no compensation from Clopay for this post. I just wanted to share our experience with you guys. 


SaveSave

Labels: , , ,

05 October 2016

A BEFORE AND AFTER 3 YEARS IN THE MAKING

I'm not one to draw projects out. When I get set on doing something I like to focus on it like a laser and pound it out until it's finished. I'd rather wait until I can do all of it exactly the way I want to than take it by bits and pieces or settle for something I don't really love because what I really, really want isn't in the budget at that time.

But for various reasons, that approach wouldn't have worked when it came to dealing with our garage. Never a very good looking building, we toyed with the idea of tearing it down completely for a time. But when it became clear that really wasn't in the budget, we set to improving it little by little over the past few years.

Last week we put what is hopefully the last major finishing touch on the garage that has helped take it from a pretty pathetic looking structure that you'd be hesitant to park your car in, to something that I think looks far more charming than it really is.

October 2013
 

It all started three years ago almost to the day when out of seemingly nowhere, I decided I was sick of looking at a wreck of a garage, especially after we did so much work to renovate the house.

April 2014

The following spring very little progress had been made, but I satisfied my urge to do well, anything, by painting the door Benjamin Moore Wythe Blue, a color I'd been dying to use somewhere.

Later that spring we had the garage reroofed (which I can find no photos of) and that helped the look of the whole thing tremendously. We also got the driveway paved, which wasn't really on my radar but was something that Mr. Much Patient had pushed for for a long time (and in retrospect it was a good call).

July 2014

A few months later we hired a painter to paint the garage. At first I wasn't sure I loved the color (Benjamin Moore Ozark Shadows with Simply White trim), but you great blog readers encouraged me to live with it a little and that's a good thing because now I quite like it. At this point I was feeling like it was looking much better but still a bit plain.

July 2014

Then we stuck a new light on it. A really small change but certainly another little improvement.

April 2015

It sat like that for several months until the following spring when we built a small pergola on it to match the pergola on our deck. Of course Mr. Much More Patient still doesn't understand what the point of it is (answer: to look pretty, obviously), but I love it.

July 2015

Later last summer I decided that the Wythe Blue was never really right and I repainted the door Benjamin Moore New York State of Mind. Ah ... that's much better.

July 2016

This spring I bought a new planter for near the garage and slid the boxwood between the doors.


And then last week we finally did what I've been waiting ages for: We replaced those ugly, dented garage doors. I'll write a full post about that process (we did not install them ourselves) soon. For now, I'm just basking in the beauty of a garage that somehow went from pretty horrible, to pretty darn good. Fixing it up over three years never would have been my choice, but it actually worked out OK, and by spreading the cost over several years it doesn't seem like nearly such a big hit.

It's funny, since it took so long to get to this point it doesn't feel like it really changed that much, but check out this before and after.


Yep, that looks just a little better. And having two garage doors that work isn't so bad either.

Labels: , , , , , ,

11 August 2015

YET ANOTHER BLUE DOOR

So I painted another door. By now, this should come as absolutely no surprise to you. When I get an itch, I paint something and 99% of the time it's a door. What can I say? They are easy and you get a lot of bang for your buck.


BEFORE (Wythe Blue door)

AFTER (New York State of Mind door)
Just as I felt like the Wythe Blue was too washed out on the screen door (which I painted a much brighter color a few weeks ago), I never really felt like it was quite right for the garage either. So I went with blue (shocker), but a new blue. It's Benjamin Moore's New York State of Mind. You might be thinking that it looks very similar to the Down Pour Blue that's on the front door and you are probably right but I did something different anyway. The collection of blue paint grows!


So I absolutely love the color. It's not too bright and it's not too navy. It maybe has just a skosh of green in it in some lights, but all around it's pretty fab.

But I'm not quite sure it's fab on the garage. I think the dark color is leaving the whole thing feeling very unbalanced. Not to mention there's a very, "Hey, I'm the service door! Look over here!" vibe to it.

So I'm living with it for a little bit. Frankly, the fix is easy, although I want to make sure to let this paint cure before I go slapping more on. So what do you think? And if it's not quite right, what is?


Labels: , , ,

09 April 2015

HOW TO BUILD A GARAGE PERGOLA


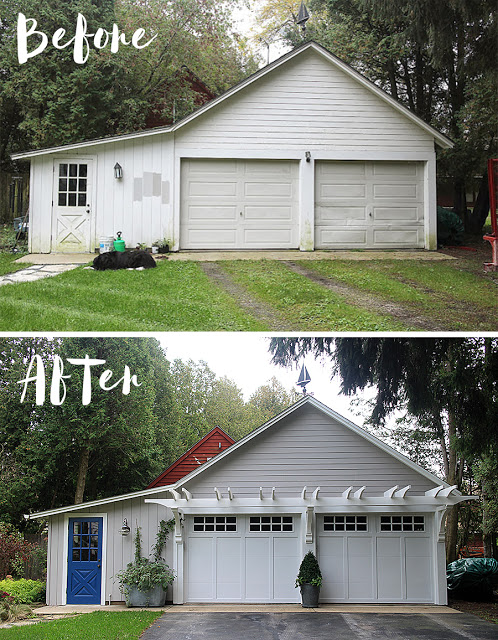
I've never been known to whip through projects quickly, but adding a pergola to our garage certainly took longer than most. Although I first mentioned adding a pergola (among other changes) on the blog way back in October 2013, we didn't start actually building it until last fall. 

We used this article from This Old House for reference, but for the most part we just sort of winged it. I drew up the design for it on graph paper using our existing pergola on the deck as a guide. I wanted the two pergolas to reference each other to help tie the garage into the house.


I bought the three brackets from Pro Wood Market and these were by far the biggest expense in this project. I choose a style similar to the brackets by the front door, again to try to keep some symmetry between the house and garage. You could certainly build your own brackets, but given that I wanted a little more detail it seemed like it would be much easier to just buy them.

After consulting with our neighbor, who is a contractor, we used large lag bolts and a little construction adhesive to attach the brackets. It was important that these be very strong because they bear the entire weight of the pergola. 


You can see the thickness of the beam here.

The next step was the main beam. Although the pergola on the deck has two long boards serving as what I'm calling the beam, because the beam on the garage needed to span 24 feet, we opted to create one thick beam. We thought it would be easier to laminate 2x8 boards together to create one long beam of double thickness. Before doing that, we cut the end profile on the end pieces, then we used two 12-foot long boards for the front and three 8-foot long boards for the back. We attached them all using construction adhesive and a lot of screws.

I designed the garage pergola to mimic the style of the pergola on the deck.

And that's where we ran into our major snag of the project. We didn't do a good job of lining up the "crowns" of the boards (all lumber has an inclination to curve one way or another. Generally, you want boards to curve in when you're laminating them), so it just wasn't coming together nicely. Before the construction adhesive dried, we pulled off the offending board, turned it around and reattached it. And that's when we realized that we had one of the curved end details pointing down as it should and the other end detail pointing up. So we had to fix it again. 

I also filled all of the screw holes and the seam where the boards met on the bottom with exterior wood filler. I used caulk on the top seam. Unfortunately, I obviously didn't use enough caulk on the top, because water permeated the seam, causing the wood filler on the bottom to fail and the stain to peel away.

I should also add here that all pieces were primed with alkyd primer (I use Benjamin Moore Fresh Start) and stained with solid Arborcoat stain, tinted to match Benjamin Moore Simply White. I know it sounds completely weird to prime before staining, but that's what you have to do (according to the can of stain and the contractor who did our house renovation). I'm not sure what makes solid stain all that different from paint, but I go with whatever works.

When attaching the beam, we measured a certain distance back from the end of the bracket, rather than out from the garage, which is not at all even.  We attached it with several long screws into the bracket.

Mr. Much More Patient was far better qualified than I to run the band saw.

We used the same end profile on the beam and the purlins (a term I had never heard before reading the This Old House article), and copied it directly from the house pergola. At first we tried cutting the profile with a jigsaw, but our jigsaw skills are not great. In the end, we borrowed a friend's business workshop which had a bandsaw and we were able to whip out all the cuts in a short period of time.
We made the purlins out of 2x8 lumber and kept all of them long on the garage end so that we could fit them individually on our less-than-square garage. Then we notched out an area for the beam, so the purlins would nestle on top of it. Everything was measured from the profile end so we could fit them to the garage later.

As far as design, I wanted to incorporate the double sets of purlins and I wanted the center set to straddle the midpoint of the beam. We made the space between each purlin in a set a little larger than the pergola on the house because we were covering a much larger area. 

We used scrap plywood fit between the studs on the inside of the garage as backing plates for the purlins.

Attaching the purlins was definitely a two-person job. First, we used scrap plywood fit between the studs on the inside of the garage where we would be attaching the purlins as a backing plate so there would be structure beyond just the siding holding them on. These backing plates were stapled in and we used a little construction adhesive as well. 

This is the view on the top of the beam. The pencil marks indicate where the purlin should go and right before we attached it, we dabbed on a little construction adhesive to hold down the notched bit.

We mapped out the location of each purlin on top of the beam, penciling in guides for each location.
On the outside, we used a level to measure the distance from the back side of the beam to the garage, thus giving us the measurement we needed to cut the purlin to from the back side of the notch. We then made sure the purlin was square to the garage and the beam and level, and traced the location of the end of the purlin on the garage. Then we drilled two holes from the outside of the garage where the butt of the purlin would go. 

While MMP screwed in the purlin from inside the garage, I held it in place and made sure it remained square to the beam.


I stood on the ladder outside and re-lined up the purlin with our guide marks, double checking for level and square, used just a dab of construction adhesive on the top of the beam to hold down the end of the purlin, then Mr. Much More Patient screwed from inside the garage through the backing plate and into the purlin. 

It was all pretty time consuming because we had to repeat the process for each of the 14 purlins, but what we ended up with was perfectly even ends.

I still need to put plugs in the brackets where the lag bolts are.


I still need to plug the holes on the brackets, fix up the failed wood filler on the beam and touch up the stain, but the structure is finished.

And look how far we've come in a year and a half.


Before our garage looked like it was suitable only for being torn down (and we thought about it). But a new roof, paint job and the pergola have breathed new life into it. Paving the driveway didn't hurt either. New garage doors would complete the look and hopefully that will happen soon but I have to price some out first. 

I would love to grow something up the pergola but it's far too shady there for anything to grow decently. One option for some additional may be to hang baskets from each bracket but I can easily see myself forgetting to water them. 

One of our new neighbors to the south is an accomplished architect and paid us the huge compliment of telling us that the pergola "did wonders" for our garage. I'm calling that a win.


Here's some of the other stuff we've done to spruce up the exterior over the past year or so:
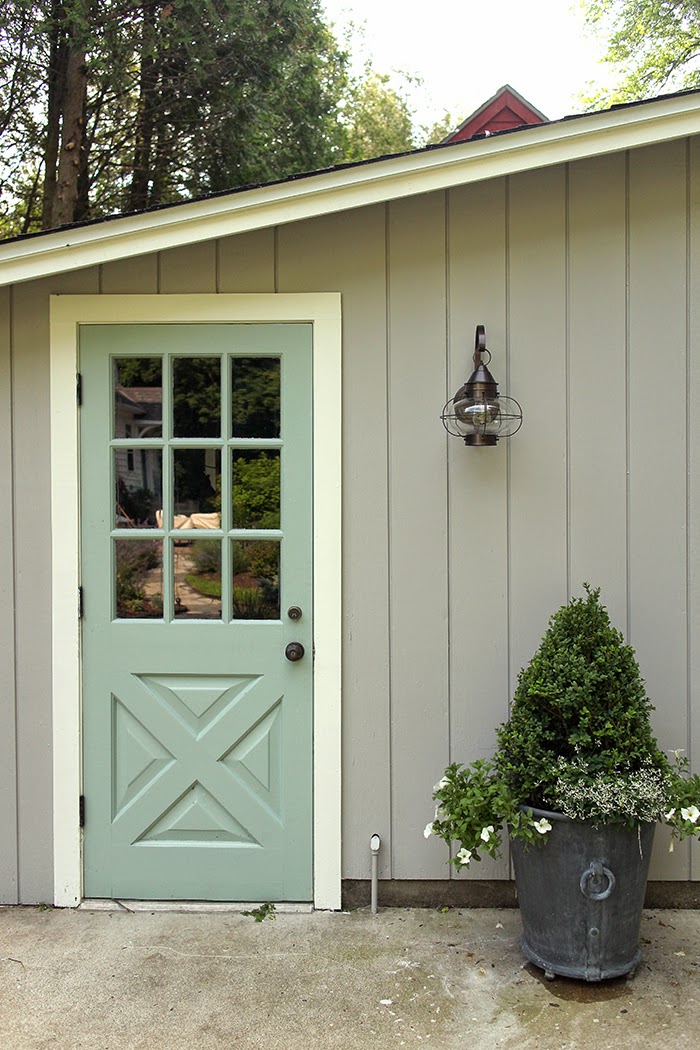
Painted the service door
Had the garage painted
Paved the driveway
Added the containerized boxwood
Redesigned the back yard garden


Labels: , ,

27 March 2015

A PREVIEW OF NEXT WEEK

It's Friday Finds time, but unfortunately it has been a busy week and I've not had much time to spend on the Interwebs. So rather than send you in the direction of some great things to read, I'm going to tease up a few posts I'm working on for next week because there are some goodies.

A glimpse at a private garden in Charleston.

I snuck away to Charleston a few weeks ago and I'm going to tell you all about it. It was a fantastic trip and I completely fell in love with the city, which I happily roamed around for an entire morning. There's a good chance I took more than 100 pictures of camellias, which I'd never seen in person before. I promise I will not run them all.

I must have beat the spring rush at the soil lab because the results of my soil tests are due back later today. I can't wait to see what they show and to share the results (and what they mean) with you.


Last weekend we officially finished construction on the garage pergola. I think it was a year and a half in the making. I'll give you the whole rundown on how we did it, what we did wrong and how we fixed it so you don't do the same thing and show you how it turned out. I will not give you an accounting of how many trips to the hardware store it required because I lost track around 20.

And who knows what else might pop up on the blog as we head into April. Have a great weekend. My weekend plans include giving the dogs baths (this is a rather time-consuming affair so it requires scheduling), potting on some more seedlings, starting a few more seeds and hopefully spending a little time on initial garden cleanup.

What's on your agenda for the weekend?


Labels: , , ,

19 December 2014

CHECKING IN ON THE SLOWEST PROJECT IN HISTORY

Behold! I bring you tidings of great news!

I got my Christmas tree decorated this week. No pictures to share yet (and frankly, I do the same thing every year on my Christmas tree so it doesn't look much different than in the past), but I will definitely share my pared-down holiday decor with you soon.

Despite the fact that I just got my tree decorated a week before Christmas, I'm actually feeling like I'm in a good place as far as the holidays go this year. I finished my shopping last week and almost everything is at least partially wrapped (I'm doing a little something special as far as wrapping goes this year, so it's a multi-step process). I'm making cookie dough on Friday and my mom and I will be crazy baker ladies on Saturday. We're not hosting anything at our house other than having my parents over for our traditional Christmas breakfast, so there's no menu planning to do. And I scaled way back on decorations. The only real issue I have right now is that there is no star on the top of my tree. When I went looking for it last night I realized it broke last year. The poor thing looks naked so I'll make a little attempt to find one.

Anyway, I wanted to bring you an update on the slowest moving project in history, mostly because the pace of this project is now downright comical. That's right, I have garage pergola news!

A couple weeks ago we got the main beam put up. Hurray!


That sucker is a beast. Although the design of this pergola mimics the pergola on the deck, we thought that it was too small do to the double beam, but since the top pieces (I do not know my pergola terminology) are going to be made from 2x8s, as well as the beam, we decided to make it a double width. That also solved our problem of how to make it long enough (it's 24 feet long).

To make it, we put two 12-foot boards on the front with a seam in the center, and three 8-foot boards on the back side, so that no seams matched up on the front and back. We used construction adhesive and screws to put it all together. I also used a liberal amount of exterior grade wood putty to fill all those screw holes, smooth out the joints and cover the bottom seam that you'll see if you're standing under it. For the top seam that won't be visible, I just used exterior painter's caulk.

Before we put the boards together we cut the detail on the end, then sistered the boards, then used a belt sander to smooth out the the end details so they were nice and even.


And although I didn't have the heart to take a photo, let's just say that if you decide to do a project like this, you're going to want to make sure that you have the ends facing the right way when you make your cuts. When we sistered them, we ended up with one end detail facing up and one facing down. Fortunately the construction adhesive did not dry nearly as quickly as advertised and we were able to pull it apart and remedy the situation.

The next step is to attach the top pieces and then there's a lot of hole filling that needs to be done and touch-up on the solid stain in spring. And with the way this project has been going, I'll probably need all winter to get the rest finished anyway.

Like I said, it's downright comical now.

There's still a Friday Finds coming later today so stay tuned.

Labels: , ,

06 November 2014

WHY SOME PROJECTS TAKE FOREVER

Did you all enjoy the weekend? As much as I am not a fan of the whole outdated concept of Daylight Savings Time, the Sunday in fall after we turn back the clocks has to be the single most productive day of the year. You work and work and work and you look at the clock and it's only 11 a.m. I love that.

Last weekend was meant to be dedicated to one of big projects at our house. I speak, of course of the garage pergola, a project that I've been swearing we're going to do for more than a year (I first wrote about it here).

And here's where it's at.


 After two days of working on it, we have two brackets up. That's it.

Allow me to fill you in on the details. But first, let me put this in context. Mr. Much More Patient is not in favor of this project. He thinks pergolas are dumb and serve no purpose (and this one really does serve no purpose other than to pretty up the garage). It is clear that if it were up to him, there would be no pergola.

Because that feeling was pretty clear from the beginning, the first thing I did last year when I cooked up this idea and got a hesitant "OK" from MMP, was buy the brackets from prowoodmarket.com.

Lesson No. 1 in how to get your partner to get on board with a project they are clearly not jazzed about: Buy the most expensive supplies first. Once you've committed the money to the project it becomes real and therefore must be finished.

Because he's not really a fan of this idea, MMP has been dragging his feet big time on this. A couple weekends ago it couldn't be done because we had to deal with all the fallen leaves. Other weekends there were mysterious "meetings" that couldn't be avoided. After he had used up ever possible excuse, he had to gather supplies.

And if you're trying to avoid a project, it can take a LONG time to gather supplies. In fact, MMP spent Saturday morning going to the dump (we don't have local garbage pickup by us) ... twice. Then he spent a lot of time with a pad of paper and a pencil making some notes. Then he ate lunch. And then, just as he was walking out of the door to go gather said supplies, we noticed that a tree on the northeast corner of our lot had fallen down and upon further inspection, realized that it had fallen on our neighbor's cherry picker that he uses for work. MMP went to gather supplies for (I swear) hours and when he came home he had to go to town on our stupid fallen tree and well, Saturday was kaput.


MMP had no excuses left on Sunday so we actually did get down to business. The problem was that we were a little unsure about measurements, mostly how high to mount this thing. Higher is better, but then it will overlap (not hit, but overlap visually) with the corner of the roof which we thought would look weird. Honestly, I still have concerns about the height, but there's no going back now.

A down jacket and shorts and flip flops? Mr. Much More Patient will do anything to avoid wearing pants and proper shoes, including freeze.

Anyway I won't bore you with more details, but basically it took us a few hours to mount the two outside brackets. We're waiting on the middle bracket until we finish making the main "beam" that will span across the width of the garage.

That is going to be made of a double width of 2x8s, with two 12-footers in front and a 12-footer and two 6-footers sistered onto the back. The whole thing will be about 24 feet long. The problem? We're not sure we're going to be able to get a 24-foot-long "beam" out of our basement because of the angle of the exit.

We also found out that the router that we have (my father-in-law's, I think) does not accommodate a long bit, meaning that we can't cut the detail on the end of the boards that make up the top part of the pergola until we figure that out (the curved bit would be very difficult to cut with a jigsaw).

Anyway, how's that for an update? But what are you going to do? Sometimes projects don't go as planned and a lot of time they take a lot longer than you planned. In this case this one has taken about a year longer than I had planned.


Labels: ,

16 July 2014

PUTTING A LITTLE LIGHT ON EXTERIOR LIGHT SHOPPING

One of the things I particularly enjoy shopping for (other than plants or anything garden related) is lighting. It can also be exhausting because of the mind-boggling amount of options, but in general I find the search for lighting to be pretty fun.

I was happy to have the chance to look for a new light for the garage. We could have kept the old one as there was nothing wrong with it, but it really didn't relate in any way to anything else going on with the house or the garage. My search started at Home Depot, where the selection in the store was tiny compared to what I saw on their website. I didn't care for any of the in-store options so my search went online.

I was looking for a sconce with a slightly rustic or nautical vibe, preferably in a copper or bronze color (to coordinate with the exterior lights on the house). We also did not want to move the location of the light, which to my eye, is a little odd. It seems a little too far from the door and a tad too low. The height was a problem because it meant that we couldn't have anything that hung down, which meant that my original thought of a barn light was off the table.

Here are some of the options we considered.


Link

This is actually the same light we have by the back door on the house.

Liked it a lot, but it doesn't come in other finishes.

Link

Cool but eek on the price!
This next bunch all falls in the onion light category and once you get there the options are all over the place in terms of size, finish and construction. There are bespoke onion lights (guaranteed for life) but I kept the options in the production realm to keep the cost down.

Round


Squishier

Not round or squishy
My favorite of the three onion lights was the last, sort of amusingly called the Vidalia. I thought it was a good compromise between too squishy and too round and I also liked the square mounting plate on it. It had the option of using seedy glass as well, and I love seedy glass on outdoor lights for some reason. Unfortunately it also was almost $400 while the squishy one (call the Cottage Onion) was only $140. For a light that will rarely be seen close up, it would be hard for me to justify spending so much more for relatively small differences and clearly they both have the same vibe.

So we went cheap (well cheaper; it's still more than I had planned on spending) and squishy. Once I started looking at the onion lights I really loved them and the other options became distant memories.


Have you added any new lighting lately? Do you enjoy shopping for lighting or do you find it to be an onerous task?

Bonus points: Can you spot the difference in the boxwood container in those two photos? Yep, different plants. I have fiber optic grass on one side and 'Diamond Frost' Euphorbia on the other side and I try to rotate the container every couple of days to make sure the boxwood grows evenly.

Labels: , ,