The Impatient Gardener: November 2013

27 November 2013

Put on your elastic pants, it's time for Thanksgiving

When I was a kid, Thanksgiving was a much more formal affair. We always went to my grandmother's house (just down the lane from our house), dressed up in uncomfortable clothes (oh how I hated tights), sat at a kids' table, which we all hated until my grandma wisened up and gave us our own bowl of mashed potatoes and hovered around my dad snitching bits of turkey as he carved the bird in the kitchen.

Those were big family gatherings that included extended relatives and they were very formal affairs.

These days, though, it's usually just my parents, us and my brother and his family, which means it's a lot like a Sunday family dinner. Because of that, it has gotten a bit more casual. Although my sense of nostalgia wants to relive those Thanksgivings of my childhood, the practical adult in me is very thankful for more casual gatherings that allow for dressy jeans and laughs instead of tears when some minor kitchen disaster occurs.

We go to my parents' house so my mom handles the lion's share of duties, including setting the table. But if I were setting the table, I'd want it to be special but reflect the casualness of what our holidays have become. No flower arrangement ordered a week in advance. Just pretty linens, a low centerpiece or series of small centerpieces (I hate when I can't see the people on the other side of the table), and lots of room for all the food.

I love the feel of this table, even if it's not particularly Thanksgiving-y. I don't know what the New York Times thing is but let's pretend that's a mini pumpkin or something, OK?

Source
And I like this one too, although even more pared down because you have to have a place to put the turkey platter!


I guess it's clear that I like a little cleaner look, but that's only because I think the food is so beautiful that it should be the real star!

My contribution is always dessert. Even though we have a small group and we could get by with just one pie, I'll be making a few options. The beauty of being the baker is that you don't have to make anything you don't like and I really do not like pumpkin pie. Anyone else is welcome to bring a pumpkin pie, but it won't be me.

This recipe appeared like magic on my desk so I'm taking that as a hint that someone would like me to make it for Thanksgiving and I'm willing to give it a try. I'm not going to make the slab version though, just a regular pie.

I'll also make a regular apple pie for the less adventurous eaters (and I make a pretty good apple pie). And if I'm feeling really ambitious, I'm going to make Ina Garten's gingerbread cupcakes because I love gingerbread and cream cheese frosting. I kind of hate raisins in things though, so I'm torn. Because the only thing you use the rum for is to soak the raisins and if you don't add the raisins, how are you going to get the rum in there? And I'm pretty sure you want the rum in there.

I hope you all have a wonderful holiday with your friends and families!

And one quick note: Libby won the Minted giveaway! Congratulations, Libby. Check your email!


Labels: , ,

25 November 2013

*This close* to all finished

This might look like a picture of some pretty double welt, but it's really a picture of what the almost end of a project looks like.


I'm this close to finishing up the chairs that have been in my house for about two years and I'm so excited to show you them. There's been a lot of hemming and hawing involved, a fair amount of just figuring stuff out and even a little bloodshed, which I'm sad to say has left it's mark on the finished project, although hopefully it's not too noticeable.

Tomorrow, I hope!

In the meantime, have you entered to win the $50 store credit to Minted? If not, make sure you do. Only two days left to enter.

Labels: ,

22 November 2013

A sweet treat, just not for me

Some gardeners are much better than I am about planting late-season crops. A friend on Facebook just posted a beautiful haul of beets the other day. I am just burned out by the end of the summer and I consider it a success if I can just stay on top of harvesting and general maintenance. Planting, and more importantly, nursing seedlings along in their early days is just not going to happen.

But I've been judiciously using my kale so that it would extend into late fall. Kale, like many of its cruciferous breathren, gets even better when the weather turns cool and it takes on a sweety, nutty flavor. In fact I've been planning a dinner in which my favorite kale salad is featured.

So imagine my surprise when I went out to the garden this morning and found my formerly lush kale bed looking like a stripped forest.


All that is left are the thick stalks, but every leafy bit has been nibbled off. The culprits are not difficult to finger. It is, of course, our healthy herd of neighborhood deer who apparently also know that kale peaks in cool weather.

I'm sure they enjoyed every sweet morsel of that kale. But I might have recommended a bit of parmesan and maybe a few toasted pine nuts to go with it.

Labels: , ,

20 November 2013

Giveaway: A bit of holiday help

Where do you stand on mailing things? Have you gone entirely digital or do you still fall back on mailing a good old fashioned note?

I'm a big fan of more traditional methods. If I get an invitation to something in the mail, I know they really want me there and that I wasn't just included because I was in their email contacts. I'm a huge believer in handwritten thank you notes. In fact I get a bit prickly about it when they don't come in a timely fashion, or at all. I have no problem with casual thank yous and invitations via email, but to me the sentiment means so much more in a handwritten note or card. And I love sending and receiving Christmas cards.

I don't begrudge people who don't sent holiday cards. I know that they are busy or money is a little tight and it's an easy thing to cut. But I certainly hope that the tradition of sending holiday cards endures well past my time on Earth.

Followers of this blog probably know that holiday cards are kind of a big deal in our house. Ever since Hudson was a puppy when we stuck a Santa hat on his head and turned it into a card, we've featured our dogs on our cards. In fact, I have actually met friends of friends who say, "Oh, you're the people with the dog cards."

Making photo holiday cards used to be a much more difficult task, but now you can design them online and preview your design with no problem. And Minted has some great designs.

I used to put a lot of work into putting the dogs in situations that could make a card all on their own, but the problem with that is that you end up being a little limited in what photos you can choose from. I like some of the card designs that get the message across with just a really nice picture, not something that is necessarily holiday related. I'm sort of loving the simplicity of this design but there are so many great ones. I usually mock up about three cards and then choose

Anyway, a good picture always helps and this year I got myself a remote and a tripod so I'm hoping it will be a little easier to take the photos with the dogs. I can't tell you the amount of crabbiness that has ensued in some other years when getting a good photo gets way too frustrating.

Here are some of the photos we've used on cards in the past. I get a little weepy even thinking about this year's card because the old boy is getting very old and I know one of these years will be his last card. :( Still, lots of good memories in these photos. My favorite will always be the series with the snowman where Hudson is eating the carrot in the last one and Rita is looking at him like he's in big trouble.


Here's the fun part. Minted is offering a $50 gift card to their shop (you can use it on holiday cards, invitations or any of the cool personalized stuff they have on the site) to one lucky reader. Oh and it should be mentioned: They will address your cards for you! Think about all the time that will save you. And that's time you can spend writing a note on the card, which I think is much nicer than a handwritten address.

To enter, just use the Rafflecopter widget below. For an additional entry, leave a comment telling me if you send out cards and if you save the cards you get from friends and family every year. I'll announce a winner next Wednesday before Thanksgiving.

a Rafflecopter giveaway


Labels: , , ,

14 November 2013

How to make a custom striped table runner

I found a great new list-keeping app for my iPhone a week or two ago. It's called Tick, and so far it's my favorite list-keeping app that I've tried, and believe me, I've tried many. You can customize the icon and color for each list. Right now I have the number 10 by the little icon of a house. That means I have 10 projects in my to-do list for stuff at home. And every one of those projects is a big, multistepped endeavor. That can get a bit overwhelming.

So it's nice when I can pump out a little project that is fun and makes me feel like I accomplished something without having to think about it too hard, and this one definitely falls under that category.


Now that we have the newly finished tabletop in the kitchen (and I'm loving it by the way), I wanted to bring a little bit of brightness to it in the form of a runner (I sort of love table runners) that I can leave on all the time.

I wanted something that would be casual and help tie in the white of the cabinets and trim with the gray (Edgecomb Gray) walls. Stripes to the rescue!

Now I should say that you can buy beautiful custom table runners on Etsy. But because they are made by artisans, they are priced as though they are made by artisans, appropriately so. Sometimes, though, that's not in the budget (or even called for, to be honest).

First of all, I think a table runner is probably very easy to make if you can sew in a straight line. I am severely challenged in the straight-line sewing department so I knew that trying to make my own would probably become yet one more "big" task that I dreaded doing. But I figured I could customize one that somebody else had made pretty easily.

I found the most basic white linen runner I could. Turns out it was way too long for my table, so I just hemmed it to the right size (no, the stitching is not super straight but who is really looking at the end of your runner?). I ironed it first, just to make sure to get all the creases out.

The runner started life as a perfectly fine but possibly a little boring plain white linen runner.

Then I just used painters tape of varying widths to tape off some stripes. I wanted a stripe in the center, so I folded the runner in half to find the center and went from there. After I had my first piece of tape down just to the right of the center, I just eyeballed it from there. I figured if any of my stripes were a little off I'd just say I was going for a more painterly look.

I did measure again to make sure my sets of stripes to the side were the same distance from the middle set of stripes, but from there it was more eyeballing.


Of course you have to make sure to press down the edges to avoid paint creepage.

From there, I just mixed up the color I wanted in Martha Stewart craft paint, which is also suitable for fabric. This is the same paint I used for the chairs in the living room and it has held up so well. For the runner, I watered down the paint quite a bit because I wanted to make sure to see the linen texture and I didn't want ridges where the paint hits the tape.


I used a cheap craft brush to brush on the paint after putting some newspaper under the runner in case any leaked through. Then I pulled the tape.


To set the paint, I used a hot iron on the reverse side and then for good measure, threw the runner into a hot dryer for a few minutes, which I've found helps the painted areas soften up a little.


I did get a little bit of seepage on a couple of the stripes where I didn't push the tape done enough, but it's pretty minor. I figure it makes it look handmade, right?
And that's it. The hemming took about four times as long as the taping and painting did and all told I bet this was a 45-minute project. There's nothing like a little immediate satisfaction.


Labels: , , , ,

13 November 2013

Don't look now but winter's coming

I was born and raised in Wisconsin, and other than a brief stint down under, I have lived in this state for my entire life. If you're not familiar Wisconsin, you probably associate the state with three things: cheese, the Green Bay Packers and cold weather. It's no coincidence that these are the first things that come to mind when you think of Wisconsin.

So how is it that every year winter sort of catches me by surprise? I have been dragging my feet a little bit on the garden clean up. All the containers are cleaned out and put away and I cut back almost all the perennials (unlike other years I decided to cut back almost everything in fall, even though it's said to be better for your plants to let them stand, to lighten my work load in spring). But I haven't been good about caging some of the trees and shrubs that I like to give a little more protection to (either from the deer or from the weather). For some reason I kept thinking, "Oh, I'll just wait for a warmer weekend day for that."

Seeing the snowflakes fly outside my office window on Monday was a good sign that my plan was flawed. But waking up Tuesday morning to snow still on the ground was proof.

Usually we get plenty of flurries that kind of make it look like you're in a snow globe but nothing really sticks until very late November or early December. For the first snowfall to stick to the ground was a bit disconcerting.

When I left for work Tuesday morning, it was 23 degrees outside and this is what it looked like in my yard.


The Limelight hydrangea flowers are all dry now, but I sort of like to let them stand over winter for a bit of interest.


The cardoon in the corner finally succumbed to the weather. This was my first year growing cardoons and I'll definitely plant them again. What a great architectural plant with beautiful gray-blue foliage.


If you're looking for some more information on how to put the garden to bed, lots of bloggers have written excellent posts about it. Heather at New House New Home offered her to-do list hereMargaret's monthly garden chores list is always great, but her November list is especially good and here are some of my very own tips for winterizing the garden.

Looks like I'm going to need some gloves to finish up the last of the work in the garden. And I'm not talking about gardening gloves.

Labels: , , ,

11 November 2013

New table, even newer color

Sometimes I think about my DIY journey and it sort of blows my mind. Six years ago I was scared to try to improve anything I didn't totally hate for fear of screwing it up. Now I have to restrain myself from NOT trying to improve things that are perfectly fine the way they are.

I think the first time I painted something brand new was when I took the can of spray paint to the speakers. By the way, they still work fine, they totally blend in with the wall and I don't regret doing that for one second.

Now I really have no problem painting something new if I can't find what I'm looking for. I've been wanting to get a new side table for between the chairs in front of the fireplace for ages. I had an overly contemporary el cheapo thing there for the last 10 years or so. What I really wanted to find was an old spindle table or maybe something with some faux bamboo that I could paint a fun color. I looked for a LONG time and found nothing that was the right size or in the realm of affordable. 

I orginally saw this side table on Joss & Main. And then I found it on Overstock for significantly less. Those daily sale sites are not always such a great deal, it turns out. 

Even at a really low price, I have to say I was not happy with the quality of this Safavieh table. It is really cheaply made. The top and the shelf on the bottom are made of luan and sort of feels like glorified cardboard. Still, it was cute and I was sick of looking (of course I found a table at Home Goods two weeks ago that would been equally good and was less expensive). 

It came in this perfectly fine gray color.


But you know it wasn't staying that color. I gave it a good dose of Benjamin Moore Cornwallis Red (which I also wrote about here), which is the most lovely orangey tomato red ever. I really have a thing for this color. 

I'm not going to give you a tutorial on how I painted it because you know the drill: Sand, clean, prime, two coats of paint, sand with 400-grit in between coats. Done.

And here it is in its new spot. With all the blue, white and gray in the living room, I think it's the perfect accent and it since its in the red family it works with the ikat dot chairs on the other side of the room too.

The Impatient Gardener, painted Safavieh table

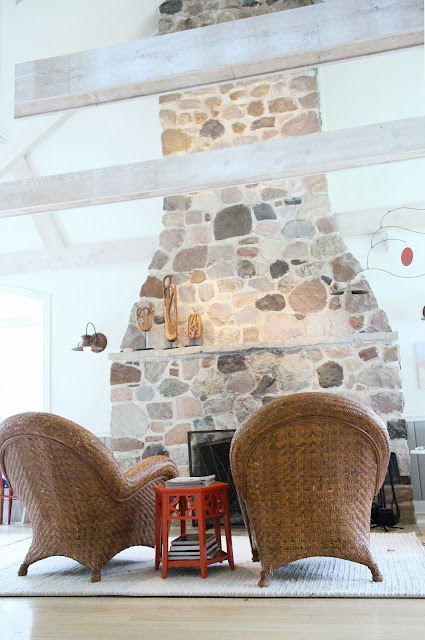
It's hard to get shot of our very long and skinny living room that give you an idea of what it looks like, but with the help of a tripod I was able to get one of this view, which is one I don't think I've shown you before. This is what you see when you walk out of the kitchen into the living room and it's what sold me on our house immediately. The lights you see on the mantle are from the track lights that hide on the backside of that beam. I'm still moving them around to figure out where to point them all. By the way, speaking of that painted speaker, there's one in this picture. Can you find it? Also, I am officially the worst mantel decorator ever. I'm actually thinking about making a temporary wood mantel sleeve to put over the stone mantel because I think it would be a lot easier to accessorize up there.

The Impatient Gardener -- living room fireplace


So have you ever painted or otherwise seriously altered something brand new? It's funny how once you just suck it up and do it once, it's not so hard the next time. Yet another slippery DIY slope.


Labels: , , , , ,

05 November 2013

How to create a weathered wood finish

I showed you the new kitchen tabletop on Friday and promised a tutorial on Monday, so it only makes sense that you're seeing this on Tuesday (punctuality is not my strong suit).


This weathered wood finish is not something I recommend for someone who isn't prepared to roll with the punches a bit. The fact is, you just don't know how it's going to work on your piece. I think you have to be prepared with a backup plan if things don't go the way you thought they would. I think that could reasonably include applying a stain or whitewash or just painting the thing if things go awry.

That was a chance I was willing to take, as the alternative either way was just repainting it.

So I did a little test patch of stripper to see what the table looked like under there. DO NOT DO THIS. Or if you do, make it the smallest possible area you can. I did mine the size of a placemat and if you look hard on the finished table, you can still see it.


Few things are as satisfying as stripped paint waiting to be scraped off.

Now that we've got all the warnings out of the way, here's what I did.

I disconnected the table top from the legs, just because it was easier to manage this project outside for the messy bits. I applied Citristrip brand stripper. This is really the only stripper I'll use as the other stuff is just way too fumy and scary to me. But you still have to be careful with this citrus stuff. I got some on my sleeve and then pushed my sleeves up. Later on I felt this horrible burning on my arm and it turns out I gave myself a pretty good chemical burn (it's still a big scab on my arm). So be careful (and there's yet another warning).

Also, it's probably not the best idea to try to use stripper in the sun, but it worked pretty well. I actually applied it twice: Once to get the paint off and a second time to remove the rest of the stain that remained on the original piece.


After stripping it, I cleaning everything off with mineral spirits. I don't really recommend that because I think it made the table too greasy. Just spend the dough to buy the stripper wash.

Then I sanded with 220-grit sandpaper. I had to be really careful with this step because my table is covered in a maple veneer that is very thin. Too much sanding and I'd go right through the veneer and then you've pretty much ruined the table, I think. This was a really light sanding, just to smooth things out a bit and get off the last vestiges of stain. In retrospect, I think I would have been better off sanding with a coarser grit because maple is already a very tightly grained wood, and such a smooth finish sort of closed off the pores of the wood a little more than I would have liked, making it harder to get the driftwood solution to soak in.

Then I mixed up a very diluted batch of Driftwood Weathered Wood Finish. The directions call for one cup of water to one packet. I think I did at least three cups of water. I was going for a lighter color and I figured I could always apply a second coat to make it darker if need be.

After sanding, before applying the Driftwood Weathered Wood Finish (in the bowl).

This stuff instantly turns the water black so don't be shocked when that happens. Then I used a cheap foam brush to apply it, but it was a little weird that it didn't really soak in. I blame that on two things: sanding down too much and using the mineral spirits to clean off the excess stripper. But I just let it sort of sit on the table out in the sun (which is supposed to accelerate the effect) for a bit, dried it off and brought it back in. The directions say it can take up to 24 hours for the color to stop changing so then I just sat tight.

Overall I was pretty happy with the results, but there were still a lot of very warm-toned areas that I wasn't thrilled with and the whole thing was looking a bit splotchy. I thought about applying another coat of the driftwood finish, but I was afraid that would only make the difference between the grayer areas and the warmer areas that much more noticeable.

After the weathered wood finish dried, the table was looking a little splotchy and a bit too warm-toned.

So I tried spot sanding a little. I was interested to see that the driftwood finish really soaked in, so when I sanded it wasn't like I was starting with fresh wood. That's something to keep in mind if you decide to do this: I'm not sure going to back to fresh wood would be easy. By sanding the warmer-toned areas (undoubtedly spots that I didn't sand well enough originally) I was able to get it a bit blonder and take some of the red out.

After a bit of sanding it looked like this:


For awhile I thought about doing a very dilute coat of a gray stain over the table, but some very wise followers on Facebook told me it was time to stop and just walk away. It was a good reminder.

So then I got crazy and I wire brushed the whole table. Yep, that sounds as weird as it was, but I was trying to open up the pores of the wood so I could do sort of a limed effect with wax. This is where the type of wood limited me. If I were dealing with oak that would have totally worked and looked great. But maple has a very tight grain and trying to bring it out to be more pronounced is really hard.

I followed that up with a coat of liming wax. I bought some as a package with the weathered wood finish powder and didn't care for it at all. I found a lot of people online who swore by Briwax Liming Wax so if I were going to try this again, I think I'd try that. But the liming wax that I bought was hard as a rock and as far as I could tell, did absolutely nothing to provide that "limed" look. I even had to soften it in the microwave and it was extremely hard to work with.

I'm becoming a real fan of waxed finishes. I've had them on some furniture that I've purchased and used it when I redid our coffee table and I've been very happy with the durability of it. I also really like the low luster that it give after a good buffing and I knew I wouldn't have to worry about it yellowing or being too shiny like a polyurethane. After what that Polycrylic did to the original painted finish on the kitchen table I'm extremely hesitant to ever go near it (or anything like it) again.

I followed it up with several coats of Annie Sloan's Paste Wax. I love this wax so much. It is the consistency of whipped margarine and is extremely easy to work with. I also sprung for a waxing brush (I bought this one) and while I'm sure I could have applied it with a rag as I have in the past, I really enjoyed working with the brush and feel like it really made for a nice finish. Even though I've waxed stuff in the past, I searched online for a good tutorial to make sure I was doing it right. This video tutorial is great and I followed it to the letter (other than what to wash the brush in; I bought a bar of real lye soap which is fantastic for washing out brushes, although I wouldn't have it in the house if I had kids).

Toward the end I was getting mighty sick of buffing, so I had Mr. Much More Patient bring a buffer home from work one day and give it a good once over with that. I actually feel like the table got too shiny after we did that, but I know that waxed finishes tend to dull with time so I'm not worried about it.

I also gave the base a fresh coat of white paint (Benjamin Moore Cloud White to match all the other whites in the kitchen). I admit to a bit of laziness on this part of the project. I just sanded them down and gave them a really good cleaning and put a coat of paint over them. Since Polycrylic is water based I figured that a water-based paint would be OK to put straight over the top so long as I prepared the surface. And I didn't do any distressing, although I'm sure some will naturally occur.


This isn't a great picture, but it's the best angle from which to see the freshly painted base.

Since this became a very long post, I thought I'd just quickly summarize the steps I would do if I were to do this same project again (and skipping all the stuff I did that didn't help):

1. Strip the tabletop.
2. Clean off the excess stripper with a stripper wash.
3. Lightly sand the table.
4. Apply a coat of Driftwood Weathered Wood Finish.
5. Apply a second coat after 24 hours if needed (I did not).
6. Wait for the table to dry thoroughly and sand the entire thing to make it smooth and less splotchy.
7. Apply several thin coats of Annie Sloan paste wax.
8. Buff between each coat and especially at the end.
9. Wait for the wax to dry a few days before putting the table into heavy use.

It can be hard to tell true color on photos, but I'll leave you with this one to get an idea of whether I ended up with a true "driftwood" finish. I picked up these two bits of driftwood on the beach the other day and set them on the table when I was cleaning out my pockets. I had a hard time finding them at first.


Just to clarify, no products were provided to me for this project and of course all opinions, good and bad, are my own.

Labels: , , , , ,

01 November 2013

A new old-looking tabletop

I'm not sure I've ever done a project in which I had no real expectations for the outcome. That's just not the way I roll. So going into refinished the kitchen table with no real idea of what it would look like at the end was not something I undertook lightly.

You may recall that we purchased our kitchen table from the Restoration Hardware outlet. It was a pretty good deal because it had pretty bad damage on the corner. Turns out that was fine with me because I knew it was too big for our space and that we'd be cutting that part off.here.
You can read all about how we customized the table for our space

Originally I painted the entire thing, and you can read more about that process here. I finished it with Polycrylic, which is a water-based coating. I chose that after testing several products on scrap piece of wood. It was the only finish coat I could find that didn't make the paint crackle or yellow. Or so I thought. Within days of applying it, it turned yellow. It bugged me then, but then it got even worse. It yellowed even worse with age. It had to go.

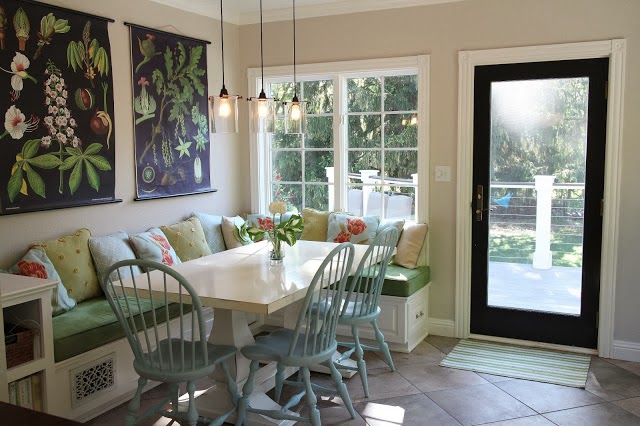
My original intention was to just paint it white again. And then a couple weeks ago I saw this table online (for the life of me I can't find the link now but I'll keep looking) and my interest was piqued. But the big question was, could I make my maple veneer table that was currently white look anything like that.
Banquette eating area, vintage school charts  -- The Impatient Gardener
The kitchen with the white table.
The only difference in terms of a starting point between trying to do a weathered finish and repainting the table was that I'd have to strip it first. So I did a little tester of stripper to see what was hiding underneath (for instance, did I leave a bunch of swirl marks from sanding it originally?). And when the stripper did its thing, it looked fantastic. This had potential.

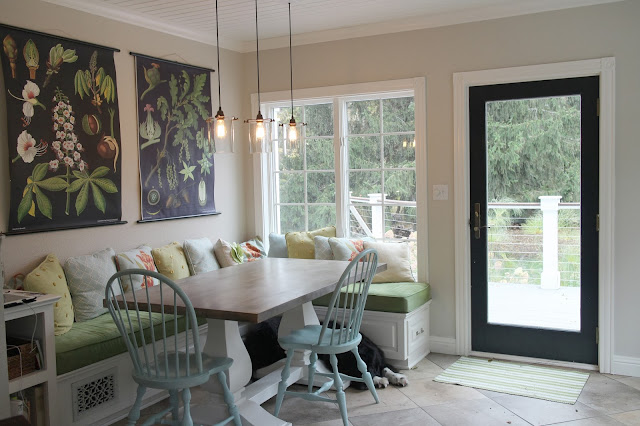
So here's where it ended up. What do you think?

Banquette eating area -- The Impatient Gardener
Refinished table.


While I liked the white table before, I'm loving this new look as well. More and more, I'm discovering that juxtaposition is my thing. I love a little bit of shiny and new mixed with vintage or weathered. It just works for me. So I like the fresh white table base with the weathered wood top, even if it doesn't really make sense.

Click here for a tutorial on how I did it.

You might notice the black furry thing under the table in those last pictures. That's Rita. There's a good chance she was stuck. Whatever the reason, it was clear to me she had no intention of moving.


Labels: , , , , ,