The Impatient Gardener: April 2012

30 April 2012

Happiness is ...

Remember those corny posters you would buy through the book club at school? (Am I aging myself here?) They were crappy mini posters that came folded so there was always a big crease on them and they featured inspirational sayings and cute pictures of kittens and puppies. I generally hung them next to my Michael Jackson Thriller posters. Don't judge.

Anyway, there were a whole series of them that said "Happiness is ...." followed by the aforementioned kitty/puppy and something like "... a huge from a friend."

Today I give you the gardener's version of that (complete with bad iPhone picture).

Happiness is ...
... having the nursery plant the six trees you bought over the weekend for you.

P.S. See that boat? The one owned by my neighbors that hasn't moved in the 10 years we've lived in this house? In a few years I hope to look that direction and see just that tree, not the boat that I'm sure will still be there. Poor boat.

25 April 2012

Ramp-ing up

We ran into our neighbors who live at the end of our road this weekend while we were out walking the dogs. They are lovely people but they don't live at this house year-round so we don't get to see them very often. As we were chatting (mostly about what a pain garlic mustard weed is), she mentioned that they have wild leeks growing everywhere and asked if I'd like a few.

Well you don't have to ask me twice. Wild leeks, also known as ramps, are supposed to be quite the delicacy. I've never tried them because they are only grown in the wild and we don't get a lot of those kinds of foods sold at our farmers' markets around here.

My neighbor showed me what they look like and where they were growing on their (very large) property.  She told me to take a couple of clumps for transplanting and some others for eating and mentioned that I should leave one of the pair of leaves per bulb. Most recipes I found called for eating the entire thing, including the bulb, but if you pull the bulb then you won't have anymore ramps, right?

Ramps, with their elongated leaf with the red streak up the middle, grow amongst the trilliums, mayapples and the trout lilies (spotted leaf) in our woods.

We were yard-work powerhouses this weekend, weeding, edging, trimming trees and doing a lot of other work that left me totally wrecked, but at one point I found myself in the sweet little spot of our woods where the mayapples and trilliums grow. I'm not sure what is so special about this little 15-foot square area, but neither of those lovely wildflowers leave the boundaries of that area to grow elsewhere. Given their affinity for that location, I guess it shouldn't have been a surprise to find ramps of my very own growing amongst the trilliums. And as soon as I saw them, I remembered seeing them in past years but not knowing what they were.

Thrilled as I was to find a very small clumps of ramps in our woods, I was still anxious to have a few more, not to mention cook a few and see what all the buzz is about. So last night after work, the whole family (Mr. Much More Patient, both dogs and I) walked the half-mile or so down the road to our neighbor's house to retrieve a few more ramps.


A clump of ramps grow in my neighbor's yard, top. I found this nice cluster of them in a corner of their yard as well and picked a few leaves to cook with.

I dug two clumps that my neighbor had pointed out I could have and picked several more leaves from other plants for eating. It was a joy to explore my neighbors' yard a bit as two years ago they invested a huge amount of money in created a wonderful mostly native landscape. I bet they planted more than 250 shrubs and probably 50 trees, in addition to rerouting their driveway to create the most charming approach to their house. I was great to see someone invest that kind of money into a landscape when so many other neighbors have ripped down houses only to built huge houses on the same spot.


My neighbor's driveway used to go straight to their house, seen in the distance in the top photo (you can see some lawn mower tracks on the grass that roughly follow the path of the old driveway). A couple years ago they rerouted it through the woods and around their detached garage to create a most charming entry to their property.


After collecting a handful of ramp leaves plus the two clumps, we headed back home. Fortunately we have a very helpful dog who happily carried the tub trug for awhile. Hudson is getting up there in years (he'll be 9 in September, which is pretty old for a giant breed dog) so I took the tub from him after awhile to give him a break, which he apparently didn't want because he took the shovel right out of Mr. MMP's hand and carried it all the way home. Love that dog.


My tub trug-carrier decided to swap out for the shovel for the half-mile walk home. Very helpful!

I separated the clumps into bulbs and planted them with the other ramps, mayapples and trilliums and tonight I'll be cooking up the leaves we grabbed. I can't wait to taste my first ramp!

If I love them, maybe I'll be adventurous enough to make this the year that I make fiddleheads. Our woods is teeming with Ostrich ferns and fiddleheads are another one of those wild-growing delicacies I've never tried.

I'll report back on the ramp experiment but I'll need a bit more courage to figure out the fiddleheads.

The end.

Labels: , , ,

18 April 2012

On my desk

Brightening up the corner of my desk at work today.


I'm so stingy about cutting flowers from my garden but I never regret it when I do. It's unbelievable to me how much this collection of daffs is making me happy today. 

Labels: ,

17 April 2012

A garage goes from grubby to great

I'm not an overly organized person, but I aspire to be. That aspiration is perpetuated by my affinity for organizing systems. I could never go to The Container Store because I'd  top my credit card limit in a matter of hours.

I've organized a few spaces that needed it pretty badly in this house, but the most successful efforts have always used some kind of system. Our walk-in closet is still in really great order more than a year after we moved into it after we created it in the renovation.

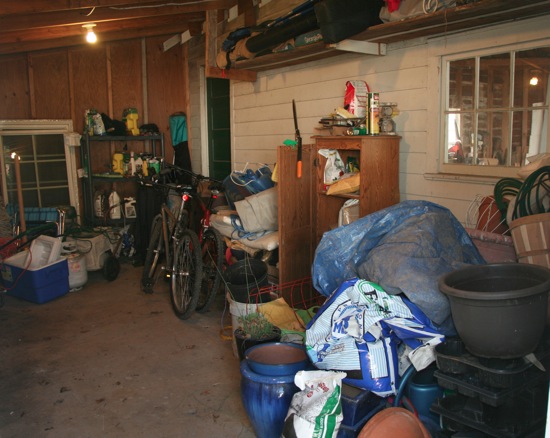
When it came time to clean up an area that has been untouched since we bought the house (save for adding to the clutter), I knew we really needed some sort of system. The little lean-to addition on our garage was jammed with stuff when we bought this house almost 10 years ago. Among the treasures I have dragged out of it was a really pretty console table that has been in our living room ever since, a hammock that we frequently use in the summer, 1,000 terra-cotta pots and a nice collection of garden tools. But the space was such a disaster we couldn't find much in it and every time I walked in there a rake would jump out and try to trip me.

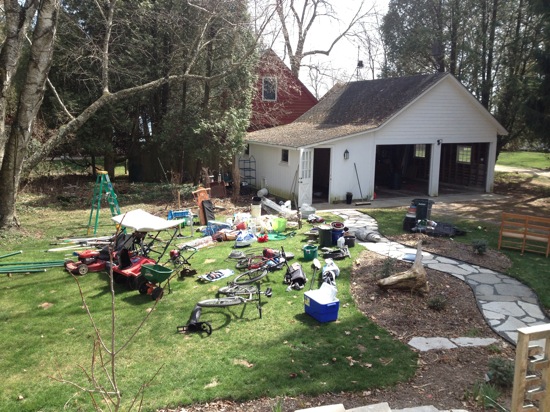
Two weekend ago we emptied the entire room and it was unbelievable how much stuff was jammed in there. Our neighbor even yelled over asking when the yard sale was because there was so much stuff spread out on the lawn.

Ugly before pictures:
Garage8

Garage9

Sadly, all this stuff was already out of there by the time I took this picture:
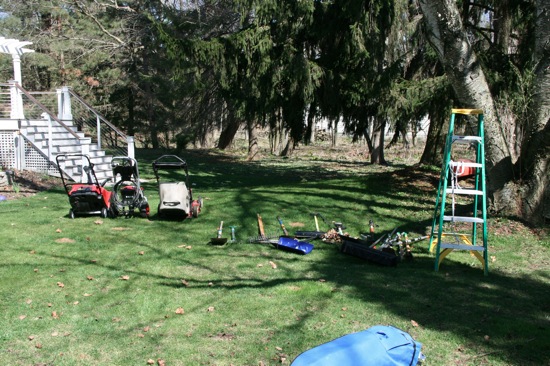
Garage7

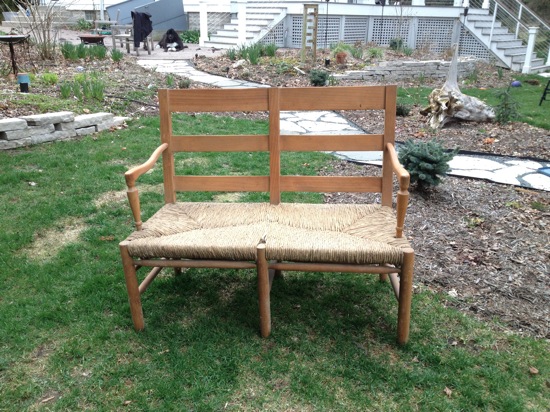
We were pretty relentless in deciding what went in the trailer to the dump and what got to go back in. If we hadn't used it in a year (and in lots of cases, ever), it had to go away. There was a cute rush-seat bench that I have been wanting to paint and bring in the house, but I decided it had to go to Goodwill because I have way too many to-be-painted projects sitting around. A couple cute folding side tables were donated as well. Almost all of the terra-cotta pots that came with the house went off to the dump. The good news about our dump is that on any given Saturday afternoon it's full of people just hanging out waiting to see what people are throwing away, so I knew that when I sent Mr. Much More Patient off with a trailer-full of castoffs that most of it would be snatched up before it got anywhere near the Dumpster. And I was right. Mr. MMP reported that there was a horde of people digging through the trailer as soon as he pulled in.
Garage1

This bench had to go to Goodwill even though I'd long planned to paint it and bring it in the house.

Garage2

This is what the yard looked like once we got everything out. This is AFTER we took a trailer full of stuff to the dump.

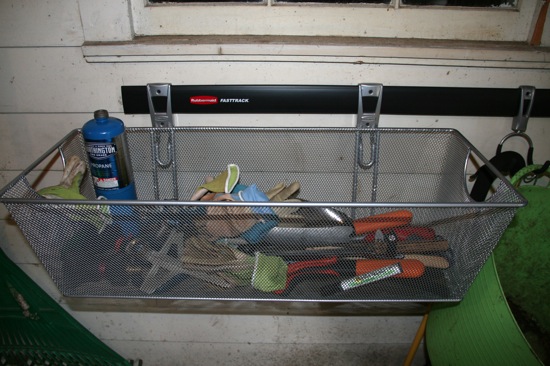
It was so nice to be able to sweep the entire room out. We've never been able to do that. Once we got everything taken out and pared down, we put up Rubbermaid Fasttrack system rails. There are some really cool garage storage systems out there, but they can get expensive quickly. We wanted some flexibility to move things around and we wanted a step up from pegboard or nails on the wall and the Fasttrack system, which has a variety of hooks, baskets and holders that fit on the rails.

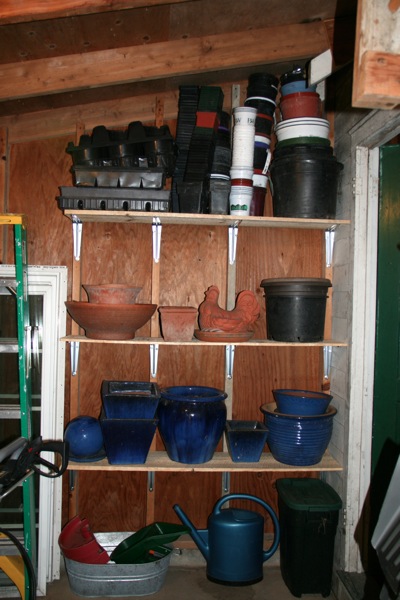
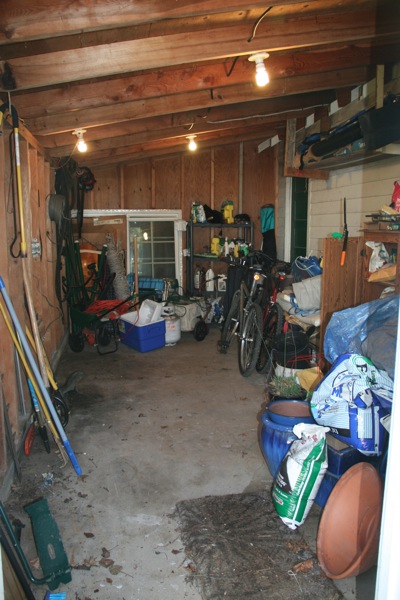
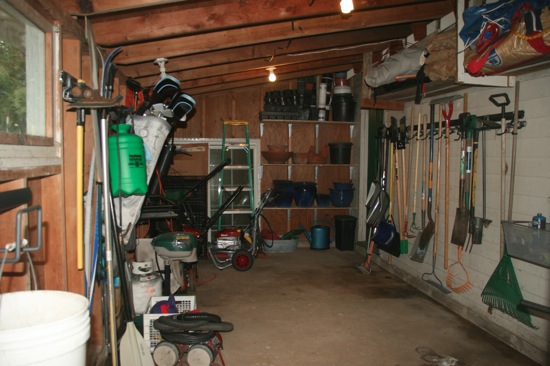
I can't tell you how geeked out I got about hanging up all our rakes, shovels, hoes, etc. on one wall. I couldn't wait to organize them all and once they were all hung up, I couldn't stop staring at them. The machinery (lawnmower, snowblower and mosquito eater) had to go back into the far corner, and I put the shelving unit that used to be on the back wall around the corner from the door. All of my small gardening tools including my pruners, hori hori, trowels, small sprinklers and huge collection of gardening gloves went into a cavernous basket on one of the rails. Golf clubs, skis, snowshoes and other sporting goods equipment went on the opposite wall. With my pot collection almost cut in half, Mr. MMP built three widely spaced shelves out of brackets and wood on our neighbor's burn pile (it's nice to have a contractor for a neighbor because he always has scrap wood around) for me to put them all on.

Ahhhhh, after:
Garage6

Garage4

Garage5

The difference is unbelievable. I don't even mind going in there anymore and I'm not afraid to reach out for something (before I was always afraid that some sort of creature would be lurking). And even better yet, I can actually walk through that part of the garage to get to the main part of the garage, so I don't have to open up a big garage door to take the garbage out.

I'm not sure how long it will stay so nicely organized but I sure am enjoying it in the meantime.

What's on your organizing list?

Labels: , ,

16 April 2012

Color me impressed

I got the most lovely e-mail message the other day. Brigitte wrote me to tell me that she was so inspired by the eating area in our kitchen, that she created her own. I thought that sounded pretty cool but when I looked at the photos, I was blown away. Brigitte did this all herself (with a little help from her husband).

Here's mine:


You might recall that I cut down a table from the Restoration Hardware outlet and painted it (read about that process here), then had a local woodworker make the banquette, which I topped with cushions made by a local upholsterer and throw pillows made by my mom.

But Brigitte did it all. I mean she built the banquette and the table! (Let's all take a moment to bow Wayne's World style to Brigitte the amazing builder woman!)


Brigitte used a couple of Ana White's plans to help her build the banquette and drawers (here and here). And here's what she said about making the table:

The table base is made of two hemlock newel posts and hemlock stair railing from Home Depot and four 10 1/2" maple corbels from Lowes. The apron is pine, and the table top is birch plywood trimmed in hemlock quarter round. The base components are assembled with lag screws. I followed the tutorial from This Old House "How to Make a Trestle Table". The paint is tinted to match the existing trim, but it's from Fine Paints of Europe. I used Cabots pre-stain conditioner for everything that was stained, Rustoleum oil based stain in American Walnut, and Cabots satin oil-based polyurethane. I also tried Daly's poly and wasn't impressed. Sanded it down and put Cabots. The banquette and bookshelf is primarily birch plywood with some hardwood, some pine, and some hemlock trim. The bench top is pine with the same stain process as the table top. The pine turned out nicer. I wish I had chosen 
Dark Walnut instead. It would match the seat tops on the chairs better.


I love my thick cushion on my banquette, but Brigitte has three little kids (yes, she did all this with three kids in tow!) and she wanted to make it an easy-to-clean area for the kids to eat. I think the stained wood top is stunning. 


Thank you so much for sharing this, Brigitte!

Labels: , ,

09 April 2012

Knots 101: The bowline (AKA the only knot you REALLY need to know)

Welcome to my first ever video post! This has been a long time in coming, mostly because I didn't realize how much time was involved in making and editing a video. I actually kind of gave up on the process, which will be totally obvious when you watch the video which is an exercise in awkward Midwestern accents, squinting, bad camera angles (I just had it sitting on the deck railing), awkward shots of feet and getting WAY too excited about knots. Oh well ... let's call it charming, shall we?

Here's why you need to know how to tie a bowline: Simply put, it is a knot that works when no other knot will, as well as being a knot that will work even if another knot might work better. In other words, if you learn how to tie only one knot, make it a bowline (pronouced bo-lin).

Here are just a few times when a bowline comes in handy:
• Tying something (a Christmas tree, perhaps) to the top of your car, when you need to strap it down tight.  Tie a bowline in one end of a line, and put the other end through the loop to give you more purchase to pull against.
• Strapping down something to a trailer or truck bed.
• Makeshift emergency dog collar.
• Towing something.
Moving a giant hosta.
• Moving a big rock (tie bowlines around it in each direction).
• Connecting almost anything to a line.
• Hanging a basket with a line so you can easily slip it in and out of the loop.
• Tying your trunk closed when you've got stuff sticking out of it.

People are often taught to tie a bowline using some weird story about a hole, a rabbit and a tree, and I refer to it in the video. It never helped me much, but it does for some people. Basically the initial loop you make is the hole (you'll hold this bit in your left hand). The bitter end (held in your right hand) is the rabbit, and the long end of the line is the tree. The rabbit comes up through the hole, around the tree and back down through the hole. Or just watch the video and hopefully it will make more sense.

After the video, I'll have a photo tutorial as well.

Knots 101: The Bowline from The Impatient Gardener on Vimeo.


OK, now it's your turn. Grab any kind of line you have (although a little bigger and a length of about 3 feet or so is probably easiest to handle when learning) and start practicing. You can adjust the side of the loop you create either while you're tying the knot (by starting the initial loop farther back or closer to the bitter end) or at the end by sort of feeding excess line through the knot.

So that's it! Remember, don't be the person who follows the adage: If you can't tie knots, tie lots. Learn how to tie a bowline and you'll never be left tying 15 overhand knots only to watch them fall apart or having to cut the line in the end because they won't open up.

Hit me up with any questions you have in the comments!

Labels: , , ,

05 April 2012

Does your soil pass the test?

Soil testing is one of those things you often hear you should be doing but few people do regularly. I can't tell you the number of times that our master gardener's class instructors harped on us to do soil tests. They aren't hard to do: take a sample from a few inches down, put it in a baggie, label it and mail it off to your local public university testing facility (they usually only charge about $10 and will send you a complete report with suggestions on what you should do to improve your soil).

Well, I didn't do that. With the early spring there are veggies (onions) and seeds that need to be planted very soon and I didn't want to wait for the results, so I bought a cheapie testing kit at the garden center. I doubt these are as accurate as a university analysis, but I was just looking for some general information about the health of my soil in the raised vegetable garden. It's one of those tests with a lot of little vials and some capsules that you combine with either a small bit of soil (in the case of the pH test) and distilled water or water from a settled soil and distilled water mix.


The results were interesting, although not entirely unexpected.

The first vial you see above, on the far left, was the pH in the main raised vegetable garden bed. As you can see when you compare it to the chart that came with the tests, it was fairly alkaline, probably around 7.6 or so if I had to guess (that's the disadvantage of these quickie tests, they aren't specific).

The second vial was the pH of the small raised bed I added last year outside the raised garden that I intend to grow onions in. That soil (almost all of which I added from bags last year and mixed with some homemade compost) is closer to neutral, maybe 7.2 or so.

The middle vial measures potash (or really, potassium) in the soil. I'm most perplexed by this one, because I don't really know what color that is supposed to be compared to that chart. I'm calling it medium (but it could also be very low ... hard to tell). Potassium is the "K" in the NPK numbers you see on fertilizer bags and it's necessary for plants to flower or fruit and aids with the overall health of a plant. I added some greensand, which also offers some trace minerals, to the garden to help increase this level. Greensand is a mined mineral that is rich in Glauconite.

The fourth vial is phosphorous (the P in NPK) which is important for root development and flowering. You can see that one is hovering in the low or very low territory, so I'll need to do a little something in that department as well. Phosphate and bone meal are good sources of phosphorous, as is organic matter, but you want to make sure not to overdue this one. Too much phosphorous can interfere with a plant's ability to absorb important minerals such as zinc and iron. I usually add compost to my beds in spring as soon as I can get at some, so I will probably start there before I add anything else.

And last vial, on the far right, is nitrogen, which you can see is severly lacking. This is not a surprise as soil test almost always show nitrogen is low. Nitrogen, of course, controls the growth rate and even foliage color (to a certain extent) for a plant. Manure, dried blood and urea are all good sources of nitrogen, but again you have to be careful. Too much nitrogen might give you very pretty leaves (although way too much won't) and lots of them, but it will hinder flowers and fruit and since I grow my tomatoes here, that would be no good at all! I probably won't take any steps to remedy this at this time, although I will do some light fertilizing to when the plants are growing that should help and I will plant a cover crop that will aid with the nitrogen in the soil in fall.

Do you do soil tests regularly?

Labels: ,

02 April 2012

No time for lounging this year

Another hairy deadline at work has passed (or will have, I pray, by the time you read this) which explains the lack of posts last week. It's funny how what is normally a pretty laid-back time of year around here is so hectic this year because of the early spring.

In the past I've actually gone a little stir crazy this time of year, chomping at the bit to get outside and get to work but being forced back inside by the weather (since it's not at all uncommon for the ground to be covered in snow). This year I actually scheduled a few activities to keep myself busy and ironically I now find myself behind schedule in my outside chores.

Two weekends ago I drove up north to visit a good friend and help her out with some work on a nursery. She was 8.5 months pregnant, had just moved into a new house that they intended to do major renovations on, were caring for their first litter of puppies from their yellow lab (the puppies were just under three weeks old and cuter than you can imagine) and working overtime to prepare for her maternity leave. I was exhausted just thinking about it. I got the baby's room painted, put a fresh coat of paint on a changing table and got the carpet ripped up (although not removed because they didn't have the new flooring yet). Crazy stuff. Side note: This was the first time I've painted with no VOC paint (I usually paint with low VOC paint) and while the particular paint we bought didn't perform as well as the Benjamin Moore Aura that is my preference, it was incredible to paint a room with no fumes.


Beware gratuitous puppy porn! We spent a fair amount of time with these cuties, who were temporarily relocated to a laundry basket while we relocated the whelping box into the living room.

Anyway, while I was off doing that, the garden was really leaping to life. Bed clean out continues but I'm amazed to see that almost all the perennials are peeking up, even the ones that are usually late to the party, such as Baptisia. I've also done a bit of pruning on the shrubs (but nothing as major as what one of the Limelight hydrangeas endured last year).

Here's what a few spots in the garden are looking like.

The climbing rose CanCan that I bought last year to grow up a trellis and help disguise the downspout going down the center of the front of the house is looking great and is leaving out. It is almost as leafed out as it was last year in mid-May when I showed a picture of it in this post.


The first daffodil is still blooming. Others aren't far behind.

One of the tree peonies must have liked its winter home caged in and covered with leaf mulch. I see that a nasty little garlic mustard weed plant did too. There is so much garlic mustard weed in the beds this year. That's not good. It's not hard to pull, but I need to do it soon before it even thinks about flowering and spreading it's seeds everywhere.

The hellebores always surprise me because I usually forget about them until I make a conscious effort to go check them out and this year I found them full of blooms. More and more I am appreciating these shy plants.

I can't believe how open the rhubarb is already. And oh-em-gee I'm so embarrassed right now because looking at this picture I see there is some petrified dog poop in the picture. I'm so sorry. I wonder how that got there since I know my dogs would never use my garden as a bathroom. Grrr.

Labels: , ,