The Impatient Gardener: October 2010

26 October 2010

Construction Update 8: Shades of gray

I've (and I say I've because I get no help whatsoever from Mr. Much-More-Patient on these matters) chosen almost all the paint colors for the remodeled areas of the house and even though I wasn't conscious of it at the time, it appears I'm really into gray at the moment.

Let's start with the most important choices: The living room ceiling and walls. Because our living room ceiling is crazy tall, painting it will never be a DIY project. And because I'm paying someone to do it, I want to make sure I like it the first time. There's no way to guarantee that, of course, but I'm going with what I know on this one.

Photobucket
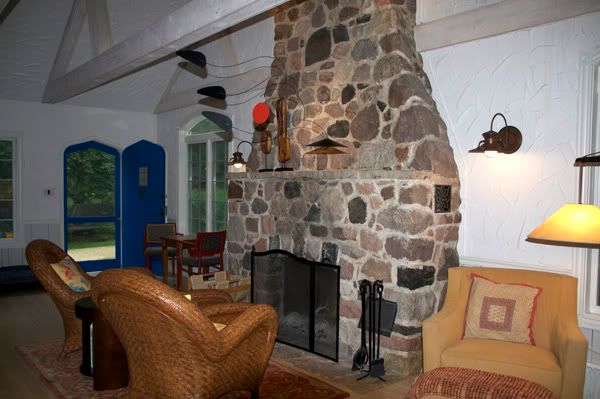
The living room was white white ... in fact there was no paint on the walls. Just drywall compound.

The old walls were the horrible swoopy plaster stuff, that was white. In fact it was so white because it had no paint on it. So take a bucket of drywall compound, smear it on your wall and let it dry. That was the color of the walls. I didn't want white white, but I definitely wanted something that I knew I wouldn't tire of. (By the way, all the color samples here look really strange and don't even look all that close to the actual color to me, but just go with it!)

Photobucket
Mascarpone


So the walls and ceiling in the living room will all be Benjamin Moore (all colors are BM, even if they won't necessarily be painted using BM paint) Mascarpone (AF-20). You may remember this color from my totally boring and seemingly neverending search for the perfect white. This the color that all the trim in the house (except for the bathrooms) will eventually be (when I get to it). It's a nice warm off-white that I don't find too creamy or too yellow. I was unsure about the trim and the walls being the same color but then I looked around the Internet a little and it seems that's quite the trend these days. That's not why I'm doing it, but hey, I'll go with it.

Photobucket
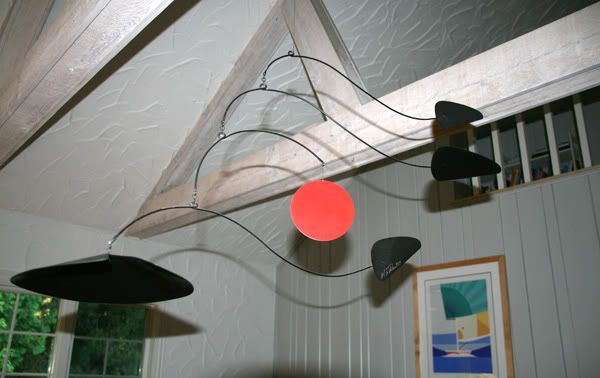
This really bizarre picture of the mobile that came with the house—we liked it so we just left it right where it was—shows the one wall in the living room that is fully paneled. The gray we're going with will be a little darker and a little warmer than what's there. Also, that horrible swoopy plaster stuff on the walls is gone! Oh happy day!
gray huskie
Gray Huskie


One full wall in the living room as well as the wainscotting on the other walls is random width paneling. This had been painted a light gray color that sometimes looked white in low-light situations. It didn't look quite right with the Mascarpone, so I'm taking it a few shades darker and a little warmer with Gray Husky (or Huskie, depending on which fan deck you're looking at). This paneling is also on the walls in the upstairs hallway that is open to the living room and up the staircase. I was (and am) worried it may be too dark, but I wanted enough contrast to notice it and that will certainly happen with Gray Husky. Incidentally, I've been toying with the idea of refinishing the beams, but it's not something I ever even considered until a week ago or so. I figured it would be safer to live with it for awhile before deciding if they should be refinished. Part of me wants to wait because I don't know whether to go with a weathered cedar look or just white. So, if anything, that's a project for the future.

One other thing about the colors for the living room: I have completely tired of the sort of modern French country colors that are currently in the room. I yearn for a crisp navy, tan and off white palette in the worst possible way. Because of this renovation, however, that's not in the cards at the moment (although it wouldn't be horribly expensive, but it would require a new couch and two new rugs. I'd recover the chair and ottoman and the coverings on the other other chairs in the room would be DIY projects. Anyway, I chose the colors for the living room with this in mind so that down the road, when we can change things around, we'll be able to without having to paint yet again.


Photobucket
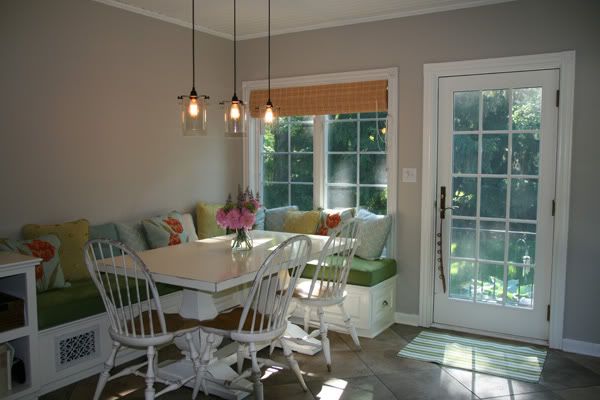
Revere Pewter in the kitchen.


revere pewter
Revere Pewter


In our bedroom I'm going to go with Revere Pewter. This is the same color I used in the kitchen and I really love it. It changes throughout the day from gray to beige but it always feels warm and like a good neutral vs. a lazy neutral (that is, one of those "safe" colors).

Both bedrooms will have wood plank (all the contractors call is car siding, which is a term I've never heard before) ceilings painted Mascarpone.


Photobucket
Stonington Gray


The other bedroom, which is going to be yellow, black, gray and white, is going to have its walls painted Stonington Gray.


Pale smoke
Pale Smoke

quiet moemtns
Quiet Moments


The bathroom paint color is still up in the air but I'm looking for a grayed blue or green. I want a color that looks gray when you look at it by itself but skews blue when looked at with the Caribbean blue accent tile that will in there. I'll be doing tile halfway up the walls so this is only for the top of the walls and the ceiling, which I think I'm going to paint in a 50% dilution of the wall color.

As you can see, it's all a little gray, but I think there's enough variation that it will still be interesting. And, as I always remind myself, other than the living room ceiling, it can all be repainted when I leave my "gray" phase.

In case you want to check out the previous construction updates here they are:


Construction Update 1
Construction Update 2
Construction Update 3
Construction Update 4
Construction Update 5
Construction Update 6

Construction Update 7
Construction Update 7.5

Labels: ,

25 October 2010

Plants of the year: Honorable (and dishonorable) mentions

Last week I wrote about my favorite new plants of the summer. Here are a few that earned honorable mentions a couple that were just plain disappointments.


Photobucket
Raspberry Blast with Gold Dust and Snow Princess on the front steps.

Narrowly missing the "best of" list was Petunia Raspberry Blast. I never really liked this petunia much in the past. It just came across as a bit gaudy to me. And then last year I saw it used in one of the street containers downtown in the town where I work. As I drove through town all of the containers looked nice, but only the container with Raspberry Blast consistently caught my eye.

I grew it this year on the front steps and I do think it was the right pop of color for that area. It also required very little maintenance other than the usual and a haircut about mid-summer.

As Tim Gunn would say, it's "a lot of look" but in the right place, I think Raspberry Blast is pretty great.


Photobucket
Photobucket
Superbells White looked good when I first planted the window box (top) and it looked good weeks later too (bottom).

Another honorable mention goes to a pretty ordinary flower: Superbells White. It has a light yellow center that brightens it up. It was in the center of my window box and it just kept on blooming all summer. More and more I'm liking calibrachoas much more than petunias.


Now's the time we get to a couple of disappointments. These were two of the most hyped Proven Winners winners plants of the year, so perhaps what we're dealing with is too much build-up. Like prom, sometimes the real deal just can't live up to the expectation. Really, these plants were promoted so much you would think that they would deadhead the rest of the plants, and water and fertilize the garden for you. And fight off weeds.

Photobucket
Snow Princess looked pretty sometimes, but she was a real diva and if you ignored her for a day, she pouted and generally threw a plant hissy fit.
The first disappointment was Lobularia Snow Princess. Yes, it's a million times better than the Lobularias of the past, so in that aspect, it was a winner. But go one day without water, and Snow Princess looking like Frosty the Snowman after he gets locked in the greenhouse. I know most containers really do like to be watered every day in the middle of summer, but most of them can go a day or two without looking positively pathetic. Snow Princess is, like her name, just a little too high maintenance for me.


Photobucket
This was taken the day I planted this container and this about the best Pretty Much Picasso looked all summer.

And the biggest disappointment of the summer: the highly touted Supertunia Pretty Much Picasso. I think this flower looks great in the promo material, when you're looking at just the flower on a white background. Unfortunately, that's not how we see our plants. We see them with stems and leaves and not always perfectly lit.

The beauty of Pretty Much Picasso is in it's green rim on the flowers, but as it turns out, it's almost impossible to see that green rim (which is more of a Kelly green than a chartreuse) when it's actually planted, unless you are on top of it. I also didn't find it to flourish well. It just never filled out very nicely. Of course, that could be entirely gardener error, but if I made that mistake with PMP, then I'm sure I've made it with other flowers that have handled it anyway.

And the last problem with PMP, is that it just doesn't go with much. Because the beauty is in the edges, you want to highlight those and not bring in a ton of other colors to fight with it in the same containers. I saw nurseries that mixed it with peach colors in containers (not my favorite), and a lot of Snow Princess and PMP in hanging baskets (disappointment in a basket?), and none of them looked particularly stunning to my eye.

So I'm sorry to say, PMP, I don't think you're going to make the cut next year. That's OK, there's a newbie on the way next year ... and I think he'll fill your shoes, and then some, just fine.

Photobucket

Labels: , ,

18 October 2010

My favorite new plants of the summer

I tried several new-to-me plants this summer and found several real winners in the bunch. These are the plants I'll find a way to incorporate into the garden next year.

Photobucket

5. Royale Chambray Superbena - I don't have a photo of this from my own garden because I used it in the window box and it got a little crowded out by some of the more aggressive growers this year. I think the best way to use it may be all by itself or just with a foliage accent. What I loved about this was the bi-color flowers, sort of a deeper purplish-blue and a true chambray blue on the inside. It might have been the prettiest blues I've seen in a flower other than a hydrangea.


Photobucket
 
4. Baby Tut Umbrella Grass - I'm giving this plant high marks on potential. I don't think I used it very well in my container (mixed with Snow Princess). It sort of took over and just looked cramped in there. But it provided amazing texture and sort of took on a roundish shape that I wasn't expecting. I think it would be amazing in the right (large) container or in the landscape. Because it has such a strong form, it would be great used in multiple containers in a row. I'll try this one again next year, but I'll do something different with it.


Photobucket

3. Gold Dust Mercardonia - This is not a plant I expected to like. I'm just not big on yellow flowers. But Gold Dust has the cutest petite flowers that are just so charming. I stuck it in a pot with Raspberry Blast petunia in an effort to create the gaudiest container I could. I wanted something super bright for the steps by the front door to help break up the great white expanse of the house and I ended up loving this combination. I think this little charmer would be an excellent ground cover and would be awesome in the garden interspersed with perennials.


Photobucket

2. Kent Beauty Oregano - This isn't a new plant, nor the first time I've grown it, but I fell in love with it all over again this year. It has the most wonderful pendulous habit and the prettiest delicate pink flowers. This is another plant that I don't think I've found exactly the best use for yet, but I'm definitely going to keep trying. (Photo by Pantry House Herbs as my photos of this all stunk).


And my No. 1, most favorite new plant of the year is (drumroll, please) ....

Photobucket


This plant never ceased to amaze me this year. I had a little bit of a hard time finding it, but when I did, I paid $14 for a quart-sized pot. Thank goodness I had the forethought to plant it in a two-gallon container before sinking the whole thing into my big pot, because I have no doubt it would have taken over the world. I also thought it would be a total water hog, and it wasn't. In fact it did quite well even this fall when we moved out of the house and the containers went largely neglected.

Here it is when I planted it:
Photobucket

And here it is last week, after not being watered for at least two weeks, probably more like three:
Photobucket

If I cut off the yellow bits, it still looks damn good.

I even used it in a flower arrangement and loved it. It is easily six feet tall, if not more, and rarely did a stem fall over. It was the perfect "wow" plant for near the front door too. Literally everyone who came to our house this summer asked me about it. Including one of the carpenters working on the house.

I did inquire with Proven Winners as to whether I could overwinter it, and was told it would be tough, even with grow lights, so I'm not going to bother trying. If it has one negative, it's that it's cost prohibitive to plant in as many places as I'd like to.

No doubt about it, King Tut will have a place in my garden for many, many years.

So those were my favorites. Tomorrow I'll talk a little bit about a few honorable mentions and a few disappointments.

So what were your favorite plants this year?

Labels: ,

06 October 2010

Construction update No. 7.5: Flooring decisions

We hadn't planned on replacing the floors in the bedrooms. The construction guys tried to save it, but when they started pulling it up, it just broke into pieces. It was douglas fir, wood that the floor guys said was garbage wood when we had the floors refinished four or five years ago, but we told them to just do their best. We ended up loving the way they turned out, and I'll miss those floors.

We decided to go with a pre-finished floor (either engineered or solid wood) for the bedrooms because, frankly, we didn't want to go through the hassle of on-site finishing of a floor. Having been through it twice (the first time we had a bad batch of finish so the floor guys had to come back six months later to redo it), if I never have another floor done in my life, I'll be thrilled.

I went to two local floor places and grabbed a bunch of samples. The first floor I saw was one I fell in love with immediately. Brazilian teak. It's gorgeous. It was also expensive. I didn't take it home.

When I got home I did a little research on some of the floors I had brought home. Here's what I learned:

1. You can't really judge a floor on it's brand. Every type of wood is different, so one brand might have a great oak floor, but a lousy cherry.
2. Engineered floors (most of them, anyway) CAN be refinished, but not several times over the years. Fortunately most pre-finished floors come with warranties up to 25 years for residential applications, so with luck you'll be sick of it before you need to refinish it more than once.
3. It pays to shop around. Prices on the Internet were much less expensive than the local stores. Of course I like to patronize local businesses whenever possible, and I don't even mind paying a little more to do that, but we're talking more than $2 a square foot difference in some cases.

Photobucket
We didn't like these five samples for various reasons: too dark, too red and too "fake" looking (even though it was solid wood). You can see I gave them the full test by walking over them.


When I found out how much less expensive some floors were online, I looked up that beautiful Brazilian teak and found it at a price that put it in the running with some other options. But that didn't go far. Even though it's not really teak (like Chilean sea bass, which is really the Patagonian toothfish, Brazilian teak has been given a pretty name to make it sound like something it's not, it's actually Cumaru), it's still a slow growing hardwood. And because there was no mention of sustainable growing practices on this particular product, I'm assuming that's because there aren't any associated with it (most products proclaim environmentally friendly practices in a prominent place). And as much as I loved that floor, I think it's just bad karma to be sleeping in a room filled with wood that used to fill beautiful rain forests in South America.

In the interest of full disclosure, I should mention that we do hope to have a small amount of real teak in our house by the end of the renovation, which is really a homage to our nautical leanings. It will, however, come from responsibly managed teak forests, which doesn't exactly make it a green choice, but it's a heck of a lot better than random clear cutting.

We quickly discounted the darkest floors I had brought home. They were just too dark for the room, even though I loved them in the showroom (a perfect example of why it's so important to look at the samples in the space, even if the space is currently just dust and studs). Two others we didn't like because they were too red or a little fake looking, in our opinion.

Which left us with three options. It was pretty close between two of them.

Then, while I was downstairs, I heard a loud chirp and came upstairs to find a 10-inch redheaded woodpecker (I think it's actually correctly called a red-bellied woodpecker, but my bird book is buried somewhere in the bowels of the basement and the red is on their heads anyway) pecking at our newly installed windows. As quickly as we could, we cranked open the windows (no small feat since the hardware isn't on them yet and all we had was a small temporary handle) and sort of shooed him out, all while hoping he didn't decide to peck our eyes out.

Photobucket
The shortlisted options. The first one is strand bamboo. The second is a wide-plank walnut, which was really pretty but pricey and made of a thinner veneer than the other engineered floors we were considering. The third was a wider plank engineered floor that we liked a lot but I noticed it was scratched  just from carrying it around in my car for a few days so that one was out too.


Turns out that he left his mark on one of our shortlisted floor picks. Given that we were sort of stuck (we're suffering from decision fatigue I think), we took it as a sign. So I guess we're going with Woody's pick!

Here are all the previous construction posts:


Construction Update 1
Construction Update 2
Construction Update 3
Construction Update 4
Construction Update 5
Construction Update 6

Construction Update 7

Labels:

05 October 2010

Construction update No. 7: Reality check time

Photobucket
I'm loving the new east side of the house. The trim (only on the top roof so far) really helps it all come together and I love the windows.


So, this update comes with the old good news, bad news scenario.

The good news is that things are still progressing nicely, although I'm extremely anxious for insulation and drywall. It's a little disheartening to see studs when you walk in the house.

The plumbing has been roughed in. Twice. Well, not all of it twice, but when I went to the house on Saturday and stood in the shower I was looking right at the shower valve (you know, where you turn the water on). Like it was eye level. OK, I know I'm vertically challenged, but not to an extreme degree (I'm 5 feet, 2 inches). This did not seem right. And the water outlet (where the water runs into the hose that will connect to the handheld showerhead, was at about 6 or 7 feet high. Since I hope to use the handheld for cleaning the shower as well as potentially a dog, it didn't make much sense to have it in a place where the hose wouldn't reach anything. So I had to have the plumber do a little moving around.

The roof is finished and looks great. I'm totally relieved because picking out shingles was really hard because they look different in all kinds of light. The new flashing around the chimney looks awesome too.

Photobucket
I think the new gable over the front door will do everything it was designed to do: tie in the new peak and let people know right away where the front door is. Plus, now if you come to our house when it's raining you won't be soaked by the time we get to the door!


The gable over the front door—the source of a great deal of consternation over the past week—is up, although they still need to construct the brackets to hold it up. We learned that having the gable will necessitate having a downspout down the front of the house, which is not exactly something we want. However, we think the gable looks so good, we won't notice the downspout much.

Photobucket
I'm a freak for windows. Can you tell? This is the bathroom space. I particularly love the square awning window over the toilet area.


Photobucket
This is bedroom No. 2. That corner with the angled ceiling is going to be a tough one to figure out. I'm not sure what we're going to do there ... maybe another window seat, but they are almost becoming cliche in our house now.


We met with the electrician on Saturday to show him where we want things. I had no idea that we had to know exactly where every light fixture is going. For some reason I thought there was a little play in this. That led to an interesting change in plans in the bathroom. The first thing I bought for this project was the sconces for the bathroom (got them on ebay for a pretty good price so I went for it). Unfortunately, I now realize that using those sconces means we will have to get a pretty small mirror for that space, which isn't really something I wanted, especially since the ceilings on that side of the bathroom are almost 11 feet tall. So last night I made a quick change to the plan: I'm going to buy two pendants to flank the mirror, which will free up wall space so I can get a bigger mirror. The sconces will go back on ebay. I'm pretty excited about the pendant idea and actually like it better than the sconces anyway.

Photobucket
I still love this sconce, but there's just no way to fit these in above the vanity without having to significantly size down the mirror.


As soon as the electrical rough-in is finished, they can start putting in the spray-foam insulation, and after that we get drywall!

So that's all the good news. The bad news is that we're WAY over budget. We're actually over over budget. We factored in an extra 10% into the loan we got to accommodate unknown expenses that often pop up in old houses. That money is already spoken for (this is projecting cost out to the end), so now we're into out-of-pocket costs.

It turns out that the living project was much bigger than anyone anticipated. That part of the project was a last-minute addition that our contractor just took a guess at in the quote. The roof over the living room (the part of the roof we kept) was severely sloped. The combination of the 2x6 construction, 72 years of wear and the hundreds (maybe thousands) of pounds of drywall compound that had been used to create the swoopy plaster effect, weighed heavily on the roof. The builder spent 150 hours fixing it. Yep ... 150 (man hours, that is). They had to jack up parts of the roof, sister in 2x8s, level everything out repeatedly. It was a pain. The good news is that it looks awesome. The bad news is that it cost major bucks.

The big unknown expenditure was the headers. Since they found out there weren't headers over most of the windows downstairs, they really needed to add in more structure. Apparently headers aren't cheap.

A couple other things were actually under budget, but the cost overruns in these two areas were so extreme that it adds up quickly. Couple that with things we knew we'd be expected to pay for from the beginning: painting, tile work (we're subbing this out to a friend who does amazing tile jobs), landscaping (which we weren't really expecting even though the GC told us it wasn't included), and you've got a lot of costs.

So we're at the point where we need to make some tough decisions. There are things we can sacrifice. We could get trim that is a little more standard than what we have downstairs. We could put carpet in the bedrooms instead of wood floor (oh yeah, I forgot to mention ... this was another cost we weren't planning on. They tried to save the wood floors in the bedrooms but when they started pulling them up they just fell apart). We could nix the deck entirely (which I REALLY don't want to do because I know if it doesn't happen now, it will never happen in the future), but we already own a sliding glass patio door that's about to be installed to where a deck is supposed to go.

What I think is one area we can makes some cuts in is the painting. We can't do much of the living room painting ourselves because of the cathedral ceiling (which requires scaffolding), and the same goes for the bedroom ceilings, but we can do the walls and the trim ourselves. Mr. Much-More-Patient-Than-His-Wife didn't want to have to do the painting, not because we can't, but because he desperately wants this project to be over (who's impatient now, huh?) and he knows professional painters can pound it out much faster than we can. I've made him a promise that I'll take a rest on the home improvement projects after this because he just wants to sit in the house and relax, instead of seeing a to-do list, and he sees us taking on the painting as a step in the wrong direction. However, I will need to be off of work for a week or so later in the month so I'm thinking maybe I can pound out some painting then.

In the meantime I'm painting everything I can get my hands on. The window trim pieces (I don't know what they are called but they have a name), all of the trim from the living room which has been removed and of course the ongoing bathroom door project (which you'll be reading about soon) are all to be painted this weekend. I'm a regular painting fool!

Want to see how things have been progressing? Check out previous updates:

Construction Update 1
Construction Update 2
Construction Update 3
Construction Update 4
Construction Update 5
Construction Update 6

Labels:

04 October 2010

Savoring, and saving, the last taste of summer

There was a good chance we were going to get our first frost Sunday night and a quick scan of the veggie garden told me that I had a ton of basil still in great shape (it was the best basil harvest I've ever had).

Photobucket
A pile of basil that couldn't be allowed to go to waste.


I'm a bit pesto'd out these days and frankly, I didn't really have time to make any pesto anyway, so I grabbed four basil plants and an Italian parsley plant—literally, ripped them out by the roots—and took them out to our temporary digs to figure out what I was going to do with them.

I seem to remember either reading a story or seeing a show about freezing whole herbs. Unfortunately I can't, for the life of me, remember where or what the process was but I figured it was worth a try.

Photobucket
Beautiful basil leaves getting a rinse before freezing.


After picking off all the herbs and giving them a good wash, I dried them as best I could (I have a great salad spinner at home that would have been perfect for this job, but out here at the cottage, paper towels had to suffice). Then I put them in Ziploc bags, rolling them to work out as much air as possible (I figured air could cause them to turn ugly brown) and stuck them in the freezer.

Photobucket
All wrapped up and ready for freezing.


Of course I saved just enough fresh basil for a few meals this week, including last night's salad of the last two tomatoes to come out of the garden, cucumber slices (also a great year for cucumbers. I bought a variety called 'Bush pickle' — original huh?— and it's a winner in my book), fresh basil and a little feta all drizzled with a little balsamic vinegar and olive oil. The tomatoes weren't the best (too cold for them to ripen too well) but still far better than any tomato I'll eat for the next 8 months or so. The cucumbers were crunchy, the feta was perfectly mildly salty and the basil was summer in a leaf. Delicious.

The frozen herbs won't be good for salads, but hopefully they will be wonderful in soups and sauces over the long winter ahead. 

Labels: ,

01 October 2010

You know your house is a mess ...

When even the plants are dirty.

My Hakonechloa 'All Gold', Heuchera 'Blackout', and new witch hazel all got a heavy coating of dust when the masons were out fixing the chimney. Guess I'll have to wash my gardens this weekend since rain isn't predicted for awhile.

Photobucket

Photobucket

Photobucket

Labels: , ,