The Impatient Gardener

14 February 2013

Back in the renovation saddle again

It has been two years since we finished our renovation. We love almost everything we did as part of that insanely large project although there are very few things we would choose to do differently if we were to do it all over again. But looking back, that renovation damn near killed me. OK, that's being dramatic, but it was far more emotionally draining and stressful than either of us expected. And because it went considerably over budget (due to a few unexpected things that popped up and a general contractor who was amazing in almost every regard other than his ability to accurately quote the job) it was also a big financial strain.

We're still feeling a the financial pinch of that renovation. Perhaps the hardest pill to swallow was that we created a whole new loan at the end of it. So, even though we pay extra on our principle every month, we were suddenly back to square one.

Those kind of numbers make you pause before you go spending any more money. Neither of us is comfortable with debt. We don't carry balances on our credit cards and we only allow ourselves to have one car payment at a time (and it would be nice if that went away too). We also like to keep a healthy cash reserve handy for emergencies too. So when we started thinking about other projects in the house, we resolved that they would be paid for in cash. No racking up credit card bills or applying for another loan.

So we've been saving. We have a little corner of the savings account reserved for our next project. Yes, believe it or not, after all that renovation, there are still projects to be done.

And there are two big ones lurking. The first is the downstairs bathroom, which we both hate and which we swore when we looked at the house would be the first room we fixed. Ironically, it is the only room in the house that we've done absolutely nothing to so far.

The other is the working side of the kitchen. The cabinets were in need of a paint job when we bought the house. Trust me, 11 years of serious cooking and dog living (when you have two enormous dogs in your house, everything is worn a little harder) haven't done them any favors. Remember, the house was a summer  place for at least the two previous owners, so nothing was really designed to be lived in hard. And we do some hard living.


This side of the kitchen is not so bad.
There is no doubt that the more glamorous of those two projects is the kitchen, but it's really not horrible the way it is. Technically, it functions. A coat of paint would most certainly greatly improve the situation. The bathroom is hideous. There is no getting around that. But ever since we built the bathroom upstairs, I basically don't go in the downstairs bathroom anymore and no one has showered in there for two years. In other words, out of sight, out of mind.

So, with a little bit of cash saved up and the memory of the renovation a bit foggy (although no amount of therapy could make the thought of the stress of that go completely away), we're back at it again. We're fixing up the kitchen.

The working site of the kitchen (before we swapped out the island top).

Don't get too excited; this isn't a gut renovation or anything particularly glamorous. Really, this is the completion of the what has become a kitchen renovation in slow motion. Within a year of buying the house we bought a new range. After that we bought a new dishwasher and replaced the floors. Then we got a new refrigerator and a new faucet. At some point I replaced all the knobs and the lighting and of course we fixed up the whole eating area. Most recently we got a walnut top for the mini island.  All of those things, other than the cabinet hardware, will remain the same, but we are getting new cabinets, new countertops and a couple other gizmos.

The kitchen isn't the worst thing in the world, but the cabinets were in rough shape when we bought the house and 11 years hasn't done them any favors. They either needed fixing and repainting or replacing. But they were never very high quality so we have a lot of sagging shelves, cracked panels and not the most creative storage.
Chipped corners and cracking seams can be found on pretty much every cabinet.

This is a good example of why you're not supposed to put your coffee maker under your cabinets. It was like this when we bought the house and it has not gotten any better. Worse yet is the mildew or whatever those dots are (they do not come off with any cleaning product known to man including the Magic Eraser).

This is the grossest shot. This is over the stove. The cabinets are completely discolored and covered in mildew. If you look closely you'll notice there seem to be some dog hairs stuck in the sticky greasy mess up there. Newfie hair has the amazing ability to go literally everywhere.

I'll share lots of details with you in the weeks to come. Some of the decisions involved in this project have been particularly challenging (I'm still suffering from decision fatigue from the renovation and that makes it that much worse), but so far we're doing a great job sticking to a pretty tight budget.

Stay tuned.


Labels: , , ,

07 May 2012

The unfinisher strikes again

It rained all weekend here which is so frustrating when there is so much to be done in the garden. The hostas, however, seem to be loving it as a I swear they've all grown 3 inches overnight. If and when the sun ever comes out I imagine everything will take off.

Given the lack of garden time this weekend, I thought it might be a good time to take a break from outdoor topics and head inside where I show you what a slacker I am. Although we finished the house renovation over a year ago, there are several unfinished projects that are starting to drive me a little crazy.

You've seen the master bedroom before from this angle:

Bedroombig

… but have you noticed that you've never seen the wall that is opposite the windows? Well, there's a good reason for that. Here is it:
Finish4

That's the closet door on the left (and can you believe that I took this photo at 2 p.m.? That's how dark and dreary it was Sunday).  When we were building this room I was so excited about that big empty spot on the wall because I saw it as the perfect place to hang a huge piece of art. It still is, but I am so fussy about art (not to mention I don't have the budget for the art I really want) that I've yet to find the right thing in the budget. Complicating the issue, I don't like placeholders in almost any situation. I like to wait for the right thing to come along. But the lack of art and color is making me a bit mad.
There is one spot where I've made some progress in the bedroom though. Take a look at the first picture. Now check out this:
Finish3

Do you see that? I have a real, live window seat cushion. And here's the best part: I made it myself! When we had the banquette made for the kitchen, the cushions were the most expensive part, even thought I found fabric at a steal. My mom is pretty handy with a sewing machine and frankly I was starting to feel a little bad about asking her to sew pillows for me all the time, so I thought it was high time I learned. So my very patient mother walked me through the steps to sew the cushion cover myself. Originally I was going to do a tutorial on how to do it, but honestly, I think I better learn a lot more about sewing before I start telling other people how to do it. It took a lot of Saturday afternoons, but it was fun and I'm thrilled with the results. It's a pretty big accomplishment for a person who actually sewed her finger in summer school sewing class. That's a true story: I sewed the damn needle straight through the top of my finger. My poor dad had to come to pull out the needle because the office people couldn't touch it since it had broken the skin. I'm not sure if I felt worse for my dad or for the sewing teacher who had to remove the needle from the machine with my finger attached to it.
Finish2

And I did get another little project that's been bugging me finished in the other bedroom. I finally painted and mounted the little mini closet doors. Our contractor thought we were nuts that we wanted this mini closet that is only accessible with the help of a ladder, but I believe that in a small house you have to make the most of every bit of storage space available and I couldn't stand the idea of a giant dust-collecting ledge up there.
Finish1

But then we go downstairs to the kitchen. This is probably the worst unfinishing offense because I actually finished the eating area of the kitchen almost three years ago now. This is an old picture of the kitchen but sadly, it still works for this post because that's exactly how it looks now (on a clean day). Again there's a huge wall screaming for huge art and I'm paralyzed by my inability to put something there for fear that it won't be the right thing. You wouldn't believe how many people walk in our house and ask what I'll be putting there. I wish I knew!
Kitchen2 101211
So what unfinished projects do you have staring you in the face?

Labels: , , ,

03 November 2011

House tour: Guest bedroom and hallway

We're finally at the end of this rather prolonged house tour. `There are a couple rooms not worth sharing at this point, but maybe in the future if they get a little sprucing up I'll share them with you.
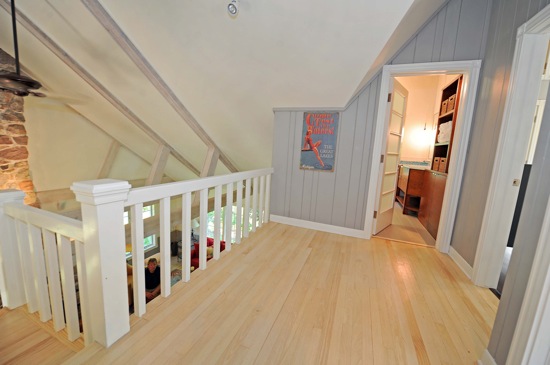
You've already seen the new bathroom, the kitchen, the living room and the master bedroom. Today we'll finish up the upstairs and show the hallway and the guest bedroom. Although the hallway got a bit smaller to allow for room for the bathroom on one end and the master bedroom closet on the other, it was important to us to preserve the character of it. We had several pieces of paneling custom made to match the existing panel so we could fill in the areas that were taller due to raising the roof.
It is open to the living room which helps the whole house feel bigger as well as allows the light streaming through all the new windows on the east wall of the bedrooms into the living room.
Here's what it looks like now (looking at the bathroom).
Hallway1

And here's what it looked like before:
Reno1 101011

And the new view of other end of the hallway:
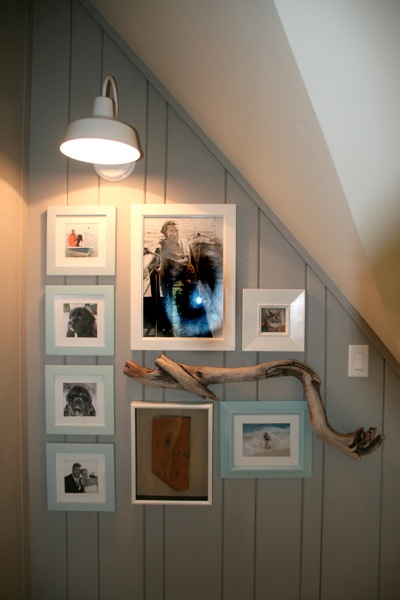
Gallerywall
The gallery wall probably deserves a post of its own because in typical form, I made it far more complicated than necessary. But for now here is a close-up that shows some of the different blue colors I used to paint the frames.
Gallerywall2

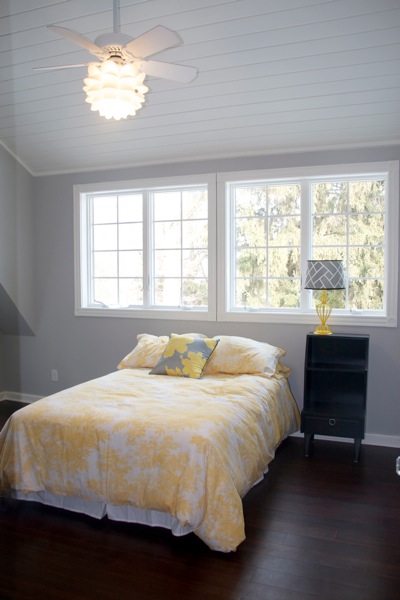
From here we move into the guest bedroom, which is admittedly a bit sparse these days. I can't seem to get the furniture placement right in this room, so for now I've sort of plunk the bed under the windows. At a minimum, it needs a headboard (do I see a DIY project in my future?) and some art to cover the large expanses of gray walls, but it needs more than that too. But, I'll get there when I get there.
Guestbed

Many of the features are the same from the master bedroom. Same floors and plank wood ceiling. The nightstand and matching dresser (not shown) were custom made for my the girls' room in my grandparents' house. Four girls, two beds. It was a good thing they had cool furniture.
Anyway, onto the details. Let me know if I miss anything that you have questions about.
Paint
  • Trim, ceilings, staircase: Benjamin Moore Mascarpone
  • Hallway paneling: Benjamin Moore Gray Huskie (and yes, it is spelled like that, but if you try to buy it as Gray Husky, they won't find it)
  • Guest bedroom walls: Benjamin Moore Stonington Gray

Floors
  • Hallway: Original red oak floors (bleached)
  • Guest bedroom: Teragren bamboo Synergy Porfolio Brown Sugar

Bedding: Pottery Barn
  • Throw pillow: Target (but you knew that because everyone has that pillow, right?)

Lighting

Labels: , , ,

26 October 2011

House tour: Master bedroom

We'll finish up the rest of the house tour this week (it's a small house and I'm probably going to cheat and not show you the ugly rooms) now that I found the battery charger for the camera (whoops). So far we've toured the new upstairs bathroom, the kitchen and the living room.

Today we move up to the master bedroom, which is not the room that was the master bedroom when we bought the house. There is actually a room downstairs that was a bedroom when we bought the house and we preferred to have our bedroom upstairs so we took the south-facing bedroom.

As you can see, the before was, um, "modest." The ceiling was low in the middle of the room and really low on the east side. I actually took that side of the bed because Mr. Much More Patient couldn't get over there without hitting his head on the ceiling. There is no light fixture on the light because everyone would have hit their head on it. As it was the mister almost got banged in the head with a fan blade more than once.

Bedroom before

You'll also notice that the dreaded wall texture showed up in this room too. The only real tragedy of the upstairs renovation is that the bedroom floors couldn't be saved. They were original to the house and we were told they were "just Douglas fir" but when we had all the floors refinished shortly after we bought the house, we told them to just do their best with the bedroom floors and they ended up being absolutely gorgeous. I actually don't think our contractor really tried to save the floors and it still sort of bugs me, but what's done is done.

This is what it looked like after one day of demo. The old chimney (make of Cream City brick, which is a material unique to the Milwaukee/southeastern Wisconsin area) had been sandwiched in the walls and was removed brick by brick. We also found out that the closets in both bedrooms had been cedar lined but someone had drywalled in the cedar. Don't you wish you could ask previous homeowners what they were thinking sometimes?

Bedroom during


And here's how it looks today.

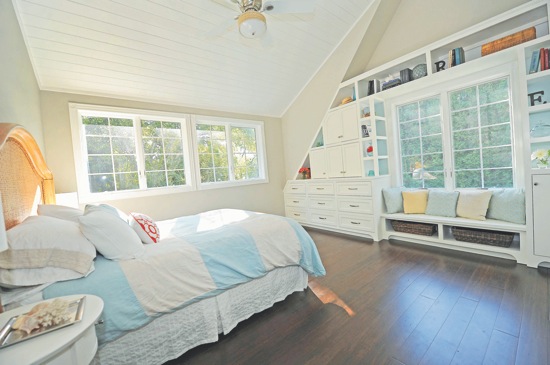
Bedroombig

Bed


By putting in a small (5x5-foot) walk-in closet at the end of what had been the hall, we got rid of the small closets between the two bedrooms and we put that extra floor space into the master, which added a couple of feet to the room. The entire east side of the room is now windows, which not only floods the room with light that spills into the living room downstairs, but also gives us a bit of a view of the lake beyond our neighbors' houses when the leaves are off the trees. I designed the built-ins and we had the same great craftsman who built the banquette in the kitchen make them. He and his teenage son spent an entire day installing them and then I finished them myself. They provide a huge amount of storage and hide a little television as well.

I'm still using the old headboard, which I don't think particularly works anymore but it's one of those things that was one of my first big "grown-up" purchases and it's tough to get rid of those. We have no art hanging in here yet, and I think I need a couple of mirrors to flank the bed. You'll notice that the nightstands don't match, which is a look I prefer although ours REALLY don't match. Still, I don't mind the look. I bet you can tell which side is mine and which is Mr. Much More Patient's.

The wood-plank ceilings are one of my favorite features in the room. What you can't see is that there's a bit of paint problem with them. The ceilings and the doors are the only things we paid a professional painter to do for us (upstairs) and I made sure that the knots in the wood were spot-primed with BIN shellac-based primer (a must for sealing knots). And I was told they were. Well guess what? Every knot had bled through and the ceiling looks like Swiss cheese now. I need to call the painter to see how we'll be dealing with this, but it's a drag. If you do this, make sure you spot-prime the knots!

Here's the info on the room:

  • Floors: Teragren Bambo Portfolio Brown Sugar (self-installed)
  • Paint: Walls: Benjamin Moore Revere Pewter, trim, ceiling and built-in: BM Mascarpone
  • Duvet cover: Rough Linen
  • Nightstands: Pottery Barn (white) and World Market (wood)
  • Lighting: Lamps Plus


Things left to do in this room:

  • Art! I must get something on these walls. It's driving me mad. I just need to find or create the right thing.
  • Mirrors. I think mirrors would be good behind the nightstands.
  • Banquette cushion (I borrowed pillows from the kitchen banquette for the photos). I have the fabric, I just need to get my mom to help me make it.

Labels: , , , ,

18 October 2011

House tour: Living room

After the bathroom and the kitchen, this is a somewhat unexciting stop in the house tour: the living room. This is pretty much our only living area in the house and I would say this is the room we spend most of our time in. Almost every blog post I've written has been composed on that red couch.
Although the living room was ripped apart during the renovation, very little changed aesthetically speaking. This was the room that I thought we were going to live in during most of the renovation, and then we found out that the roof on this half of the house was sagging and would have to be shored up at some point. Since we weren't planning on ripping up the house again anytime soon, we opted to take care of while everything was ripped up.
You might recall that the living room walls and ceiling were covered in the oddest heavily textured swoopy stuff that was a dust magnet and drove me nuts. When the construction guys started taking down the ceiling they discovered that it was actually joint compound. We think that a previous owner just bought buckets of the stuff and stuck it on for a plaster look. The compound was on so thickly that they couldn't cut pieces much bigger than 3-by-2 feet because they were so heavy. Anyway, once the framework was exposed, they jacked up the 2x6 joists (which apparently is what they used in 1938) and sistered them with 2x8s (it's OK to be impressed by my vast knowledge of construction terms). Then we had them do about 4 inches of spray foam insulation and fill the rest in with rolled insulation, as we did in the rest of the house.
Livingroomconstruction

Here's a view from upstairs looking into the living room the day that the drywall texture was applied (it's still wet so that's why it looks all wonky in the picture). The wainscoting on the lower level is original, and in we had them replace the drywall to get rid of the horrible texture on the walls as well. This picture shows where they removed the railing during the construction and I have to say, it was really freaky to not have that there.
Livingroomconstruction2
And here it is now.
Livingroom

Here's a view looking the other direction so you can get a feel for the whole room. You can see the horrific wall texture (which I'm lucky enough to experience every day in the three rooms in the house that remain untouched) in this picture taken before the renovation.
Lr5

You can also see the very first thing we changed in the house in these pictures: the sconces that flank the fireplace. When we bought the house they were some kind of shiny gold, beveled glass 1980s wonder and I couldn't stand them. We bought those copper outdoor lights from Smith and Hawken way before anyone (in Wisconsin at least) heard of putting outdoor lights inside. The Calder-esque mobile that is hanging from the beam in both photos came with the house (one of many, many things left behind by the previous owner during a chaotic moving day). Even though it doesn't have a lot in common with the room, I love it. And, I fit under it. Mr. Much More Patient does not.
As much as I once loved the color scheme in here, I don't much anymore. I'd love to change it all over to a navy, off white, pop of color thing, but I'll just add that to the list. I've given some thought to having the beams (which we found out really are structural) faux painted to be a different color (they do have a bit of a pink cast to them sometimes), but they don't bother me that much and I bet that would be pretty expensive.
I sort of wimped out in choosing colors in this room, but I felt like the ceiling and walls should be the same color since they sort of flow into each other, and I knew I wanted something I wouldn't easily get sick of because with the super tall ceilings, this is definitely a professional paint job. Plus, I knew at some point I wanted to change from the red/mustard color scheme and I didn't want to limit myself with the existing wall colors.
There's not a lot to tell about this room, but here are the paint colors:
  • Walls, ceiling, trim: Benjamin Moore Mascarpone
  • Wainscotting, wall paneling: Benjamin Moore Gray Husky

Labels: ,

13 October 2011

House tour: The Kitchen

From a room that didn't even exist a year ago, our tour moves to the kitchen, which has had some modifications made over the years but is largely the same as it was when we bought the house.

Kitchen1 101211


Kitchen2 101211


The cabinets, countertops (laminate, but not bad looking, and very easy to keep clean) and window treatments haven't changed. We did replace the white vinyl kitchen floor with porcelain tile, bought new appliances, moved the laundry out of what should have been a pantry and made it back into a pantry (next to the dividing wall between the eating and cooking areas, shown just in the bottom left corner of the second photo). I also painted the walls and the paneled ceiling, which was sort of pickled pink.

The eating area has changed quite a bit. We took it from a round table that seated four people and stuck out into the walkway from the back door (the most frequently used entrance) to a banquette that can seat seven or more. We still badly need a piece of art on that wall, but I'm picky about art and haven't found the right thing for that spot.

Paint

  • Walls: Benjamin Moore Revere Pewter
  • Trim, ceilings, banquette, table: Benjamin Moore Mascarpone AF-20
  • Cabinets: Unknown color badly in need of painting, but it's close to Benjamin Moore White Dove

Sources

  • Banquette: Custom made (if you are local, contact me for information)
  • Banquette fabrics: www.fabric.com, www.joann.com
  • Entry rug: Dash & Albert indoor/outdoor (highly recommended, washes up bright white in the washer)
  • Table: Restoration Hardware Outlet
  • Chairs: Existing
  • Eating area lights: Velocity Art & Design
  • Butcher block light: Pottery Barn (several years ago, I don't know if they still carry it)
  • Sink light: Barn Light Electric


Here's a roundup of some of the projects we've done in the kitchen:

The future of the kitchen:

I'm not finished in here yet. At the very least the cabinets need a coat of paint, but I'm not satisfied to stop there. Once we've recovered a bit financially from the renovation, we'll do some sprucing up in here. What we do will be largely driven by budget, but ideally, I'd like to continue the cabinets all the way up to the ceiling by adding another row of cabinets on top of the existing cabinets sort of like this:

269138361 7CJ9opLo c

via Pinterest

There is nothing wrong with our cabinet boxes, so I'd keep those, but if the budget allowed, I'd have them refaced, skipping the arches that are seen on the top cabinets. I'd also like to turn some of the lower cabinets into drawers if possible. And then, of course, I'd like new counters, but every day I go back and forth on what those might look like. I'm pretty sure I'd pick a quartz though, as I'm thrilled with how our bathroom counter has performed and as beautiful as marble is, I'm not a person who would be satisfied with a counter that gets "a patina." And last but not least, I'd add in a backsplash, probably some variation on classic subway tile like this elongated tile:

151997884 UGdGsO4s cvia granitegurus.com

Labels: , , , ,

11 October 2011

House tour: The bathroom

I know I've show some (OK, a lot) of photos of the renovation here, but I thought I'd do a bit of a house tour now that I have some good photos of the rooms thanks to getting the photos from the article that was done on the house (a wide-angle lens is a beautiful thing).

And there is no better place to start than my favorite room that came out of the renovation: the upstairs bathroom. Since we were a one-bathroom household before this (and that bathroom leaves something to be desired in the space and decor department), it was a real treat to be able to make room for a second bathroom, and, as I've mentioned before, any splurging that happened in the renovation, happened in this room.

Here's what the space that became the bathroom (thanks to raising the roof and adding a small shed dormer) looked like before. Take special note of the absolute hideous wall texture. The peak of that mini dormer ceiling was 5 feet 3 inches.

Reno1 101011 copy

And here's what it looks like now.

Reno4 101011


Reno2 101011

Reno3 101011

Bathroom2 040311


Bathroom11 040311


Paint:


  • Walls: Benjamin Moore Gray Mist
  • Ceiling: Benjamin Moore Healing Aloe
  • Trim: Benjamin Moore Cloud White

Fixtures (All Kohler unless otherwise noted):

  • Sink: Archer undermount
  • Vanity faucet: Margaux
  • Shower valve trim: Purist
  • Showerhead: Flipside 02 (LOVE this thing!)
  • Toilet: Toto Carolina II
  • Towel warmer: Runtal Neptune

Other:

  • Countertops: Hanstone Ruscello Aspen
  • Vanity/cabinet: custom, made of beech veneer
  • Teak shower floor (removable) and teak niche shelf
  • Mirror: Pottery Barn Kensington pivot mirror
  • Bath fan/light: Panasonic Whisper
  • Vanity lights: Sonneman 1-Light pendant
  • Door: Salvaged from my grandmother's house

Sources


Let me know if I missed anything or you have any other questions.

Wide angle photos by Sam Arendt/Ozaukee Press


Labels: , , , ,

04 October 2011

Things to know before you reno: Part 2

Construction1

Honey, does it seem drafty in here to you?


This is the second part of a list on what you need to know before you renovate. If you haven't read part Part 1, check it out here. And now, here's the rest.

6. Have a friend who won't get sick of talking to you about your reno.

You need to have a person to run ideas by. Ideally this person will share your design style or at least understand and respect your designs. They need to be honest, because sometimes you really need someone to tell you that something is REALLY ugly, and you can't have someone mincing words. This person should not be your spouse (whose opinion also counts but in a different way). It should also, under no circumstances, be your mother.

7. Spend your money on the stuff you can't see.

I know this is one of those things you hear all the time, but it's true. And that's simply because as much as you'd hate to, you can always go back and change out an ugly light fixture in a few years when your budget had recovered a little, but you can't rip back into your walls and put in more insulation. We had to fix some structural issues on the side of the house we weren't planning on touching, but we did it at the same time because we couldn't fathom coming back in 10 years and ripping our house up again. We also took the opportunity to thoroughly insulate everything with a layer of spray foam insulation and then the regular rolled insulation. It's not a fun thing to spend money on but it's worth it.

8. Get what you want.

I guess this more a matter of what kind of person you are, but it works for me. I'm one of those people who would rather save up for a longer time and get what I really want rather than spend less but get something I don't like as much. For most people a renovation is a big deal and it was for us. I don't intend to do many (any, actually) more of these, so this was my one chance to get some of these things right. So that's why we spent a lot of time figuring out our priorities and deciding which things were really important to us and which things we could live without. For us, the bathroom was a priority, so we sort of went hog wild in there. We did manage costs by getting an inexpensive field tile and then spending more on the accent tile rather than using accent tile everywhere, but, in general, we pretty much got what we really wanted in the bathroom. That meant we had to cut costs elsewhere and one of those places was the bedroom floors. We wanted a gorgeous nailed-in hardwood floor but the cost plus installation was more than we were comfortable with. So we went with floors we could install ourselves to save money. We still love them, although I would have liked other floors better, but it's not a decision I regret. I'm certain if we had cheaped out on some of things we chose for the bathroom, I would regret it every morning.

9. Be a team.

If you are undergoing a renovation with a partner or spouse, remember to stay on the same side. There's no doubt it can be horrible and frustrating at times and you will both be at your breaking point because all you want to do is get dressed in the morning, have a cup of coffee and watch a little TV, but you can't find your clothes because you're living out of laundry baskets in the basement, the coffeemaker is covered in a quarter-inch layer of dust and you can't even find the television. These are the times when you can't lash out at each other. You have to share the frustration. One person gets to be frustrated and crabby at a time. The other one has to normal and sane, and remind the other that it will be over soon and it will be so worth it. You can switch spots later.

10. Consider being your own general contractor.

OK, I know that sounds really scary, and I certainly wouldn't recommend it for a new build, but honestly I think it's very doable for a lot of people. We chose a lot of our own subcontractors for various reasons, either because we wanted to give a specific company our business, or we had a friend who could do it better, etc. And every time we went with our own guy, they became our responsibility. Also, one of us was at the house almost every day, even if it was just stopping in for lunch. And if we didn't, invariably something was done incorrectly, or we were getting a call asking how we wanted something to look. And even with the subcontractors that were hired by our general contractor, we were often expected to communicate directly with them to ease the process. With the exception of the complicated structural issues in the beginning, I think we could have handled the general contracting just fine.

11. The construction guys will see your underwear.

Yep. At some point, no matter how much you try to keep your unmentionables out of public view, random construction guys will see your undies. What's worse is that if the renovation drags on long enough, you won't care anymore. And what's even worse is that if it drags on even longer, you won't even care when they see your dirty undies in the laundry pile in the basement (which sometimes looks a lot like the clean clothes pile since they are all being kept within a foot of each other). Hey I didn't tell you it would be pretty.

Labels:

Things to know before you reno: Part 1

Hudsonandrita
Resident supervisors Rita and Hudson posed for a photograph for the newspaper photo shoot a couple weeks ago.I'm just realizing now that somebody should have washed Rita's feet first.

In continuing to revisit the renovation roughly a year after it got started, I thought I'd put together a list of things you should know if you are considering a renovation of your own. This list got a little longer than I anticipated, so I'm breaking it in to two posts.

1. Even though you've heard that every renovation goes over time and over budget, you will talk yourself into thinking that with all your planning you will be the exception to this rule. You are wrong.
We budgeted an extra 10 percent into our loan to cover the surprises. Believe it or not, this was at the suggestion of our lender and our contractor swore to us that he would do his best to bring the numbers down as the project continued. Although the financial situation got so dire during the renovation that I stopped keeping track of it all, but we probably finished about 30 percent over the original budget. As for time, the project took about 50 percent more time than we expected, due to hiccups with supplies of some items and various other issues that hung things up.

2. Have a partner.
Even if you're building or renovating and you're a single homeowner (and if you are, I applaud you), you need to have another person involved. That's because you need to have a person on reserve to wear the black hat. There will be times that have an issue with a contractor and you need one person to be sweet and understanding and another person to be the nasty one pushing for things to be done correctly. I handled most of the day to day things, but when something serious came up, or when I felt like I was getting the "you're-just-an-irrational-woman" brush off (and yes, I do think that happened), Mr. Much More Patient would step in handle it. I think our contractor knew that if he got a call from the husband he knew we were serious about something.

3. Find balance.
Throughout the entire renovation I constantly felt like I was walking the line of being a pushover or being a bitch. It was difficult to find a middle ground. Certainly you don't want to come out of the gate swinging on a project, but you also don't want to come across as a person who will let them slide with subpar work.

4. Make every decision you can ahead of time.
I did pretty good on this. I had plumbing fixtures chosen and delivered for months before they were needed. Tile was picked out before the bathroom was even officially drawn on paper. But there were other decisions that came up out of nowhere and needed to be made quickly. I expected to have a couple of weeks to figure out what we wanted for the roof. We ended up having a weekend to pick out the style and color of shingles as well as underlayments, etc. It's important to make decisions in a timely fashion to keep things moving along, and I found that the contractors seemed to have a lot more respect for us when we were able to quickly make decisions. Having so many things decided ahead of time (and then not second guessing ourselves: I did not look at a single bathroom picture on the Internet after we picked out tile and fixtures because I was afraid I'd find something I'd want more) made making the quick decisions a bit easier because we weren't thinking about tile, plumbing, lighting and roofing … just roofing.

5. But don't be forced into making a decision you are not comfortable with.
No matter how much pressure a contractor is putting on you to make a decision, do not allow yourself to be forced into making it until you are truly comfortable with it. You may delay your project a bit, but it will cost more in the long run when you can't stand it and have to go back and fix it. This is what happened with the shingle siding on the upper half of the house. We went back and forth on where it should be and we were getting a lot of pressure on making the decision, and what that decision would be. We were both suffering from renovation fatigue and we sort of threw up our hands and said, "Yeah, whatever," and we ended up with the shingles starting higher than we'd like them to. We actually bought additional shingles to have it fixed, but we've since had a falling out with our contractor so we won't have them do it and I just haven't bothered to look for someone else to do it yet. Everyone told me I wouldn't notice in a few months. I do. And it bugs me every single time I look at the house. Every day.

Check out Part 2 for more information.

Labels:

07 September 2011

Looking back at the reno, a year later

It is hard to believe that it was just about a year ago that we started the house renovation (September 1, 2010, to be exact). The renovation seemed like it lasted forever (and it was a good six months) but looking back on it now it seems like a distant memory. Surely renovating a house (and probably building one too, although I have no experience in that area) must be like having a child: you forget the worst parts and remember only the good.

I'm not quite to the point where I've forgotten ALL the bad parts, but I suppose I'll get there someday. Having been through it, though, I can see why some people become serial renovators: You learn so much during the process that would have been really helpful to know in the beginning that you almost want to do it again (almost) just to apply that knowledge.

I didn't blog much about the renovation after it was finished because I was sick of it and exhausted and I thought anything I wrote about it would probably come out sounding overly bitter. Now that I'm a bit removed from it I thought I'd share a few thoughts about renovating with you this week.

First, though, an update. There are a lot of little projects in the house that are not finished. When spring came I so needed a break from house projects that I dropped them all and went outside. And I'm just starting to come back inside now. Some of the items on the short-term agenda are the gallery wall I have planned for the upstairs hallway (by the time I get this finished I suppose gallery walls will be passé), making the cushion for the window seat in the master bedroom, moving things onto the shelves in the master bedroom and generally just filling the walls with art. I also need to paint the doors on the mini-closet in the second bedroom. I've still not done anything about window treatments in the bedrooms and at this point I'm not sure if I will. We haven't had a need for them yet, and I think the windows might look OK without them.

And now, onto some photos. For whatever reason I've never put the exterior photos together like this before.

Here are the plan drawings of the front (south side) and back (east side). Yes I realize that doesn't make sense that we consider one the front the other the back, but in my bizarre mind that's how I've always thought of it.

House 1


Here's the original front side (on the day we moved out of the house for the reno hence the junk on the patio):

Reno1 090210


And here's the new front:

Newhouse2


And the old back (that snow fencing protected a dwarf Japanese maple that I'm happy to report made it through the construction just fine):

Oldhouseback


And here's the new back of the house, including the new landscaping I worked on all spring:

Newhouse1


And just for shock value, here's maybe the scariest demo photo:

Demo1 091410

If you're interested in looking back at the whole process of the remodel, check out these posts:

Labels: ,

06 July 2011

The back side: What a difference!

I inadvertently took all off last week off from blogging but in a second you'll see what I've been up to. I've been busy, busy, busy working on the back yard (which is really the side yard but for whatever reason we call it the back yard). And it wasn't until after work yesterday when I snapped a few photos that I realized:

1. Holy smokes, somewhere along the line this turned into a really big project, and

2. What a difference from nine months ago.


Here's what the house looked like September 1, 2010:

Backhouse1

And here's what it looks like today:

Backhouse2


That's some kind of after, huh? In the past six weeks or so, I put in the stone path (which leads to our detached garage), the stone retaining walls on either side of the path, and all of the plantings to the right of the path and the little bit you see in the foreground on the left side of the path. I'll give you a closer look at some of the new gardens, which are pretty bare bones, later this week. My goal for this summer was to just get the framework in, so I focused on getting in trees and shrubs. I filled in with many of the perennials I had around from buying sprees and some of the things I have purchased through the Yahoo plant-buying co-op.

I'll try to take some photos of the garden from different angles. I struggled for a long time about whether to add the half-moon shaped garden on the left side of the path (as you're looking at it now) so I'll be interested to hear people's thoughts on that.

I haven't written much about the renovation since it ended because I was just exhausted and sick of the whole project. It definitely was emotionally draining and every time I tried to blog about it, it got way too preachy and whiny, so I'm saving that for another time when I have had more time to gain better perspective on it. I will tell you this, though: Toward the end, when it became clear that we were way over budget, we gave serious though to eliminating the deck from the plan, and looking at this photo, I'm so happy we kept it. We have been eating outside much more at a table under the pergola and it truly feels like an extension of the living area.

Labels: , , , , ,

27 May 2011

Putting the clothes (and the paint brush) away

It will (and it probably should) horrify many of you to know that we have been living with our clothes on makeshift shelving and stored in laundry baskets in the basement for about nine months since the start of the remodel. Can you even imagine that? I actually lost track of a lot of my clothes in the process.

But last weekend, when I was supposed to be working on the path but the weather had other ideas, we officially moved our stuff back into our room. The holdup was a very long paint job on the built-ins in our bedroom. It took me well over a month to paint them. Normally it wouldn't have taken so long but I was so burned out on painting that it was very hard to get myself inspired to get back to work on them and I wanted to do a really good job on them. It is so hard to paint doors and anything with edges, at least for me.

I designed these built-ins and had an amazingly talented woodworker (the same person who built the banquette in the kitchen) create them. He and I work well together because he seems to actually understand my vision for these things. As we were going through the remodel one thing I learned is that sometimes things that make perfect sense to me are pictured entirely different by the person who is actually doing the work.

Builtin1

Builtins2

Builtins3

Builtins4

Builtins5

Between all those drawers, which are nice and deep and have soft-close sliders that mean there is no excuse to ever have a drawer sticking out, and the new walk-in closet, we have a lot of storage. Since we both pared down our wardrobes quite a bit (if I didn't need it for the last nine months, I probably don't need it now was my thought) we have more than enough room. This is especially exciting because we've never had enough room to store both of our wardrobes in the same room (this speaks more to the diminutive size of our house rather than any propensity towards being clothes horses).

Obviously I have a lot of work still to do on the built-ins. I'll be making a cushion for the window seat as soon as I find the right fabric. I'm looking for a couple of baskets for those cut-outs underneath the window seat. And I need to bring in books and accessories for the open shelving. You'll notice I painted the back of the open shelves that flank the windows a light blue (mixed from all the different blues I tried to paint the bathroom before I realized that grayish white was really the color it should be).

And while moving our clothing back into a proper storage area feels better than you can imagine, finishing the built-ins marks a major milestone for me: the painting is finished. OK, it's not totally finished as there are a few very small painting projects to be done, but for the most part my paint brush is taking the summer off and I am so relieved.

Labels: , ,

14 May 2011

What's happening now

This headline should really read "What WAS happening a few days ago." Blogger was down for much of the end of the week so I couldn't post this, but I hope you enjoy it now. Sorry for the delay.

Sometimes I feel like everything I write on this blog is old news because my zone 5 garden is so far behind so many of those of my readers. I can't believe that some blogs have pictures of tomatoes on the vine this week!

The situation seems to be particularly bad this year, although I'm not sure if that's because the weather really has been worse than normal or if it's because we had a lovely spring last year so things are slow in comparison to last year when they were probably ahead of schedule.

I planted climbing rose CanCan in front of the downspout in the front of the house. I was so upset when I found out there was no option to putting that downspout smack dab in the middle of the front of the house, although I have to say it doesn't look as bad as I thought it would. Cancan is developed by Bill Radler who created the Knock-out rose series and grows to about 10 feet so I have hopes that it will do well in this place and not eat the house.

Update1


Some of the daffodils are blooming. Is there any cheerier flower than a daffodil? OK, maybe daises, but daffs are close.

Lately2


Other varieties have yet to bloom. I should have daffodil blooms for at least the next two to three weeks.

Lately3


I was thrilled to see the wonderful purple spikes of 'Blue Angel' hosta poking up. Certainly a favorite in my garden.

Lately5


The Serviceberry tree has fuzzy little buds getting ready to bloom. The Serviceberry trees at work usually bloom four to seven days before the one at my house does so I usually have a little warning. My mother-in-law bought this tree for us the second summer after we bought the house, so it's been in the garden for eight years now. It's a lovely little tree.

Lately4


Dicentra 'Gold Heart' is coming up. I think everyone should grow this plant. It's just amazing.

Lately8


The mini greenhouse is full of plants: some plugs from the Yahoo plant co-op, some from last year that I overwintered in pots heeled into the ground and, believe it or not, I finally potted up the poor amaryllis bulbs that were forgotten in the basement.

Lately6


There are a lot of plants by the garage waiting for a spot in the ground. Three beautiful Hydrangea 'Little Lime' are waiting, along with some roses I overwintered (again in pots in the ground) and a few other random things.
Lately7


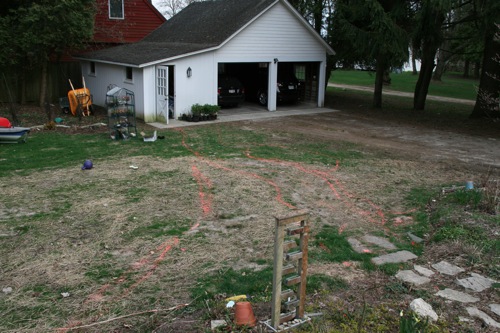
They back yard looks like a graffiti artist attacked it. That's the rough layout for a path and new beds that I have planned. I'm not at all looking forward to doing the hardscaping, but paying someone to do it just isn't in the budget so that too is going to be a (back-breaking) DIY project. I hope to complete it by Memorial Day but I suspect that, like a lot of my DIY projects, that is a totally unrealistic deadline. (There is nothing like taking a picture of your own space to realize what a dump it looks like!)

Lately9


And very exciting news: The cable railings are finally finished on the deck! I was going to do a post on installing these because Mr. Much More Patient did the honors, but honestly, it's a pretty high-level DIY project that is a bit more complicated than a post on a blog would cover. They are however, sailboat lifelines. No seriously, they really ARE sailboat lifelines. There is NO difference and we actually bought the materials for this project from a company that sells both marine stainless steel products and has an architectural line. By the way, if you're looking for something like this, email me for the contact information. Anyway, since Mr. MMP has experience with lifelines, he figured this out pretty quickly, but it was still a three-weekend project just because drilling all the holes and cutting all the wire took a long time. I'm happy it's finished now. All we have to do now is touch up some of the stain on the deck and pergola and install the stair lights and the deck is finished!

Lately10


So as Al Roker would say, that's what's happening in my neck of the woods. What's up in yours?

Labels: , , , , , ,