The Impatient Gardener

05 October 2016

A BEFORE AND AFTER 3 YEARS IN THE MAKING

I'm not one to draw projects out. When I get set on doing something I like to focus on it like a laser and pound it out until it's finished. I'd rather wait until I can do all of it exactly the way I want to than take it by bits and pieces or settle for something I don't really love because what I really, really want isn't in the budget at that time.

But for various reasons, that approach wouldn't have worked when it came to dealing with our garage. Never a very good looking building, we toyed with the idea of tearing it down completely for a time. But when it became clear that really wasn't in the budget, we set to improving it little by little over the past few years.

Last week we put what is hopefully the last major finishing touch on the garage that has helped take it from a pretty pathetic looking structure that you'd be hesitant to park your car in, to something that I think looks far more charming than it really is.

October 2013
 

It all started three years ago almost to the day when out of seemingly nowhere, I decided I was sick of looking at a wreck of a garage, especially after we did so much work to renovate the house.

April 2014

The following spring very little progress had been made, but I satisfied my urge to do well, anything, by painting the door Benjamin Moore Wythe Blue, a color I'd been dying to use somewhere.

Later that spring we had the garage reroofed (which I can find no photos of) and that helped the look of the whole thing tremendously. We also got the driveway paved, which wasn't really on my radar but was something that Mr. Much Patient had pushed for for a long time (and in retrospect it was a good call).

July 2014

A few months later we hired a painter to paint the garage. At first I wasn't sure I loved the color (Benjamin Moore Ozark Shadows with Simply White trim), but you great blog readers encouraged me to live with it a little and that's a good thing because now I quite like it. At this point I was feeling like it was looking much better but still a bit plain.

July 2014

Then we stuck a new light on it. A really small change but certainly another little improvement.

April 2015

It sat like that for several months until the following spring when we built a small pergola on it to match the pergola on our deck. Of course Mr. Much More Patient still doesn't understand what the point of it is (answer: to look pretty, obviously), but I love it.

July 2015

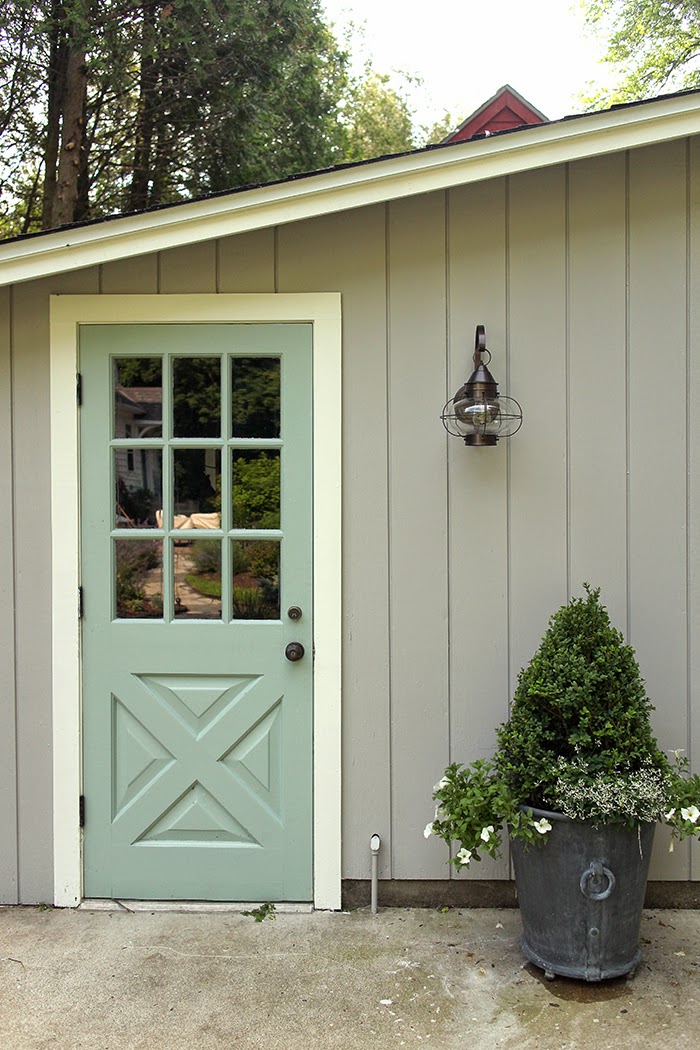
Later last summer I decided that the Wythe Blue was never really right and I repainted the door Benjamin Moore New York State of Mind. Ah ... that's much better.

July 2016

This spring I bought a new planter for near the garage and slid the boxwood between the doors.


And then last week we finally did what I've been waiting ages for: We replaced those ugly, dented garage doors. I'll write a full post about that process (we did not install them ourselves) soon. For now, I'm just basking in the beauty of a garage that somehow went from pretty horrible, to pretty darn good. Fixing it up over three years never would have been my choice, but it actually worked out OK, and by spreading the cost over several years it doesn't seem like nearly such a big hit.

It's funny, since it took so long to get to this point it doesn't feel like it really changed that much, but check out this before and after.


Yep, that looks just a little better. And having two garage doors that work isn't so bad either.

Labels: , , , , , ,

13 March 2014

LIGHT AND BRIGHT: GIVING A DRESSER NEW LIFE

Remember when I bought this dresser?


Oh, you don't? Well that's probably because I did that at least three years ago. I bought it because it was just sitting there in the thrift store and it looked so cool that I bought it. Without any plan for it.

You will be happy to know that I have stopped doing that: buying stuff at thrift stores that I don't have a plan for. It almost never ends well.

In the case of this poor dresser it went into the garage. Where it sat and collected dust, spider eggs and a good amount of mildew.

Last year I dug it out, determined to fix it up or get rid of it. And when I did I was reminded of just how cool it is. It's not the most well-made dresser. It's all veneer, some of it in not such good shape, and while it's sturdy, it's not like this was built by a craftsman.

Dresser redo: paint, wood bleach and liming wax

I solved the mildew problem with a really good wipe down with white vinegar (which is a good idea with old furniture anyway because it takes care of smells as well. Then I sanded it down with 220-grit sandpaper just to rough everything up. In places where the veneer was lifting, I pulled it up and glued it back down with regular wood glue. I also filled some of the holes with and areas where the veneer was damaged with wood putty.

I used Zinnser BIN Cover Stain primer because it has good adhesion and I just wanted to seal up everything really well. Then I put on two coats of Benjamin Moore Aura semigloss in Mascarpone. And then I let it sit for more than a year while I figure out what to do with the drawers.

In that time, we managed to pile a bunch of stuff up on top of it and ruined the paint job on top, so when I took this project up again, I lightly sanded the top and put another coat of paint on it and then went back to the drawers.

I had already sanded them when I first started this project, but I gave them just a light touching up by hand with 220-grit and cleaned them well. I really liked the light color they were after sanding, but there was no way to keep that color because wax or polyurethane would darken it. So I used some wood bleach to lighten them up. I just bought a bottle at the hardware store and followed the directions. Honestly, I'm not sure how well it worked but I think they got a little lighter.

When they were dry I went back and used liming wax on them. The white of the liming wax brought out the grain, which I actually liked on this piece (which is unusual for me), and lightened up the wood. It also helped take out some of the yellow in the wood (which really isn't coming through in these photos taken in the dark depths of my basement).

Dresser resurrection: Paint, wood bleach and liming wax

I still don't know where this is going to live. I think once I get the finished half of the basement spruced up (seriously, will that EVER happen?) it might be nice there and could even be used as console for a television if we would have one down there.

It might not have a home immediately, but I still  love it. I'm happy I went out of my comfort zone of painting everything and did something different with this piece.

Labels: , ,

24 February 2014

Smooth operator

I am basking in the glow of a finished hallway, folks. After a weekend of painting and a few finishing touches, the hallway is looking so much better.

Smooth wall, relocated thermostat, new light, lots of paint

It was a weekend of many projects (I hope to show you the others soon), but I felt like I was running from one thing to the next. At one point I had four paintbrushes drying in the sink. The priority, though, was the hallway. Sometimes you just need to finish something up to cross it off the list, you know?

You would think a 6-foot hallway wouldn't take long to spruce up, wouldn't you? But with five doors and six doorways there was so much trim to be painted. And trim takes a long time to paint.

But let's get to the fun part. Here's what it looked like when all this started.

Hallway before

And here's what it looks like now.

Fixed up hallway, smooth walls, painted


Here's what went into it, in the (somewhat nonsensical) order we did it in:


  1. Sanded and painted the wood plant ceiling.
  2. Replaced the light.
  3. Sanded the texture off the walls.
  4. Sanded all the trim.
  5. Removed the closet doors to paint them in the basement.
  6. Did a final scraping on the walls to get the areas the sander missed.
  7. Primed the trim and wainscotting.
  8. Painted the wainscotting (Benjamin Moore Gray Husky).
  9. Moved and replaced the thermostat.
  10. Skim coated the walls.
  11. Primed and painted the walls (BM Mascarpone in matte finish).
  12. Painted the trim (BM Mascarpone in satin finish).
  13. Hung up a piece of art, sat back and gave myself a big high five.

I wouldn't mind installing some beefier crown molding like we have in the kitchen, but I'm still smarting from our epic crown molding failure and I'm not ready to go down that road again. Replacing the doorknobs is also on the agenda, but all in due time. I have the glass doorknobs from my grandmother's house but retrofitting pre-drilled doors with antique door hardware is remarkably difficult, not to mention expensive. We did replace the kitchen doorknob with one of the antique knobs. When we redid the upstairs we put in reproductions and I'd love all the doorknobs in the house to match someday. 

Antique round glass doorknob
Antique glass knob on the kitchen door. (Can you see me taking the picture?)

But those are minor details. For now I'm just enjoying the "new" hallway. In fact, I'm finding excuses to linger there a little bit. Perhaps the biggest compliment came from Mr. Much More Patient who, when he came home to find the hallway finished, said, "I should never doubt you." Aw, thanks honey. Wait, what?

Labels: , ,

24 January 2014

A DIY magnetic chalkboard: Now you see it, now you don't

I have to apologize, you guys. My disorganized method of managing photos has struck again. I kick myself for this. I work with professional photographers at work every day and I know that they all have a method for cataloging every photo they download, so why I never started doing the same thing is a bit of a mystery.

I've been trying to write this post for well over a month now (the photos prove that) but I've been hunting for all the in-progress photos I dutifully took along the way so I could do a true tutorial. Well, I give up. I absolutely cannot find those photos on my computer or my external hard drive. 

 So, unfortunately you're going to have to live with just an after photo in this tutorial and trust me on the rest. I hereby promise to do a better job keeping track of my photos. Or better yet, finish projects in a more timely fashion so I don't lose them to begin with.

When we did the kitchen renovation, I couldn't wait to clean up the wall where the refrigerator was and part of that was creating the look of a built-in fridge that was just a regular standalone fridge.

Before there was this sort of strange half wall that didn't quite cover the fridge, so about a foot of the side of it stuck out. I hated the look but I loved the fact that it gave me a place to hang the stuff one needs to hang on their fridge: pictures of our nephews and niece, save-the-dates for upcoming events, the magnet your plumber gives you that comes in handy when a toilet is blowing up, that kind of stuff. 

The fridge wall before. You can see that even the counter-depth fridge stuck out from the cabinet surround, which was ugly, but gave us a little room on the side of the fridge to stick things.
As much as I loved the new look, I missed that spot. 

I didn't want to hang something just out in the kitchen. As much as I try, those types of spaces always end up cluttered and my goal for the kitchen has been to keep clutter to a minimum. I don't mind a little clutter in my life, but I love a clutter-free, almost sparse kitchen and creating that was one of the goals for the kitchen.
After, the fridge had a nice built-in look and the pantry didn't jut out into the room oddly, but I had nowhere to stick things that used to hang on the side of the fridge.

So I looked to the inside of the pantry door. And of course, I wanted it all: both a surface to write on and something magnetic to stick stuff on.


I started with a piece of galvanized sheet metal. You want to look for this in the plumber's section of your big box store as its intended purpose is to put behind pipes when soldering so you don't light the wall on fire. This is what it looks like. 


It cost me about $9. You can buy other metal that will do the job, but it's usually much more expensive and if you're covering it anyway, you don't need to get fancy.

I cut it to size using tin snips. I'm not going to tell you to wear gloves when you do this because a.) you already know that and b.) you won't anyway. And yes, I cut myself doing this.

After that I mounted it on what Home Depot calls a "project panel." It's only 1/8-inch thick but it provides enough rigidity to keep the metal from flopping around without adding too much weight or bulk. I used contact cement for this.

Then I painted it with two or three coats of chalkboard paint. Although the can suggested that chalkboard paint should be rolled, I had the best results when I brushed it on.

The hardest part of the whole project was creating a frame. Since this was done on the cheap, I certainly didn't want to have to go out and get a custom-made frame for this odd shaped thing, but my homemade attempts at creating a frame were, um, less than successful. Finally I went to my handy stash of balsa wood strips (last used for this project) and cut them to size. No miter joint here, just a regular old butt joint. I used a good amount of wood glue in the joint, wrapped in waxed paper (to keep the glue from attaching itself to the support pieces), used a piece of scrap wood on either side to stabilize it, and then clamped it for several hours. (Boy, a picture of that process sure would be nice, wouldn't it?)

Anyway, by the time the glue dried I had a very light and relatively delicate frame. I gave it a little sanding and quite paint job then glued it right onto the chalkboard, overlapping the frame onto the board by about a half inch on each side. 


Then I used some 3M vecro mounting strips to attach the whole thing to the inside of the pantry door. I used the strips on the backer board, rather than the frame, which is purely decorative. By cutting the backerboard and metal sheet the same size as the inset panel, the whole thing sat flush to the door, with the frame just extending about a quarter inch. 

I'm happy to report that the board fulfills both its chalkboard and magnetic functions perfectly (that little pad of paper on the bottom is on a magnetic clip), and I love that it can be out of sight when I don't need it but it's easy to get to when I want to.

Now I just need to work on my chalkboard art (not to mention my Happy New Year message).


Labels: , , ,

17 December 2013

Orange you glad they are finally finished?

You know I always have several projects in the works at one time, but I think this one holds the record for longest in-progress project. Obsessed with cane chairs, I found a pair of them on Craigslist more than two years ago and picked them up for $30 each. This really wasn't a good deal (I've since seen similar chairs at Goodwill for $5), but I drove a long way for them and I wasn't going home without them!

They languished, like many of my projects do, in the basement for some time. Then I reupholstered a couple other chairs as practice for these last winter. Finally, this fall, I decided it was time to really get going on these. I'll save the tutorial (such as it is) for another post, because it's way more fun to just skip to the good part.

And here it is.


This is the part where I show you the picture of what these chairs (they don't match by the way, but close enough for me) looked like before, in all their dusty rose velvet glory. Except I can't find that picture. That's how you really know that  you've taken way too long on a project: when the before pictures have been moved off your computer and now reside on a hard drive with 9 years of other photos and can't be found.

But I did snap these in the driveway after I had already removed the fabric and sanded them, but before I started painting.


I've been lusting over an orange chair (I can't explain this, but it started here) for years and I've been lusting over that fabric for almost as long. Even though the whole world has already done their thing with Schumacher's Chiang Mai Dragon fabric and moved on, I just kept coming back to it. I am a sucker for a large, bright floral. The paint color, by the way, is Benjamin Moore Starburst Orange.


Technically speaking, reupholstering these chairs wasn't that difficult, other than that I was constantly afraid of screwing it up or doing something to mess up the fabric. By far the longest portion of the project was laying out the patterns on the fabric. I was so afraid to screw it up and I wanted the pattern on the chairs to match as closely as possible.

I also chose a turquoise houndstooth fabric for the back, not only to switch it up a little, but also to save a bit of money. I like the look.


These are in the back sunroom/office/den, which is the next room on the list for improvement. At some point we'll be redrywalling in there (the dreaded textured walls still exist in there) and putting in a wood plank ceiling like the rest of the downstairs rooms. I think they'll look great in that room once everything is finished. Oh, and they are pretty darn comfortable too!

It might have taken a long time, but this might be my favorite DIY project to date.


Labels: , , , ,

05 June 2013

The kitchen is finished! A look at the new digs

I am exceedingly happy to tell you that the kitchen is finished. OK, not finished, but finished ... for now. I need to touch up some paint (we came pretty close to slapping it on Memorial Day when we had family coming over for cocktails ... we finished in time but had to warm them not to touch the walls) and we have to put a trim piece under the window, but that's it.

It's hard to describe the look I was going for in the kitchen. I wanted it to fit with our 1938 cottage and not seem out of place, but I also wanted it to feel updated and maybe even a little modern. I definitely wanted it to feel clean (I like bathrooms and kitchens to feel clean almost to the point of spartan, but not quite).

I suppose you could call it transitional, but I sort of hate that label. I wanted a little bit of industrial edge (found mostly in the lighting), a little bit of classic (the cabinets), a little bit of historic (the cabinet glass and cabinet knobs) and a little bit modern (the counters and appliances) all with a handful of "warm" (the range hood and walnut island).

Of course it all took way longer than we had planned and there were some bits and pieces toward the end that just took awhile to finish up.

First ... a pretty picture to show you what it looks like now.


OK, that was your peek. But first let's take a look back to what it looked like before. I wish I had pictures from the REAL before, when we first bought the house, but I can't find any. But here's a little walk back in time.

BEFORE
Found one with the original vinyl floor. I washed that floor three times a day and it was never clean. Don't miss the stark white walls either. And in the lower right corner you can see how the old table really stuck out into the space.


This was after we put in the tile floor and replaced the appliances but before I painted the ceiling.

The ugliest light fixture ever.
A couple years ago after the light fixture was changed and the ceiling painted.


A very strange angle of what the eating area looked like before we put in the banquette.

AFTER


Walnut trim around the mantel hood. The panel above it opens up for additional storage as well.


What's new/changed
  1. New cabinets. We originally were going to reface the lowers and replace the uppers (so they would extend to the ceiling) but it turned out to cost just slightly more to do all new cabinets. The old cabinets were recycled to a friend so they didn't go to waste. We went with custom cabinets built by a fantastic local cabinet maker who also did the built-ins in our bedroom and the banquette bench. I can't tell you how lucky we are to have found a craftsman to work with on these projects who works so hard for us.
  2. New countertops. We went with quartz countertops. We wanted the low maintenance of quartz (no sealing, no etching, no staining, no worries) which we've loved in our upstairs bathroom. We ended up with Caesarstone only because that's the company that made the color we liked. I think most of the bigger brands of quartz (Caesarstone, Cambria, Hanstone, Silestone, etc. are created equally).
  3. A new sink. This was a big deal for Mr. Much More Patient, who is also the main dishwasher in the house. It's a huge stainless steel single bowl sink. Since we have no bathtub in the house I joke that if we ever had a kid, he or she could take a bath in the kitchen sink until about age 10. 
  4. New faucet and a new filtered water faucet.
  5. Overhead vent hood. We got a 36-inch insert and then the cabinet maker built the surround. We currently have a downdraft vent, but we didn't want to be tied to a specific range when it came time to replace the current range and very few companies make downdraft ranges. We are so happy we did this. It is so great to have a proper vent that works really, really well.
  6. Tile backsplash. This is the piece de resistance, at least for me. It's where this kitchen concept started and I think it's what ties it all together. It is 1-inch mother of pearl mosaic tile with bright white grout. I originally saw it in Coastal Living magazine and contacted the tile store listed in the article's sources and actually purchased it through them, even though the store was in Key West, Florida.
  7. We removed the small vertical wall by the fridge that originally enclosed the washer and dryer. We moved the laundry facilities to the basement several years ago and used that area as a pantry, but the wall really stuck out into the space.
  8. We added a garbage disposal. We compost everything we can but I really appreciate not having to clean out the basket strainer. We installed an air switch in the counter to control it which is totally slick.
  9. A new light over the island. The old one was a little too country for the new kitchen. I also spray painted the light over the sink black. I felt like the black from the other side of the room needed to migrate a little and the white light was getting lost in between the taller cabinets.
  10. I repainted the ceiling using semi-gloss paint, which was totally worth the pain in the neck. The walls also got repainted in Edgecomb Gray. I loved the Revere Pewter and still love the color in our bedroom but I felt like it was too dark with the tile.


What stayed the same

We didn't change the floor (tiled about six or seven years ago) or replace any appliances, all of which we've replaced since we bought the house 11 years ago. The range is probably 10 years old and the fridge and dishwasher are probably about 7 years old or so. They all work fine (and I hope they continue to for many years to come).

Nothing in the eating area of the kitchen changed, recently anyway.

Info and sources
  • Cabinets: Custom, painted Benjamin Moore Cloud White
  • Countertops: Caesarstone Eggshell (aka Osprey)
  • Hardware: Emtek Georgetown 1.25-inch glass knob and Restoration Hardware Aubrey pulls in polished nickel
  • Vent hood: Kobe 36-inch insert (comes with a remote, too)
  • Backsplash tile: Mother of pearl 1-inch mosiac tile purchased from Key West Tile. Similar (or possibly the same) tile here.
  • Cabinet glass: Bendheim Glass: Soft-seeded mouth blown glass (a splurge but so worth it)
  • Thomas O'Brien Large Hicks pendant in polished nickel
  • Ceiling paint: Benjamin Moore Cloud White (semi-gloss)
  • Wall color: Benjamin Moore Edgecomb Gray
  • Sink: 32-inch single-bowl Kraus sink (purchased during a killer Black Friday sale through a site called Express Decor. I think it was less than $250, which is a pretty great price for a 16-gauge stainless steel sink).
  • Faucet: Hansgrohe Talis S purchased through Amazon. DO NOT buy from Home Perfect even though they appear to have the best price. That turned out to be a huge nightmare and I had to dispute the charges with my credit card company and ended up buying the faucet from Amazon for about $15 more.

Labels: , ,