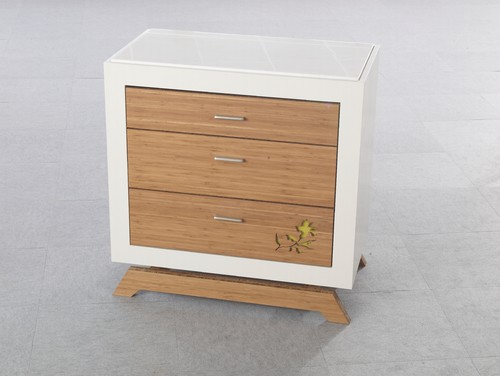
LIGHT AND BRIGHT: GIVING A DRESSER NEW LIFE
Remember when I bought this dresser?

Oh, you don't? Well that's probably because I did that at least three years ago. I bought it because it was just sitting there in the thrift store and it looked so cool that I bought it. Without any plan for it.
You will be happy to know that I have stopped doing that: buying stuff at thrift stores that I don't have a plan for. It almost never ends well.
In the case of this poor dresser it went into the garage. Where it sat and collected dust, spider eggs and a good amount of mildew.
Last year I dug it out, determined to fix it up or get rid of it. And when I did I was reminded of just how cool it is. It's not the most well-made dresser. It's all veneer, some of it in not such good shape, and while it's sturdy, it's not like this was built by a craftsman.

I solved the mildew problem with a really good wipe down with white vinegar (which is a good idea with old furniture anyway because it takes care of smells as well. Then I sanded it down with 220-grit sandpaper just to rough everything up. In places where the veneer was lifting, I pulled it up and glued it back down with regular wood glue. I also filled some of the holes with and areas where the veneer was damaged with wood putty.
I used Zinnser BIN Cover Stain primer because it has good adhesion and I just wanted to seal up everything really well. Then I put on two coats of Benjamin Moore Aura semigloss in Mascarpone. And then I let it sit for more than a year while I figure out what to do with the drawers.
In that time, we managed to pile a bunch of stuff up on top of it and ruined the paint job on top, so when I took this project up again, I lightly sanded the top and put another coat of paint on it and then went back to the drawers.
I had already sanded them when I first started this project, but I gave them just a light touching up by hand with 220-grit and cleaned them well. I really liked the light color they were after sanding, but there was no way to keep that color because wax or polyurethane would darken it. So I used some wood bleach to lighten them up. I just bought a bottle at the hardware store and followed the directions. Honestly, I'm not sure how well it worked but I think they got a little lighter.
When they were dry I went back and used liming wax on them. The white of the liming wax brought out the grain, which I actually liked on this piece (which is unusual for me), and lightened up the wood. It also helped take out some of the yellow in the wood (which really isn't coming through in these photos taken in the dark depths of my basement).

I still don't know where this is going to live. I think once I get the finished half of the basement spruced up (seriously, will that EVER happen?) it might be nice there and could even be used as console for a television if we would have one down there.
It might not have a home immediately, but I still love it. I'm happy I went out of my comfort zone of painting everything and did something different with this piece.
Oh, you don't? Well that's probably because I did that at least three years ago. I bought it because it was just sitting there in the thrift store and it looked so cool that I bought it. Without any plan for it.
You will be happy to know that I have stopped doing that: buying stuff at thrift stores that I don't have a plan for. It almost never ends well.
In the case of this poor dresser it went into the garage. Where it sat and collected dust, spider eggs and a good amount of mildew.
Last year I dug it out, determined to fix it up or get rid of it. And when I did I was reminded of just how cool it is. It's not the most well-made dresser. It's all veneer, some of it in not such good shape, and while it's sturdy, it's not like this was built by a craftsman.
I used Zinnser BIN Cover Stain primer because it has good adhesion and I just wanted to seal up everything really well. Then I put on two coats of Benjamin Moore Aura semigloss in Mascarpone. And then I let it sit for more than a year while I figure out what to do with the drawers.
In that time, we managed to pile a bunch of stuff up on top of it and ruined the paint job on top, so when I took this project up again, I lightly sanded the top and put another coat of paint on it and then went back to the drawers.
I had already sanded them when I first started this project, but I gave them just a light touching up by hand with 220-grit and cleaned them well. I really liked the light color they were after sanding, but there was no way to keep that color because wax or polyurethane would darken it. So I used some wood bleach to lighten them up. I just bought a bottle at the hardware store and followed the directions. Honestly, I'm not sure how well it worked but I think they got a little lighter.
When they were dry I went back and used liming wax on them. The white of the liming wax brought out the grain, which I actually liked on this piece (which is unusual for me), and lightened up the wood. It also helped take out some of the yellow in the wood (which really isn't coming through in these photos taken in the dark depths of my basement).
I still don't know where this is going to live. I think once I get the finished half of the basement spruced up (seriously, will that EVER happen?) it might be nice there and could even be used as console for a television if we would have one down there.
It might not have a home immediately, but I still love it. I'm happy I went out of my comfort zone of painting everything and did something different with this piece.
Labels: before and after, DIY, dresser
posted by Erin @ The Impatient Gardener at
10:22 AM
3 Comments