The Impatient Gardener: December 2011

30 December 2011

Happy New Year & some non-resolution resolutions

6a00d8345165de69e20147e128f21f970b 320wi

I'm not a resolution maker. I don't think there's anything more depressing than setting yourself up for failure, which is what most resolutions do. I am, however, in favor of change for the better so here are a few things I'm hoping to change for the better in 2012.

1. Blog more. I'll never write a post every day. God, that would be a total bore. I don't ever want to write a post just because I have to. I strive to make posts here something that you want to read about. However, there are a lot of blog drafts sitting in a folder in my computer that never make it to all of you, and I'd like to do a better job on getting the worthy posts published.

2. Be a better blogger. This means doing a better job responding to comments and making comments on the hundreds of other blogs I follow.

3. Use my passport more. Because of my job and Mr. Much More Patient's job we have a unique opportunity to do a fair amount of traveling, but I can't tell you the number of times in 2011 that I've opted to stay home. Mostly it's because I'm lazy. It is a lot of work to get organized enough at work to be out of the office for a few days. It's even more work, accompanied by a fair amount of guilt, to leave the dogs for a few days. But the dogs love their sitters and so long as the best dog sitters in the world are available, they'll be just fine without me. Sometimes I opt not to go because I know that my travel partner will be busy working and it doesn't sound like much fun to travel on my own. I need to get over that. I don't have a lot of regrets (it is my most despised feeling), but most of those I do have are travel opportunities that I've passed up.

4. Bring lunch to work. Duh. I'm going broke and gaining weight by eating out all the time. It needs to stop.

And then there are all those typical ones about managing money, being healthier, etc., but why even bother writing those down? They are pretty much a given anyway, aren't they?

Are you a resolution maker? If so, what's yours?

Wishing you all a fun New Year's Eve and a wonderful 2012!

28 December 2011

2011 favorites

I've noticed that a lot of blogs are running posts featuring some of their most popular projects or posts from the past year and who am I to avoid hopping on a bandwagon?


So let's take a look at what you all were digging in 2011.


You really liked Looking back at the reno, a year later, and to be honest, I like it too. Even though it still wasn't that long ago, it's pretty amazing to see that our house went from this:

Oldhouseback


To this:

Newhouse1


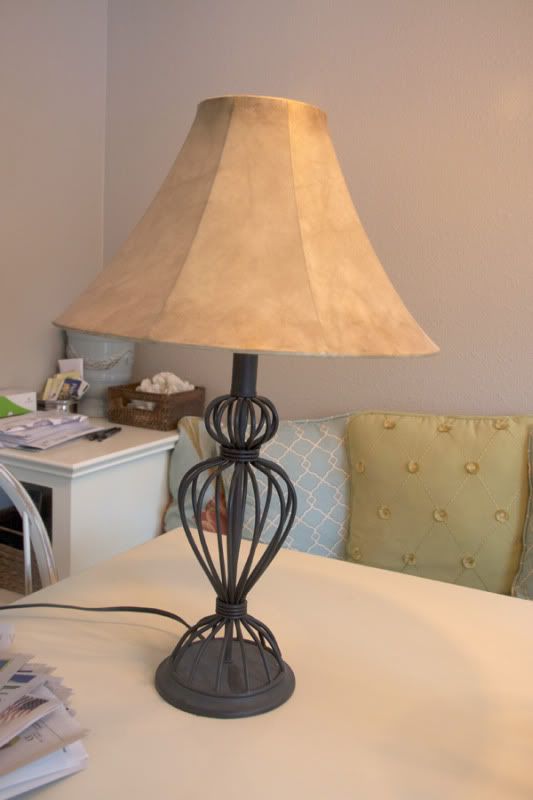
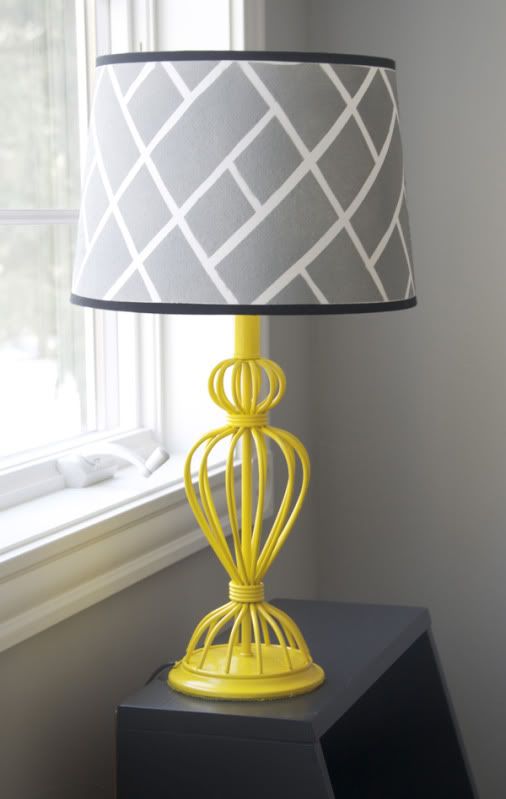
This silly little lamp redo, in which I exercised my newfound love/respect for spray paint to save a pretty ugly lamp.

lamp1_031311.jpg

lamp4_031411.jpg


A bit of the house tour of the kitchen, which we really haven't done much work to, was also at the top of the list. And yeah, still no art over the banquette. I just don't do placeholders so I'm still waiting for the right thing to come along.

Kitchen2 101211


And from a room that hasn't been changed much (other than putting in that banquette, which I still think is one of the best changes we've made to the house) to a room that didn't exist a year and a half ago: the bathroom.

Reno3 101011


And I'm happy to note that I might prevent some of you from making some of the same plant mistakes I've made by telling you about some plants I'll (probably) never plant again including the dreaded artemesia 'Oriental Lime Light.'

Artemisia


I hope to bring you lots more interesting posts in 2012 and I so very much appreciate all of you who stop by daily, or just once, to check out the blog.

Labels: , , ,

23 December 2011

Traditional tanenbaum


I'm traditional about very few things in life. I'm a pretty independent woman, so much so that I can sometimes be offputting to gentlemen offering to help with something. I have no problem painting a piece of fine furniture white (or any other color) if I'm going to like it better that way. And we all know my approach to gardening can't be found in any book. But when it comes to Christmas, I'm a traditionalist at heart.

I love looking at themed trees and decorations and I'm always impressed by people who change their tree decorations every year, but for me, it's not my Christmas tree until it is just so. And that just so is exactly the same every year. I like to put on white and red lights (Go Badgers!). I like to hang simple glass balls in a variety of colors as a "background" to other ornaments. I like my favorite ornaments to be displayed front and center and the ugly ones that I feel bad leaving in the basement in the back of the tree (I love looking at the backs of people's Christmas trees ... it's very telling). And I love to finish off my tree with hundreds of glass icicles, so that it's absolutely dripping with them by the time I'm finished (like I did with a big ol' tree in 2009).

But this year I had to scale back a bit. Mr. Much More Patient has been out of town since before Thanksgiving (and I'm very happy to be picking him up at the airport tomorrow afternoon) so that meant I was on my own for whatever Christmas decorations I wanted to do. And that meant that traipsing into the far reaches of the Christmas tree farm to cut down a tree then drag it a mile back to the parking lot was not in the cards (by the way, I think I might be over that tradition). We didn't put up a tree last year because we were still at the tail end of the renovation and I was tempted to skip it again this year, but two years in a row without a tree is an alarming trend. So I went for small, but not short. Basically I found the cheapest 8-foot tree in the lot (it was "untrimmed" and "kind of a wild one" so it was marked way down which was great because I love a more natural looking tree). Then I cut off the bottom 3 feet of branches and stuck it in an urn I found on clearance at a local nursery. I jammed it full of beach stones for stability and filled it with water.

And then my living room flooded. Whoops. Probably should have checked if the thing was waterproof or not first.

Plan B. Insert a five-gallon bucket into the urn. Build an old-fashioned X-stand (using an old 2x4, chop saw and drill, all by myself I might add), screw that onto the tree, stick the tree in the bucket, and then fashion an elaborate web to add stability by drilling holes in the bucket and stringing line between them and around the tree.


But that left the bucket partly exposed, so I fashioned a cute little urn scarf out of burlap. I love that little scarf.

Then I proceeded to decorate as usual, although I left a lot of ornaments off due to space constraints.


I also got lots of my wrapping finished early this year so I'm able to enjoy the pretty presents under the tree.


A bit of tidying up, a few boxes of cookies to pack up for neighbors and we're all set to celebrate. I hope you have a wonderful Christmas if you celebrate and if not, have a great weekend!


Here's a quick shot of how the Christmas card turned out. Enjoy.


By the way, if you haven't already done it already, remember to make your tree trunk ornament

20 December 2011

Crazy Christmas shopping pictures

It's amazing where you can find interesting displays this time of year. I snapped this picture in the gift second of the grocery store this weekend. I just love the feel of this tables cape. I tend to prefer more color around the holidays, but this is so casual and sleek at the same time. And yep, I bought those linen placemats.

Sendiks


On a different shopping trip earlier this holiday season I snapped a picture in Pottery Barn. Turns out it has kind of a similar color scheme. I really love those candlesticks on the coffee table, but the real reason I took this picture is because I thought that couch was the most ridiculous thing I'd ever seen. Seriously there is no where to sit on that couch, there are so many throw pillows. Maybe that was the intention so they didn't get weary loungers, but still. That's just silly.

Potterybarn


And at a trip to one of my favorite nurseries  I snapped these pictures.

I don't care what percent off that tree is. That thing is U.G.L.Y.

Caans1


Traditionally colored poinsettia with Euphorbia Diamond Frost? Maybe.

Caans2


Creepy purple poinsettia with Diamond Frost? Not a chance.

Caans3


Part of me sort of loves this way over-the-top garland just dripping with ornaments.

Caans4


I thought this fountain was pretty funky cool. The price ($1,500) was certainly not, but I think in front of the right house this could be pretty fantastic.

Caans5

A tale of two mantels

I did my mantel twice this year. No sooner had I gotten the wreath up than I found out that the newspaper that had featured the house in the home and garden section was interested in doing a special Christmas cover shoot at our house. They were looking for a big fireplace in front which a local group of high schoolers who put on a madigral dinner every year could pose in sort of a celebratory, raucous party scene. They knew I had a bit fireplace.
I had no problem with that. The problem came in when it came to setting a renaissance-type scene. I'm not sure any style could be more opposed to my usual M.O. and frankly I was flummoxed on what to do. And I didn't have a lot of time in which to do it.
I threw a whole bunch of greens on the mantel for starters. I didn't wire them or anything. I literally just stuck them up there. I mostly used the branches I cut off the tree, but I also filled in with cedar and white pine (like I did with the wreath). Then I filled in some lemon leaves (which are NOT lemon leaves. I've seen them called salal tips, but I will have to find the botanical name) to get a different texture in there. After that I threw (again, literally) some oranges and apples on top and borrowed some candlesticks from my mother-in-law (the dear woman let me take them right off her completed mantel). Because the starfish in the wreath would not at all work I just covered them with lemon leaves to obscure them.
To complete the over-the-top look (which is what I associate with that renaissance feel), I added some fresh Casablanca lilies at my good friend's suggestion.
Mantle1
2011wreath2
2012wreath3
The group was supposed to bring props with them; lutes, flutes, goblets, etc. Unfortunately they didn't, so the photographers (two of them: one to take the shot and a second to help set it up) had to get creative with posing. I had NOTHING in the house that would work, although they did end up using the single goblet I borrowed from  a neighbor mid photo-shoot.
Here's the photographer standing on a ladder in the doorway to the living room.
Mantle2
Here's the side few (the chair isn't visible from the front-on angle the photographer was shooting from).
Mantle3

The kids were troopers. They were in those heavy costumes and our fire puts out some serious heat. Even with the windows open it was hot in front of that fireplace (hot enough that I fried one side of those poinsettias in front of it). After they were finished I went back to a more traditional (for me) look. Gone were the candlesticks, fruit and flowers, and in came the stockings, glass bead garland and starfish. It really could benefit from some candles, but I was ready to be done decorating that mantel!
The furniture and mobile are back too.
Mantle4
Mantle5

I'll post a photo of the newspaper cover when it comes out later in the week.

Labels: ,

16 December 2011

Decking the outside

I had so much fun decorating the outside this year, partly because it's fun to deck out the "new house" and partly because it's been downright nice (for December) to be outside this year. If it weren't for not wanting to totally break the bank, I would have just kept on decorating. It's no secret that I love Deborah Silver's container designs, but I draw so much inspiration from her amazing holiday creations.

One of the things I did that's new this year, is mix in obviously faux materials with natural materials. I had seen Deborah do it and it intrigued me, so I added the sparkly balls to the  window box. Another little tip I learned from reading Deborah's blog is to wire the dogwood twigs together before putting them in the pot to keep them in nicer bundles. I also added faux eucalyptus to the containers  as it was easier to find (and less expensive than the real stuff). The greens and the dogwood were all gathered from our property or my parents' property (OK, maybe the field across the road from my parents, but close).

Xmasoutside3


I always fill the big container by the front door, too and that got a similar greens/dogwood/eucalyptus treatment.

Xmasoutside2


I put in some C9 LEDs as well so it glows at night.

Xmasoutside1


For the first time, I also filled the container I leave in the garden as well. It's not lit but I love looking out the kitchen window at it.

Xmasoutside4

But I had the most fun decorating the pergola. As I've mentioned before, given the orientation of the deck, the pergola doesn't really do much in the way of shading. It's purely aesthetic and I'd be lying if I didn't say that that decorating it for Christmas was on my mind when we (and by we I mean me since Mr. Much More Patient still doesn't understand what the purpose of the pergola is) decided to have it built as part of the deck project.

I had intended to pull the fake fruit off these Costco wreaths and put on ornaments instead, but I kind of liked the natural look more. I hung a wreath on two sides of the pergola and stuck some nice, big red bows on them. The garland is also lit and I just love how it all looks at night. I always cut my garland and rewire it so that it's facing the right direction. I can't stand garland running against the grain on the vertical.

Xmasoutside7

Xmasoutside6

Xmasoutside5


I'm thrilled with how it turned out. If we were having a big party I might have swagged garland all along the deck railing and added small wreaths at the bottom of the stairs. Lately I'm finding it much more fun to decorate outside than inside. Not sure why, but I'm sure the nice weather has something to do with it.

Labels:

12 December 2011

Sprucing up a wreath

The trip to an area Dick's Sporting Goods store was not without it's usual frustrations. As usual, it was impossible to find an employee to help and I was getting more frustrated by the fact that I had left my purse in the car so I was juggling my wallet and a flyer full of coupons somewhat unsuccessfully. But I had to stick it out because for me, Christmas decorating starts at the sporting good store.

And I had some decorating to do this weekend.

My parents always hang a huge wreath over their fireplace (in fact there is a rather adorable photo of me as an 11-month old baby with my brother gazing at our stockings in front of that fireplace with the wreath hanging over it) so when we bought a house with a huge stone fireplace, I knew I would hang a wreath there. But there is some engineering involved in this, especially since you don't want to put any sort of hanger in the masonry.

We have a wood beam sort of built into the exterior wall, so several years ago we put an eye screw in the top of it on either side of the fireplace. Then I string fishing line between the two screws and hang the wreath on the line. I've tweaked this system over the years but I might have perfected it this year. In the past I've used 60-pound monofilament fishing line, but since the hardware store had no high-test line, I had to run to the sporting goods store. And there I found that fishing line has changed. Now there is braided line that feels more like string than plastic. There are two problems with monofilament line: it is very hard to tie knots in and it stretches a lot. But the new line is super low stretch and since it feels like string, there's no problem tying knots in it.

Wreath9

The arrows point to the beams built into the wall where we put eye screws and then run fishing line between them to hang the wreath.


Wreath5

Which is why I  spent a good 20 minutes (without help from an employee, thank you very much) in the fishing line aisle. The 80-pound braided fishing line I got wasn't cheap, at all, but I got 300 yards which should last me about 10 years if I don't lose it.

With the string strung, it was back to the wreath. There are some beautifully decorated wreaths out there and I always strive to make one, but I'm always a little hesitant to go too far out of my comfort zone so I end up doing something a lot like what I've done in the past. But I'm OK with that. The holidays are one of those times when I'm OK with the same time over and over again for the sake of tradition.

I start with a 36-inch wreath that is pretty basic. You know the one: red bow, white pinecones, lots of balsam.

Wreath1


Then I strip it down (I spread out a bed sheet to keep the mess under control). I save the bow for something else (often at the end of the driveway or outside somewhere).

Wreath2


The next step is to lay out all the extras I'll be adding to get a feel for where they go. I don't attach them at this point, just get a feel for what is going where. When I took off the pinecones, one area had a bit of a hole in it so I decided to put the ribbon there.

Wreath3


I like a very full wreath and I like them to be a bit wild and shaggy, with lots of texture. But wreaths like that are very expensive. So I bought a pretty basic wreath made mostly of balsam and a little bit of white pine and then bought extra greens to add to it. It's really easy to add greens to a wreath. I just stick them in between the stems and if need be, throw on a wrap of floral wire (I'd be lost without floral wire for holiday decorating). With the greens added, I attach all ornaments, which also helps to keep some of the greens in place. It's not like this wreath is hanging on a door that will be swinging back and forth. It goes up on the fireplace and stays there until it comes down.

Wreath4

With all the ornaments added, I double checked the greens and filled in a few spots and then added the bow. I usually just do the red bow but I felt like it was a little small in scale (and I was out of ribbon) so I added a stiffer white jute ribbon (which has a little fleck of gold running through it).

Here's where my next little secret comes in. I use a carbiner to hang it. You know, the things that are really for rock climbing but now people use them on their keyring? I found a nice small one that was actually called an S-biner, with opening clips on each side and this is a wonderful little gadget, at least for hanging wreaths. I clip one side on the wire frame of the wreath and then just slip the other side over the pre-strung fishing line. This allows me to slide it side to side to get it centered properly.

Wreath6

Wreath7


Wreath8

And there you go. One wreath finished. Now … onto that tree. Bet Dick's doesn't have anything to help with that.

09 December 2011

Christmas inspiration everywhere

It is so hard to blog when you're never home during daylight hours. These short days are such a bummer, especially because I'm not able to snap a few pictures when I get home.

Anyway, I have been working on a bit of Christmas decorating and have a bit more planned for the weekend (I didn't not get a lot of the outdoor decorating done last weekend like I planned because it poured all day Saturday). Whatever isn't done by the end of the weekend isn't getting done. Sometimes you just have to call it a day, you know?

So in the absence of photos from my own house, I thought I'd share a few inspirational holiday photos that I've been looking at lately. I think when you see what I've done at home you'll see that I was heavily influenced by some of these.

How's your decorating going?


Source: bhg.com via Erin on Pinterest