The Impatient Gardener: January 2014

31 January 2014

Discovering garden styles part 3: Cottage gardens

OK, we're back with another look at a garden style, and I suspect this one is a bit more relatable to most people: the good ol' cottage garden. We've already looked at modern gardens and formal gardens, but now it's time to loosen things up a little.

C O T T A G E   G A R D E N S

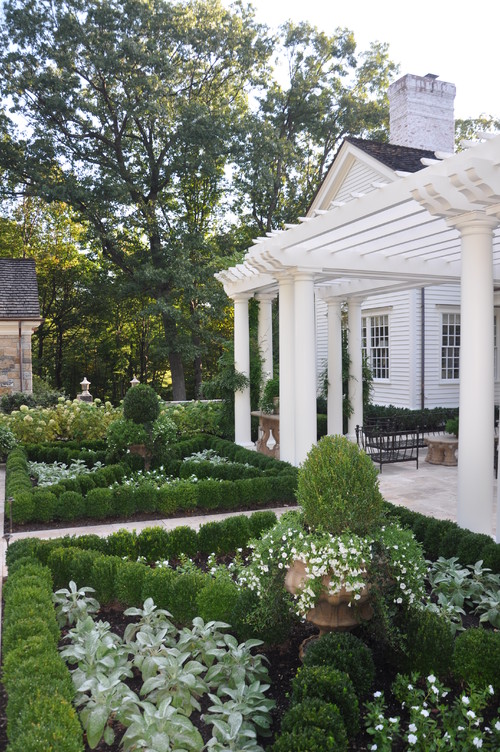
The free-flowing nature of cottage gardens makes a gardener want to throw on a big straw hat and a pair of overalls and spend days puttering in it. It is all about color, and free expression and, well, charm.


Plants are massed and abundant in a cottage garden.


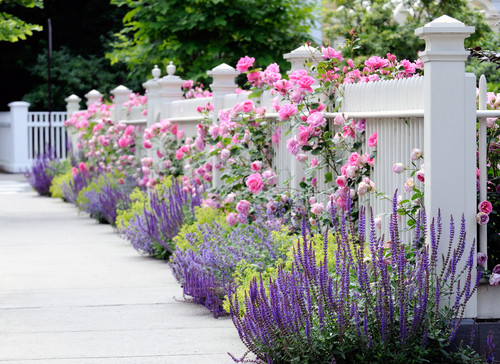
They often seem to be place haphazardly, but sometimes they are a bit more restrained in plant choices. (By the way, this next photo is one of my favorite garden photos of all time.)


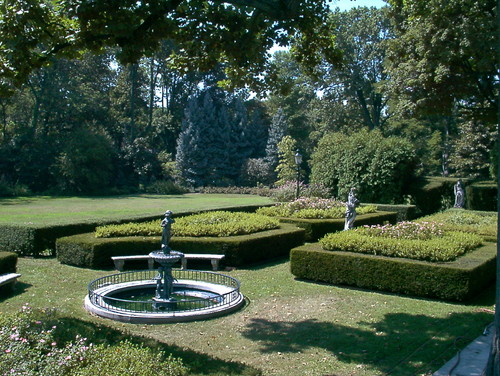
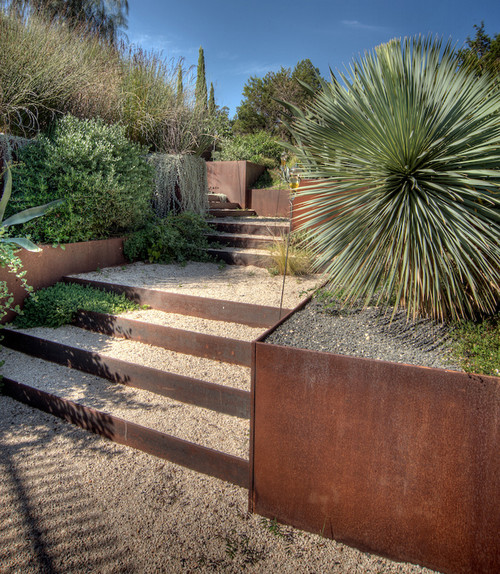
They lend themselves to all kinds of hardscaping options, so long as the form is free-flowing. Stone walls bring to mind traditional English cottage gardens and paths of flagstone can look like they just sprang up out of the garden. The best paths are those where the plants soften the edges.


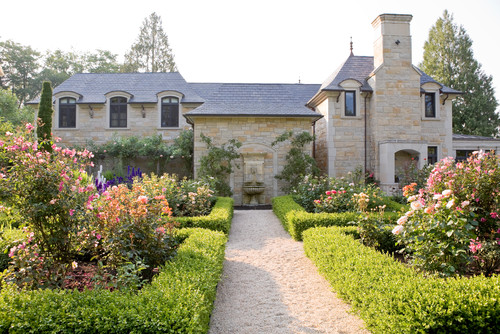
There are plants that immediately come to mind when you think of cottage gardens. Hollyhocks, delphiniums, shrub roses, nepeta, phlox and echinacea all say "cottage garden" to me. 

I also think of cottage gardens as mix of trees, shrubs perennials, annuals and bulbs. The most successful cottage gardens will have a layered effect, and care will be taken to make sure something is blooming at all times. 

The gardens of Anne Hathaway (William Shakespeare's wife). Richard Peat photo

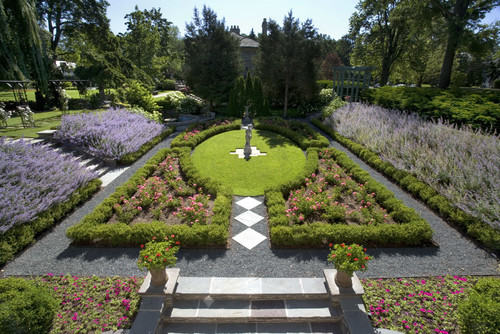
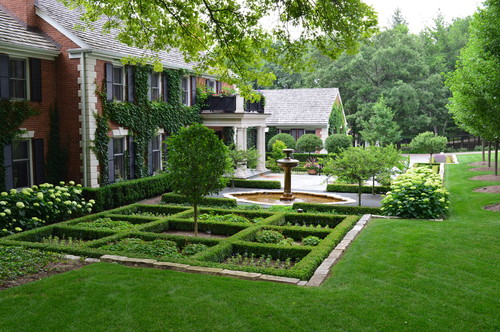
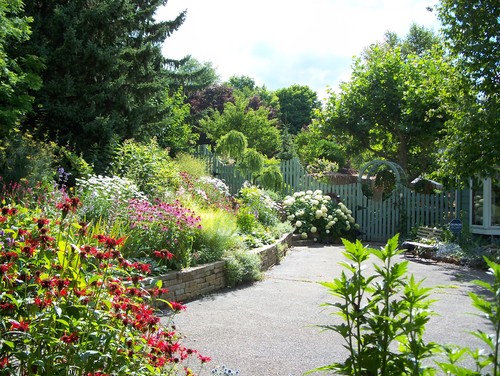
Cottage gardens work well in spaces of any size.

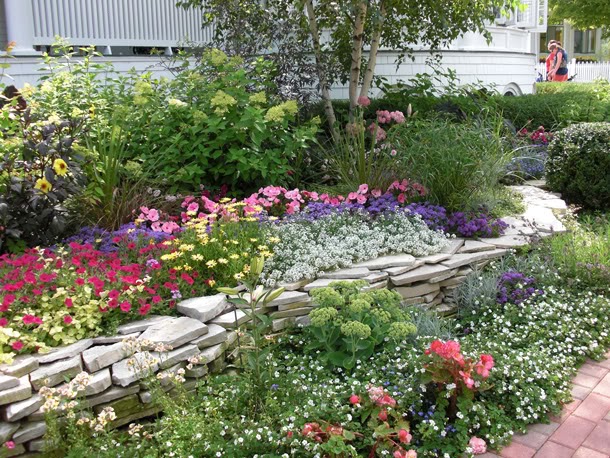
Jack Barnwell-designed garden at the Iroquois Hotel on Mackinac Island. The Impatient Gardener photo


C O T T A G E   G A R D E N S at a glance

H A R D S C A P E :  Many materials are suitable to cottage gardens as long as they have an informal look to them. It's even better if they look a little "lived in." Lines are using arching rather than angular. Fences are naturally suited to cottage gardens as well and perhaps none more so than the traditional white picket fence, although many other styles also work. 

P L A N T S : A cottage garden is a plant lover's garden. Almost any variety of plant can (and should) be worked into the design. However, planting in drifts is far more attractive than one plant of each variety. There still needs to be flow in any design, even an informal one.

M A I N T E N A N C E : I think cottage gardens have peaks and valleys for maintenance. They will be a lot of work to establish, if only because of the sheer number and variety of plants, but once they are grown, there will be a lot of maintenance in spring and fall to get the garden cleaned up and not as much in mid-summer when full plants will keep weeds at a minimum. From there, plant selection determines how much work there is to be done. If low-maintenance perennials are chosen, you can probably sit back and relax in summer, but some plants need to be coddled a bit. 

G A R D E N E R  T Y P E :  Gardeners who love an abundance of plants will be naturally drawn to these gardens. The nice thing with cottage gardens is that if you don't like where you've put a plant, you can usually move it elsewhere in the garden without having to redesign the whole thing (try doing that with a formal garden). Cottage gardeners love poking around their gardens and find it difficult to just sit down and enjoy them without popping up to pull a weed or deadhead a spent bloom. I think cottage gardens are also good for indecisive gardeners. You can have a bit of everything. But people who like a natural order to things might get the shakes around cottage gardens. They can be a little wild, which will work for some but send others in search of symmetry.

Labels: ,

29 January 2014

Discovering garden styles part 2: Formal gardens

Yesterday in a little break-from-winter look at garden styles we took a look at modern gardens. Now we're going in what you would think is the opposite direction, to formal gardens, but really these two styles share more in common than you might think.

F O R M A L   G A R D E N S

Even if you're not a fan of ultra formal gardens, you can probably appreciate their beauty. They are, to me, the quintessential "original" garden.

Symmetry (to the inch) is a hallmark of the style and nothing demonstrates this better that parterre gardens.


Bodysgallen Hall Hotel, National Trust Images/Charles Hawes photo
While I tend to think of formal gardens being associated with older traditional homes, they can be translated to more contemporary look as well.

Clive Nichols photo
The color palette in formal gardens is often restrained. There will be no riot of color here and shades of green brought in by the many manicured hedges is likely to take center stage.

Of course there are formal rose gardens that are a bit more colorful.


Hardscaping materials in formal gardens are varied but I picture stone walls as you might find in an old English garden. But crunchy gravel, brick and even concrete works too.

Formal gardens are rarely just about plants. A statue or often a fountain is often used as the centerpiece of these impressive gardens.


F O R M A L   G A R D E N S at a glance

H A R D S C A P E :  Almost any material works so long as it is used in an orderly fashion. Still hardscaping isn't as important as in some other styles. Classic materials include fieldstone and crunchy gravel, but brick certainly works in some applications.

P L A N T S : You better love boxwood. Because formal gardens love boxwood trimmed into every shape conceivable. Plantings are restrained and plant selection is limited so if you're a plant collector, a formal garden probably isn't for you.

M A I N T E N A N C E : Plan on giving up some serious free time to keep a formal garden looking good. You'll be setting up mazes of line levels to make sure all of the hedges are perfectly trimmed. And a weed? Gasp. The formal garden police will have you arrested for an errant weed. In other words, formal gardens are a lot of work to keep looking great.

G A R D E N E R  T Y P E :  Do you love math? You better if you plan on installing a formal garden by yourself. But the symmetry that makes formal gardens so beautiful will appeal to some gardeners' OCD tendencies. A formal garden is a big commitment and doesn't leave a lot of room for drastic changes down the road so a gardener should be relatively sure that it's really for them. And put away the plant catalogs. You'll be buying a handful of plants in bulk, not trying out new plants in groups of three.

Next up: We're loosening things up a little with cottage gardens.

Labels: ,

28 January 2014

Discovering garden styles: Modern gardens

Damn this weather. Let's talk gardening, shall we?

I love studying garden design (that is, if you count looking at countless photos of gardens to be studying). I think it would be great to have a garden in every style if such a thing was possible to pull off (I think would require multiple properties or one really, really big one).

So I thought I'd do a few posts on the various kinds of garden designs. And at the end we'll all fess up as to what kind of gardens we have and what kind we want. Or something like that.

I'm starting with ...

M O D E R N   G A R D E N S

Modern gardens rely heavily on hardscaping for their style. Structure is key and usually created through hardscaping with materials that tend to be cleaner lined and smoother in texture. Concrete, steel and slate, along with wood that's anything but rustic, are generally called for.

Often that hardscaping is angular.


Wide, arcing curves are a bit easier on the eye, I think.

Andy Sturgeon design photo

Modern gardens tend to have great paths and patios.


D-Crain Design photo

Repetition is also a hallmark of modern garden design, although I think it's pretty much key in any garden design.

Some elements call to mind Japanese style, but I think that's more because the two styles share such clean lines.


As for plants, modern gardens tend to be more reserved in the variety of plants. Succulents, bamboo and "hard-edged" plants like yucca are common. More subdued (although hardy and low-maintenance) perennials such as nepeta fit in well, as do numerous ground covers and neatly trimmed hedges.


But I think the hallmark plants of modern gardens are ornamental grasses.


M O D E R N   G A R D E N S at a glance

H A R D S C A P E :  Possibly the most important aspect of the style. Materials are clean lined: concrete, steel, rocks, ipe hardwood

P L A N T S : Ornamental grasses, succulents, bamboo, perfectly trimmed hedges

M A I N T E N A N C E : Once it's installed, most modern gardens won't be much work thanks to plants that mostly take care of themselves. But be forewarned, the look is all about things being perfect and it will fall apart the second things get a little shabby.

G A R D E N E R  T Y P E :  Loves back-breaking hardscaping installations and likes to sit back on a gorgeous but sparse patio with a Cosmopolitan and laugh while watching the neighbors toil over their high-maintenance gardens. Suckers.

Next up: Formal gardens

Labels: ,

27 January 2014

Questions I'd like to ask the previous owners of my house

I wanted to lay around and do pretty much nothing this weekend. The gravitational pull of the couch was particularly strong, so it's a good thing I published that to-do list last week. There's nothing like having to have something to write about on a blog to keep you honest.

Maybe I'm a glutton for punishment, but I tackled the ugliest item on that list: those damn hallway walls.

I knew sanding the texture—created with massive amounts of joint compound—off the walls in the hallway was going to be an ugly job. But some jobs just stink so much you can't properly prepare yourself for them.

I taped off all entryways (amazingly there are four in that hallway), put a drywall bag in the shopvac, donned the respirator (and looked really, really hard for work goggles to no avail), tied a scarf around my head and went at that wall with the belt sander. And 80 tons of superfine drywall dust was released into the air.

This is the view looking down from up on the stepladder. That's how dusty it was in that little hallway. 

There were a few areas where I had to use the smaller sander, which was far less efficient and there are two skinnier areas where no power sander will fit, so I have to figure out how to deal with that.

Unfortunately, it's not like I got the wall perfectly flat and smooth, so I'll have to skim coat the walls, which is a bit nerve-wracking because I get the impression that drywall texture is one of those things that requires a fair bit of skill.

Of course all of that sealing of doorways still didn't keep that damn dust from getting everywhere, so I'll be cleaning that up for weeks to come. Even the bedrooms upstairs have a fine layer of dust on them.

And this is how I looked:


But the whole time I was doing this heinous task I kept wondering what possessed the previous owners to do this to a wall?

I'd love to sit down with all the previous owners of this house and hear what went into all the decisions that make me shake my head. This is a hypothetical conversation, of course, because several previous owners are long since dead, including the cobbler who somebody once told me haunts the basement. I can only assume that he moved out when he saw all our stuff all over the place down there because I've never run into him.

At the top of my list to ask about would be the textured walls. I suspect that the renovation that put drywall on the walls (replacing the original plaster) was at least partly DIY and they discovered that applying drywall texture was hard to put on unless you just slathered it on  with a trowel and called it stylish. And I can only assume they were so sick of the project by the end of it that they didn't think anything of never priming or painting the walls.

I'd also love to hear the thinking behind painting out all the original paneling and the stairs without doing any prep at all, including sanding or priming.

And I'd love to hear about the idea that led to drywalling over the cedar lining in the closets (that we discovered when we demo'd during our renovation).

Of course I don't think I'm immune to the same kind of questioning. I can envision a future owner of this house (way in the future since I pretty much plan to die here and join the cobbler ghost dude) having a few questions for me, too.

Questions such as:

  • What is with you and white and gray? You do know there are other colors you can paint walls, right?
  • Why did you turn the entire yard into a giant garden with a little grass in between?
  • Why is there still dog hair in crevices in this house even though you haven't lived here for 50 years? (Answer: That's the power of Newfoundland fur, people: It has staying power.)
  • You know I'm STILL cleaning your crap out of the basement, right?
So, what would you ask the previous owners of your home if you could? And what do you think will befuddle future owners of your home?

Labels: ,

24 January 2014

A DIY magnetic chalkboard: Now you see it, now you don't

I have to apologize, you guys. My disorganized method of managing photos has struck again. I kick myself for this. I work with professional photographers at work every day and I know that they all have a method for cataloging every photo they download, so why I never started doing the same thing is a bit of a mystery.

I've been trying to write this post for well over a month now (the photos prove that) but I've been hunting for all the in-progress photos I dutifully took along the way so I could do a true tutorial. Well, I give up. I absolutely cannot find those photos on my computer or my external hard drive. 

 So, unfortunately you're going to have to live with just an after photo in this tutorial and trust me on the rest. I hereby promise to do a better job keeping track of my photos. Or better yet, finish projects in a more timely fashion so I don't lose them to begin with.

When we did the kitchen renovation, I couldn't wait to clean up the wall where the refrigerator was and part of that was creating the look of a built-in fridge that was just a regular standalone fridge.

Before there was this sort of strange half wall that didn't quite cover the fridge, so about a foot of the side of it stuck out. I hated the look but I loved the fact that it gave me a place to hang the stuff one needs to hang on their fridge: pictures of our nephews and niece, save-the-dates for upcoming events, the magnet your plumber gives you that comes in handy when a toilet is blowing up, that kind of stuff. 

The fridge wall before. You can see that even the counter-depth fridge stuck out from the cabinet surround, which was ugly, but gave us a little room on the side of the fridge to stick things.
As much as I loved the new look, I missed that spot. 

I didn't want to hang something just out in the kitchen. As much as I try, those types of spaces always end up cluttered and my goal for the kitchen has been to keep clutter to a minimum. I don't mind a little clutter in my life, but I love a clutter-free, almost sparse kitchen and creating that was one of the goals for the kitchen.
After, the fridge had a nice built-in look and the pantry didn't jut out into the room oddly, but I had nowhere to stick things that used to hang on the side of the fridge.

So I looked to the inside of the pantry door. And of course, I wanted it all: both a surface to write on and something magnetic to stick stuff on.


I started with a piece of galvanized sheet metal. You want to look for this in the plumber's section of your big box store as its intended purpose is to put behind pipes when soldering so you don't light the wall on fire. This is what it looks like. 


It cost me about $9. You can buy other metal that will do the job, but it's usually much more expensive and if you're covering it anyway, you don't need to get fancy.

I cut it to size using tin snips. I'm not going to tell you to wear gloves when you do this because a.) you already know that and b.) you won't anyway. And yes, I cut myself doing this.

After that I mounted it on what Home Depot calls a "project panel." It's only 1/8-inch thick but it provides enough rigidity to keep the metal from flopping around without adding too much weight or bulk. I used contact cement for this.

Then I painted it with two or three coats of chalkboard paint. Although the can suggested that chalkboard paint should be rolled, I had the best results when I brushed it on.

The hardest part of the whole project was creating a frame. Since this was done on the cheap, I certainly didn't want to have to go out and get a custom-made frame for this odd shaped thing, but my homemade attempts at creating a frame were, um, less than successful. Finally I went to my handy stash of balsa wood strips (last used for this project) and cut them to size. No miter joint here, just a regular old butt joint. I used a good amount of wood glue in the joint, wrapped in waxed paper (to keep the glue from attaching itself to the support pieces), used a piece of scrap wood on either side to stabilize it, and then clamped it for several hours. (Boy, a picture of that process sure would be nice, wouldn't it?)

Anyway, by the time the glue dried I had a very light and relatively delicate frame. I gave it a little sanding and quite paint job then glued it right onto the chalkboard, overlapping the frame onto the board by about a half inch on each side. 


Then I used some 3M vecro mounting strips to attach the whole thing to the inside of the pantry door. I used the strips on the backer board, rather than the frame, which is purely decorative. By cutting the backerboard and metal sheet the same size as the inset panel, the whole thing sat flush to the door, with the frame just extending about a quarter inch. 

I'm happy to report that the board fulfills both its chalkboard and magnetic functions perfectly (that little pad of paper on the bottom is on a magnetic clip), and I love that it can be out of sight when I don't need it but it's easy to get to when I want to.

Now I just need to work on my chalkboard art (not to mention my Happy New Year message).


Labels: , , ,

20 January 2014

Taking stock: What's on the agenda

Ahhhh. I'm back and so refreshed. Call it a massive rapid influx of Vitamin D, but sailing the Exuma islands of the Bahamas was certainly just what the doctor ordered. I feel refreshed and ready to jump into some great winter projects. Now that the holidays are over (and I am SO thankful that I put everything away before we left January 9 because it was so nice to come back to a Christmas-free house), we are in prime project time and I'm ready to get going.

As I often do this time of year, here's a rundown of the projects that are on the to-do list. If you know anything about my to-do lists, you know that there has never been a time when everything gets crossed off, but for me, a list is the first step to getting myself in the right frame of mind to prioritize projects.

Gardening related tasks

This is obviously my favorite category because I love knowing that spring is coming, even when the weather tries to tell me differently.
  • Plan vegetable garden, take stock of current seeds and order new seeds. (Here's what I ordered last year.)
  • Order onion sets and other vegetable garden (non-seed) items (i.e. specialized fertilizers, assorted gizmos, etc.).
  • Scope out new perennials and shrubs I might be interested in.
  • Possibly re-design the mini garden bed by the garage (below).

House projects
  • Clean out the basement. Yuck. Not looking forward to that.
  • Sand the wall texture in the hallway.

  • Paint walls and trim in the hallway.
  • Finish the dresser refinishing I started well over a year ago.
Office projects

I never really finished up the office renovation at work and there are a few finishing touches I'd like to do there.
  • Paint the file cabinets.
  • Hang art on the wall I look at all day.
Outdoor projects
  • Plan the pergola for over the garage doors.
  • Order pergola brackets (I feel safer ordering them than building them).
  • Cut pergola pieces.
  • Stain/paint pergola parts so it is all ready to be installed in spring.
  • Add some trim around the garage doors and replace damaged trim.
  • Look into new garage doors.
  • Find new outdoor lights for the garage.

Blog projects
  • A good friend of the blog and I have been cooking up what could be a very cool somewhat regular feature that is gardening related. Now we just have to translate talk into action.
  • What do you guys think? Is a redesign in order? I went through so many redesigns, at least two of them paid for, until I settled on this one that I did myself and I've been pretty happy with it, but I wonder if the site couldn't use a little sprucing up. Any thoughts? 
What's on your agenda now that the holidays are over?

Labels:

13 January 2014

Flown the coop

It's the same every year. The Christmas decorations come down and almost instantly my thoughts turn to the garden. This is problematic because the earliest I can start working in the garden is early April, and that's if all the stars align and we have an actual spring (something  that is almost unheard of in this part of the country).

That makes for four very long months. Sure, the seed and nursery catalogs have started arriving and those are good to lose oneself in for awhile, but that only sustains a gardener for so long.

I have found the best cure for gardening fever, not to mention cabin fever, is a bit of time away. It's really only delaying the inevitable gardening obsession, but I suspect it's aids in sanity maintenance.

So I'm off for a little jaunt to the south for a work-related trip that will be so fun it will look more like a vacation. In fact, by the time you read this it will be half over. I doubt I'll be able to post while I'm gone (spotty Internet is usually step No. 1 in a good vacation) but have no fear, I'll be back soon and ready to talk gardening. Aren't we all?

So ... I actually wrote this post on the plane on the way down and have been trying unsuccessfully for four days to get a picture from the journey in it. Sadly, it's not to meant to be (spotty Internet, what a great problem to have on vacation) so you'll have to do without. Be back soon!


09 January 2014

Skinny trees for sunny spots

I saw a lot of gardening "trend" stories pop up around the beginning of the year. The concept of trends in gardening always seems a little off to me. I look at photos of gardens designed a hundred years ago and love them as much (or more) than one designed last year. But I know particular kinds of plants come and go. I don't know what all the fuss over fig trees is but I do know that just about every shelter magazine has about 50 photos of them in fancy interiors.

Anyway, I'm not sure that espalier trees are a trend, but I feel like I'm seeing them more and more. Or maybe they've been there all along and I'm just noticing them now. But I like them. A lot.

They seem to fit a purpose that few other kinds of trees, shrubs or plants could and therefore they are as useful as they are beautiful.

I think most people think of espalier trees growing along the side of a house or tall wall or fence.

This gorgeous tree has been trained into a fan shape.

Source
The candlelabra form, I think, is what most people envision when they think of espalier trees.

Source

Espalier trees are not for the hands-off gardener. They require a good amount of attention because all those branches have to be trained when they are young and malleable. And they aren't for the faint of heart either because there is a lot of pruning. And they probably aren't for the impatient because, as you can imagine, that kind of thing doesn't happen in just a summer or two.

Fine Gardening has an excellent article on how to grow and train espalier trees and P. Allen Smith has a good tutorial online as well. Of course you can start them from a seedling, but if I were to grow one, I think I'd start with a potted tree. That way I could concentrate more on the training and less on just keeping it alive.

I think my favorite use of espalier trees is as a living fence as this Belgian fence below. Would you rather look at this than a wooden wall?

But I have to think that something like that fence is easier to site when starting from scratch on new landscape plan. Obviously you need a lot of sun and, let's be honest, it's more of a visual barracade than a practical one.

Source
An espalier tree is probably not the best fit for a gardener like me, given that I'm a less than steadfast pruner and we all know that patience is not my strong suit. Still, I love trying new things in the garden and I'm usually willing to try almost anything once.

Unfortunately I can't think of any place to put one. One place that comes to mind is the front of the house. It's a bright southern exposure and there's a good amount of space there. But I've also finally got some climbing plants going there and I'd hate to have to move those.

Perhaps some garden area in the future will lend itself to trying an espalier. I think it could be great fun trying to grow one.


Labels: ,

07 January 2014

Think you've got Mother Nature figured out? Think again, sucka

Since most of the country (and Canada) is in the grips of the polar vortex I'll spare you my tale of woe and the pictures from my cell phone of the thermometer on my car. School's been cancelled due to the cold for two days now and one of our buildings at work is without heat but my main concern regarding all this cold weather isn't of a personal nature, unless you count the head banging I'm likely to do when I assess the damage to the garden come spring.

There's not like getting a little over confident about the weather to have Mother Nature laugh in your face.

I've been doing my fair share of zone pushing lately. That is, planting perennials, shrubs and trees that are rated for a zone warmer than where you garden. Well, sort of. From the time I started gardening here, it has been zone 5a. A couple years ago the USDA announced a new zone map, bumping us up to 5b. I've been more than a little skeptical, particularly since I sometimes thought that even the 5a designation was optimistic, as just a bit inland it was 4b territory (and now 5a).

Anyway, as far as hardiness goes, I only really breath easy with a zone 4 plant, but often buy zone 5a plants without a lot of worry. After all I've lost far more plants to poor siting or a lack of consistent watering in the first season or the damn deer, and, well, winters just aren't like they used to be. 

Or so I thought anyway. Climate change, I told myself. Winters just don't get as cold anymore, I said. Oh sure we get a bad winter every once in a while, but that's like what, every 25 years?

The low temperature (not windchill) here Monday night was somewhere around -20 and that is a problem. The USDA hardiness map for zone 5b is -10 to -15. Zone 4b is rated for -20 to -25. 

So what's a gardener to do? Well, not much at this point, frankly. Fortunately we have a pretty good blanket of snow on the ground. If that wasn't there I'd really be panicking. I'd be happier (from a gardening standpoint anyway) if we had gotten some of the several inches of snow that fell in the states south and west of us so that blanket would be even thicker. 

In fall I did some protection of the plants I deemed to be most precious or most suseptable to winter damage from weather or critters. A couple of new small trees including a gingko and a Japanese Maples got cages stuffed about halfway with leaf mulch. 

This is what the Venus dogwood looked like until the week (pay no attention to the pile of branches and burlap it was about to be dressed with). 

But there's one tree that has me particularly worried. It's a Venus dogwood and I wrote about it last April and a few months later I was planting the biggest one I could get a mail order nursery to send me. I wrote about it when I was considering buying it and even then I admitted that it was a risk since it's probably a zone 6a plant, even though some descriptions said it was hardy to zone 5b.

I really babied that tree last summer and in fall it got a nice thick layer of leaf mulch at its base and a full deer fence enclosure. But when I saw the forecast for this week, I thought it would be worth trying to do a bit more to save it.

I grabbed all the extra pine boughs I had from making my winter containers and stacked them  up at the base of the tree plus around the deer fence. Then I wrapped the entire thing in burlap. It was important that I didn't do any of that any earlier because the snow piled up at its base should help it more than anything I can do and if I had burlapped it sooner, it would have missed the snow.


I also piled more branches around the new gingko and japanese maple as well as put a bit of burlap around the gingko. None of it is pretty, that's for sure, and it's not exactly the look I was going for out the living room winter, but I'm happy to give up my winter view for beauty the rest of the year.

The little Japanese maple just got a few branches stuck in its cage.
I have no idea if my last ditch efforts will make a difference and it will be a long wait to find out. I figure it will be May before I really know the extent of the damage. Doesn't May seem like a lifetime away right now?

How's your garden faring through the polar vortex?


Labels: , , ,

02 January 2014

Let there be (a not ugly) light

Happy new year, everyone! I hope you had a nice New Year's Eve and a great first day 2014. I was happy to get the house completely de-Christmassed. As much as I like the decorations (and I really just got them up about a week and a half ago), it's still nice to reclaim the house.

Last weekend, when I was supposed to be taking down the Christmas decorations, I got involved in a few other projects that seemed like way more fun. It was nice to check a few things off the to-do list that have been lingering there for quite some time. 

We have a very small hallway downstairs that is a total nothing space. It's not really offensive, but it's completely blah, and it's been on the list to get a little love for quite some time. 

Here's what it has looked like since we bought the house (other than the blue stripe on the ceiling, which was a color test and the yellow tape on the trim in preparation for painting).


Nothing to get excited about right? The kitchen is the doorway to the right, the bathroom is to the left, the two doors on the left that you see are closets and straight ahead is the sunroom/den/back room (I really have to decide what I'm going to call that room so I can quit with all the slashes). This is taken from the living room.

The ceiling was the same pickled knotty pine that was in the kitchen before I painted it (the first time and the second time when I realized it really needed to be semi-gloss). The wainscotting is a continuation from the living room and you notice that the walls have the hideous plaster texture on them. Oh, and let's not forget the light. It was a cheap plastic light fixture that had one big thing going for it: it wasn't a boob light.

About seven hours later, here's what it looked like. I love that this was one of those projects that didn't take too much time and made such a big change.


I painted the ceiling with the same method I used in the kitchen. First I sanded the whole thing. It's a pain, but it's key. Then I primed with BIN shellac primer. When I did the kitchen I just spot primed the knots with BIN, which seals the knots from "leaking" through the paint and then primed the entire ceiling with a standard primer, but the hallway was so small I just did the entire thing in BIN, which has the advantage of drying in 45 minutes. 

Then I followed up with two coats of semi-gloss paint. The first coat was Benjamin Moore Bird's Egg, but it turned out a bit too intense for me. So for the second coat I made a custom blend (this is not something I like to do because it's impossible to replicate the color in the future, but I really wanted to finish up this project that day) that was a mix of the Bird's Egg, Wythe Blue and Mascarpone, all of which I had on hand. That lightened up the Bird's Egg just a touch and the Wythe Blue added a bit of greeny gray that I liked as well. 


When the paint was (more or less) dry, we installed the new light, that I had purchased way back in spring. It's a capiz shell globe that I picked up on a great sale from Pottery Barn Teen. I was rather surprised when it showed up and found out it was only the shade, without a light kit, and I had a hard time finding a light kit that would work with it. I ended up finding one for a pretty good price from World Market, but it was irritating to me that it didn't come with one.

This is just stage one of what I'd like to do in the hallway. I want to paint the wainscotting the same Gray Huskie that is in the living room. Then I want to get rid of the icky wall texture. While just replacing the drywall is the easiest way to do that (and what we did in the living room), this is a small enough space that I'm going to try just sanding it all. It's going to create a hideous mess, but I don't think it will take that long. Once that's done the walls, all the trim and the doors will all get a coat of Mascarpone like the rest of the trim in the house (except the kitchen and the upstairs bathroom). And I'd really like to move the thermostat over a touch so I could fit some art on that wall. 

There's more work to do but I'm happy it's on the road to looking like more of a space and less of an afterthought.

Labels: , , ,