The Impatient Gardener

20 August 2015

A RARE RUMMAGING FIND

I've been staying out of thrift stores for awhile now because I have instituted a rule of not buying something if I don't have an immediate use for it (and will fix it up within a reasonable amount of time). But I am in a few rummage-type Facebook groups in our area and every so often something pops up that really catches my eye.


So it was with this side table. It's got great mid-century styling and it has obviously been painted, but I like the color and the brass feet are intact. I brought it home and put it in the den/back room and it's absolutely perfect there. I love it to pieces.

Not only a shot of the table, but a rare look at one of the last walls in the house with the horrible texture still on it. Will this winter be the year it finally goes away? We can only hope.


The top has a piece of glass currently has a map under it (it came that way). I think I'll put in a section of a navigational chart in there for now, but I like the idea that you can really change up the look by putting different things under there.

I think I paid $40 for it. I probably should have haggled a bit, but honestly, I liked it enough that I knew I would have no problem paying that.

Labels: , ,

27 November 2013

Put on your elastic pants, it's time for Thanksgiving

When I was a kid, Thanksgiving was a much more formal affair. We always went to my grandmother's house (just down the lane from our house), dressed up in uncomfortable clothes (oh how I hated tights), sat at a kids' table, which we all hated until my grandma wisened up and gave us our own bowl of mashed potatoes and hovered around my dad snitching bits of turkey as he carved the bird in the kitchen.

Those were big family gatherings that included extended relatives and they were very formal affairs.

These days, though, it's usually just my parents, us and my brother and his family, which means it's a lot like a Sunday family dinner. Because of that, it has gotten a bit more casual. Although my sense of nostalgia wants to relive those Thanksgivings of my childhood, the practical adult in me is very thankful for more casual gatherings that allow for dressy jeans and laughs instead of tears when some minor kitchen disaster occurs.

We go to my parents' house so my mom handles the lion's share of duties, including setting the table. But if I were setting the table, I'd want it to be special but reflect the casualness of what our holidays have become. No flower arrangement ordered a week in advance. Just pretty linens, a low centerpiece or series of small centerpieces (I hate when I can't see the people on the other side of the table), and lots of room for all the food.

I love the feel of this table, even if it's not particularly Thanksgiving-y. I don't know what the New York Times thing is but let's pretend that's a mini pumpkin or something, OK?

Source
And I like this one too, although even more pared down because you have to have a place to put the turkey platter!


I guess it's clear that I like a little cleaner look, but that's only because I think the food is so beautiful that it should be the real star!

My contribution is always dessert. Even though we have a small group and we could get by with just one pie, I'll be making a few options. The beauty of being the baker is that you don't have to make anything you don't like and I really do not like pumpkin pie. Anyone else is welcome to bring a pumpkin pie, but it won't be me.

This recipe appeared like magic on my desk so I'm taking that as a hint that someone would like me to make it for Thanksgiving and I'm willing to give it a try. I'm not going to make the slab version though, just a regular pie.

I'll also make a regular apple pie for the less adventurous eaters (and I make a pretty good apple pie). And if I'm feeling really ambitious, I'm going to make Ina Garten's gingerbread cupcakes because I love gingerbread and cream cheese frosting. I kind of hate raisins in things though, so I'm torn. Because the only thing you use the rum for is to soak the raisins and if you don't add the raisins, how are you going to get the rum in there? And I'm pretty sure you want the rum in there.

I hope you all have a wonderful holiday with your friends and families!

And one quick note: Libby won the Minted giveaway! Congratulations, Libby. Check your email!


Labels: , ,

14 November 2013

How to make a custom striped table runner

I found a great new list-keeping app for my iPhone a week or two ago. It's called Tick, and so far it's my favorite list-keeping app that I've tried, and believe me, I've tried many. You can customize the icon and color for each list. Right now I have the number 10 by the little icon of a house. That means I have 10 projects in my to-do list for stuff at home. And every one of those projects is a big, multistepped endeavor. That can get a bit overwhelming.

So it's nice when I can pump out a little project that is fun and makes me feel like I accomplished something without having to think about it too hard, and this one definitely falls under that category.


Now that we have the newly finished tabletop in the kitchen (and I'm loving it by the way), I wanted to bring a little bit of brightness to it in the form of a runner (I sort of love table runners) that I can leave on all the time.

I wanted something that would be casual and help tie in the white of the cabinets and trim with the gray (Edgecomb Gray) walls. Stripes to the rescue!

Now I should say that you can buy beautiful custom table runners on Etsy. But because they are made by artisans, they are priced as though they are made by artisans, appropriately so. Sometimes, though, that's not in the budget (or even called for, to be honest).

First of all, I think a table runner is probably very easy to make if you can sew in a straight line. I am severely challenged in the straight-line sewing department so I knew that trying to make my own would probably become yet one more "big" task that I dreaded doing. But I figured I could customize one that somebody else had made pretty easily.

I found the most basic white linen runner I could. Turns out it was way too long for my table, so I just hemmed it to the right size (no, the stitching is not super straight but who is really looking at the end of your runner?). I ironed it first, just to make sure to get all the creases out.

The runner started life as a perfectly fine but possibly a little boring plain white linen runner.

Then I just used painters tape of varying widths to tape off some stripes. I wanted a stripe in the center, so I folded the runner in half to find the center and went from there. After I had my first piece of tape down just to the right of the center, I just eyeballed it from there. I figured if any of my stripes were a little off I'd just say I was going for a more painterly look.

I did measure again to make sure my sets of stripes to the side were the same distance from the middle set of stripes, but from there it was more eyeballing.


Of course you have to make sure to press down the edges to avoid paint creepage.

From there, I just mixed up the color I wanted in Martha Stewart craft paint, which is also suitable for fabric. This is the same paint I used for the chairs in the living room and it has held up so well. For the runner, I watered down the paint quite a bit because I wanted to make sure to see the linen texture and I didn't want ridges where the paint hits the tape.


I used a cheap craft brush to brush on the paint after putting some newspaper under the runner in case any leaked through. Then I pulled the tape.


To set the paint, I used a hot iron on the reverse side and then for good measure, threw the runner into a hot dryer for a few minutes, which I've found helps the painted areas soften up a little.


I did get a little bit of seepage on a couple of the stripes where I didn't push the tape done enough, but it's pretty minor. I figure it makes it look handmade, right?
And that's it. The hemming took about four times as long as the taping and painting did and all told I bet this was a 45-minute project. There's nothing like a little immediate satisfaction.


Labels: , , , ,

05 November 2013

How to create a weathered wood finish

I showed you the new kitchen tabletop on Friday and promised a tutorial on Monday, so it only makes sense that you're seeing this on Tuesday (punctuality is not my strong suit).


This weathered wood finish is not something I recommend for someone who isn't prepared to roll with the punches a bit. The fact is, you just don't know how it's going to work on your piece. I think you have to be prepared with a backup plan if things don't go the way you thought they would. I think that could reasonably include applying a stain or whitewash or just painting the thing if things go awry.

That was a chance I was willing to take, as the alternative either way was just repainting it.

So I did a little test patch of stripper to see what the table looked like under there. DO NOT DO THIS. Or if you do, make it the smallest possible area you can. I did mine the size of a placemat and if you look hard on the finished table, you can still see it.


Few things are as satisfying as stripped paint waiting to be scraped off.

Now that we've got all the warnings out of the way, here's what I did.

I disconnected the table top from the legs, just because it was easier to manage this project outside for the messy bits. I applied Citristrip brand stripper. This is really the only stripper I'll use as the other stuff is just way too fumy and scary to me. But you still have to be careful with this citrus stuff. I got some on my sleeve and then pushed my sleeves up. Later on I felt this horrible burning on my arm and it turns out I gave myself a pretty good chemical burn (it's still a big scab on my arm). So be careful (and there's yet another warning).

Also, it's probably not the best idea to try to use stripper in the sun, but it worked pretty well. I actually applied it twice: Once to get the paint off and a second time to remove the rest of the stain that remained on the original piece.


After stripping it, I cleaning everything off with mineral spirits. I don't really recommend that because I think it made the table too greasy. Just spend the dough to buy the stripper wash.

Then I sanded with 220-grit sandpaper. I had to be really careful with this step because my table is covered in a maple veneer that is very thin. Too much sanding and I'd go right through the veneer and then you've pretty much ruined the table, I think. This was a really light sanding, just to smooth things out a bit and get off the last vestiges of stain. In retrospect, I think I would have been better off sanding with a coarser grit because maple is already a very tightly grained wood, and such a smooth finish sort of closed off the pores of the wood a little more than I would have liked, making it harder to get the driftwood solution to soak in.

Then I mixed up a very diluted batch of Driftwood Weathered Wood Finish. The directions call for one cup of water to one packet. I think I did at least three cups of water. I was going for a lighter color and I figured I could always apply a second coat to make it darker if need be.

After sanding, before applying the Driftwood Weathered Wood Finish (in the bowl).

This stuff instantly turns the water black so don't be shocked when that happens. Then I used a cheap foam brush to apply it, but it was a little weird that it didn't really soak in. I blame that on two things: sanding down too much and using the mineral spirits to clean off the excess stripper. But I just let it sort of sit on the table out in the sun (which is supposed to accelerate the effect) for a bit, dried it off and brought it back in. The directions say it can take up to 24 hours for the color to stop changing so then I just sat tight.

Overall I was pretty happy with the results, but there were still a lot of very warm-toned areas that I wasn't thrilled with and the whole thing was looking a bit splotchy. I thought about applying another coat of the driftwood finish, but I was afraid that would only make the difference between the grayer areas and the warmer areas that much more noticeable.

After the weathered wood finish dried, the table was looking a little splotchy and a bit too warm-toned.

So I tried spot sanding a little. I was interested to see that the driftwood finish really soaked in, so when I sanded it wasn't like I was starting with fresh wood. That's something to keep in mind if you decide to do this: I'm not sure going to back to fresh wood would be easy. By sanding the warmer-toned areas (undoubtedly spots that I didn't sand well enough originally) I was able to get it a bit blonder and take some of the red out.

After a bit of sanding it looked like this:


For awhile I thought about doing a very dilute coat of a gray stain over the table, but some very wise followers on Facebook told me it was time to stop and just walk away. It was a good reminder.

So then I got crazy and I wire brushed the whole table. Yep, that sounds as weird as it was, but I was trying to open up the pores of the wood so I could do sort of a limed effect with wax. This is where the type of wood limited me. If I were dealing with oak that would have totally worked and looked great. But maple has a very tight grain and trying to bring it out to be more pronounced is really hard.

I followed that up with a coat of liming wax. I bought some as a package with the weathered wood finish powder and didn't care for it at all. I found a lot of people online who swore by Briwax Liming Wax so if I were going to try this again, I think I'd try that. But the liming wax that I bought was hard as a rock and as far as I could tell, did absolutely nothing to provide that "limed" look. I even had to soften it in the microwave and it was extremely hard to work with.

I'm becoming a real fan of waxed finishes. I've had them on some furniture that I've purchased and used it when I redid our coffee table and I've been very happy with the durability of it. I also really like the low luster that it give after a good buffing and I knew I wouldn't have to worry about it yellowing or being too shiny like a polyurethane. After what that Polycrylic did to the original painted finish on the kitchen table I'm extremely hesitant to ever go near it (or anything like it) again.

I followed it up with several coats of Annie Sloan's Paste Wax. I love this wax so much. It is the consistency of whipped margarine and is extremely easy to work with. I also sprung for a waxing brush (I bought this one) and while I'm sure I could have applied it with a rag as I have in the past, I really enjoyed working with the brush and feel like it really made for a nice finish. Even though I've waxed stuff in the past, I searched online for a good tutorial to make sure I was doing it right. This video tutorial is great and I followed it to the letter (other than what to wash the brush in; I bought a bar of real lye soap which is fantastic for washing out brushes, although I wouldn't have it in the house if I had kids).

Toward the end I was getting mighty sick of buffing, so I had Mr. Much More Patient bring a buffer home from work one day and give it a good once over with that. I actually feel like the table got too shiny after we did that, but I know that waxed finishes tend to dull with time so I'm not worried about it.

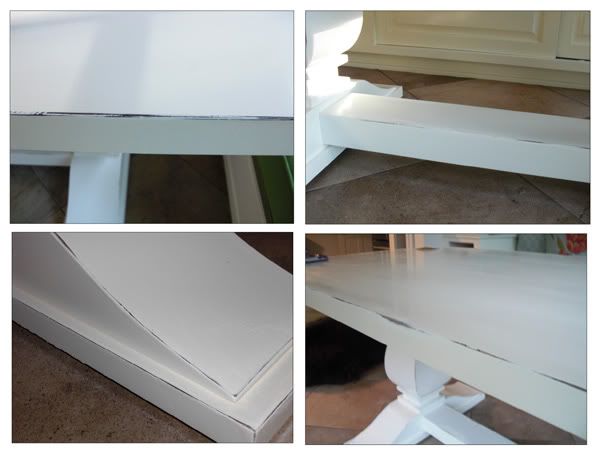
I also gave the base a fresh coat of white paint (Benjamin Moore Cloud White to match all the other whites in the kitchen). I admit to a bit of laziness on this part of the project. I just sanded them down and gave them a really good cleaning and put a coat of paint over them. Since Polycrylic is water based I figured that a water-based paint would be OK to put straight over the top so long as I prepared the surface. And I didn't do any distressing, although I'm sure some will naturally occur.


This isn't a great picture, but it's the best angle from which to see the freshly painted base.

Since this became a very long post, I thought I'd just quickly summarize the steps I would do if I were to do this same project again (and skipping all the stuff I did that didn't help):

1. Strip the tabletop.
2. Clean off the excess stripper with a stripper wash.
3. Lightly sand the table.
4. Apply a coat of Driftwood Weathered Wood Finish.
5. Apply a second coat after 24 hours if needed (I did not).
6. Wait for the table to dry thoroughly and sand the entire thing to make it smooth and less splotchy.
7. Apply several thin coats of Annie Sloan paste wax.
8. Buff between each coat and especially at the end.
9. Wait for the wax to dry a few days before putting the table into heavy use.

It can be hard to tell true color on photos, but I'll leave you with this one to get an idea of whether I ended up with a true "driftwood" finish. I picked up these two bits of driftwood on the beach the other day and set them on the table when I was cleaning out my pockets. I had a hard time finding them at first.


Just to clarify, no products were provided to me for this project and of course all opinions, good and bad, are my own.

Labels: , , , , ,

01 November 2013

A new old-looking tabletop

I'm not sure I've ever done a project in which I had no real expectations for the outcome. That's just not the way I roll. So going into refinished the kitchen table with no real idea of what it would look like at the end was not something I undertook lightly.

You may recall that we purchased our kitchen table from the Restoration Hardware outlet. It was a pretty good deal because it had pretty bad damage on the corner. Turns out that was fine with me because I knew it was too big for our space and that we'd be cutting that part off.here.
You can read all about how we customized the table for our space

Originally I painted the entire thing, and you can read more about that process here. I finished it with Polycrylic, which is a water-based coating. I chose that after testing several products on scrap piece of wood. It was the only finish coat I could find that didn't make the paint crackle or yellow. Or so I thought. Within days of applying it, it turned yellow. It bugged me then, but then it got even worse. It yellowed even worse with age. It had to go.

My original intention was to just paint it white again. And then a couple weeks ago I saw this table online (for the life of me I can't find the link now but I'll keep looking) and my interest was piqued. But the big question was, could I make my maple veneer table that was currently white look anything like that.
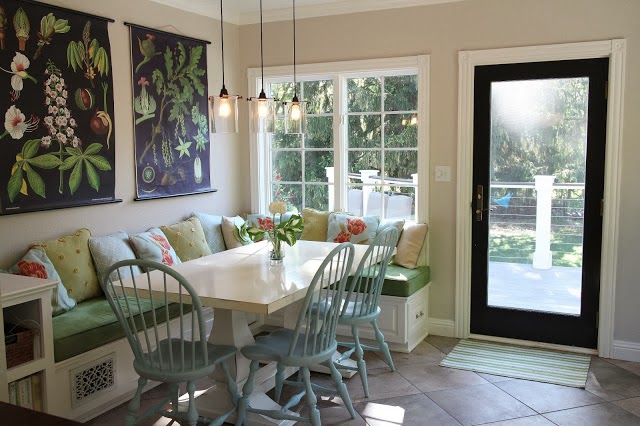
Banquette eating area, vintage school charts  -- The Impatient Gardener
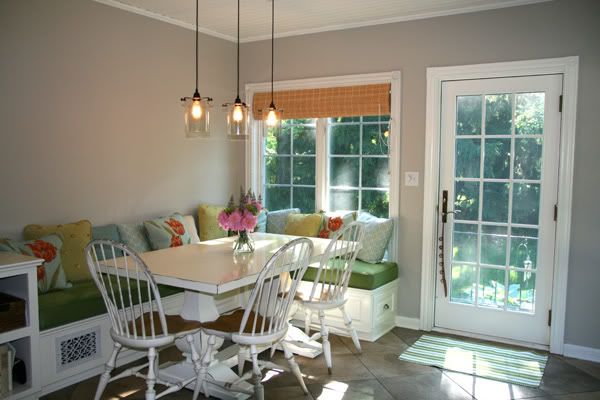
The kitchen with the white table.
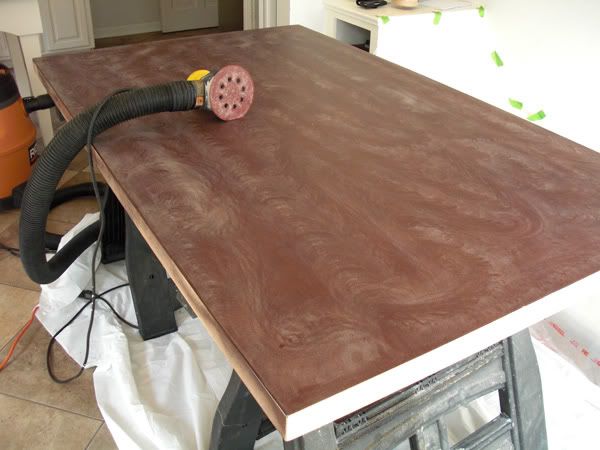
The only difference in terms of a starting point between trying to do a weathered finish and repainting the table was that I'd have to strip it first. So I did a little tester of stripper to see what was hiding underneath (for instance, did I leave a bunch of swirl marks from sanding it originally?). And when the stripper did its thing, it looked fantastic. This had potential.

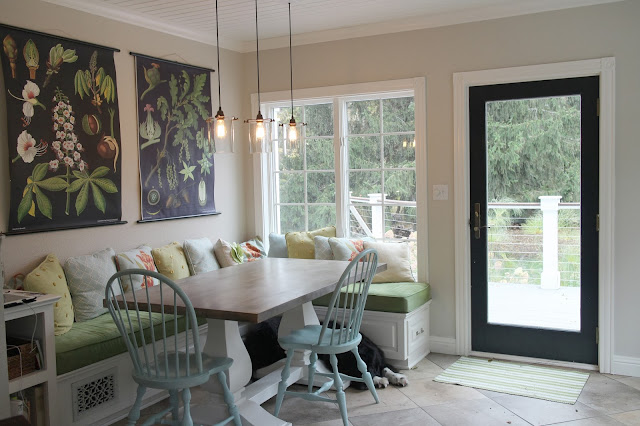
So here's where it ended up. What do you think?

Banquette eating area -- The Impatient Gardener
Refinished table.


While I liked the white table before, I'm loving this new look as well. More and more, I'm discovering that juxtaposition is my thing. I love a little bit of shiny and new mixed with vintage or weathered. It just works for me. So I like the fresh white table base with the weathered wood top, even if it doesn't really make sense.

Click here for a tutorial on how I did it.

You might notice the black furry thing under the table in those last pictures. That's Rita. There's a good chance she was stuck. Whatever the reason, it was clear to me she had no intention of moving.


Labels: , , , , ,

17 October 2013

Mid-project updates

I know that sometimes it seems like nothing is happening here in Impatient Gardener land. You don't hear from me for a few days (unless you follow me in Facebook or Instagram where I'm much more likely to post regular updates) and you assume I'm probably asleep on the couch with my laptop half on my face. You would be right a lot of the time.

But right now I have a bunch of projects in motion. The problem with projects, I'm finding, is that apparently they can take some time to finish. So instead of waiting what could realistically be months for the finished project (I literally have two big pieces of furniture in the basement that have been 80% finished for going on a year now), I thought I'd show you some of what's going on.

Probably the biggest project I've been working on is the kitchen table. Yep, longtime readers will recall when I did it the first time. I won't get in the why I'm redoing it right now, but suffice to say, something needed to be done.

This is what the table looked like until last Sunday.


Fast forward to this week. This is what the table looks like now (below, and keep in mind that the quality of the photos here is vastly different). I'm getting some positive comments on Facebook but there is work to be done. I'm probably going to take a wire brush to it to scuff it up (after I just got done sanding it by the way) and then use some liming wax. In any case, the final protective finish will be wax. Oh, and I'm repainting the legs too, but just the white that the rest of the kitchen is.


Meanwhile, the basement is full of orange. I don't think I've ever been so into orange before, but here I am with two different shades of orange going on furniture in the basement.


I've been working on redoing these cane chairs I bought two years ago on Craigslist and have gotten to the point where I'm on the last coat of paint, so it was time to double check to make sure I was happy with the color (oranges and reds, in my opinion, take at least three coats if not four to develop to the correct color). I brought one of the chairs up to the room where it's going and draped some of the fabric that I'm recovering the cushions in (yep ... I went for the most overused and expensive fabric you can find on the Internet; I can't help it, I adore it).


The color—Benjamin Moore Starburst Orange—is actually showing up a tad pinker than I expected, but I think once the finish goes gloss, which it is, the color will change a bit.

In other project news, I'm painting another ceiling (funny how I keep doing that even after swearing that I would never do that again). I've also determined that painting the garage is not going to happen this fall. The weather has turned and I don't want to take a chance of the paint job not working. By the way, thank you all for your nice comments on the garage project.

So that's what's happening in my world ... what do you think?

Labels: , , , ,

02 September 2010

How to turn an OK table into the perfect table: Part Two (Finishing)

This is Part 2 of a series on how I changed a brand new (but flawed) table into just what I needed. You can find Part 1 here.

With the table the right length (and the legs in the right place), it was time to finish it. Like a lot of furniture refinishing, the concern was that the table would be covered in brush marks and that was not the look I wanted. I sampled multiple paints and protective coatings on the two pieces of table we cut off, practicing different sanding and application techniques to figure out which worked best. Ultimately I used the random orbital sander and 120-grit sandpaper to rough up the shiny surface of the table. I made sure to keep the sander moving to avoid sanding straight through the thin veneer (REALLY thin veneer ... I can't believe how much this table originally cost given what I thought was rather cheap construction, but I digress). On the legs and curvier bits, I hand sanded. I should mention here that I disassembled the table for ease of finishing. I put the legs on the workbench on little dollies so I could spin them around to finish all sides.

Photobucket
The first step in the finishing process was to sand it lightly with 120-grit sandpaper just to rough up the glossy surface. I did this on sawbucks in the kitchen while the legs and trestle were being finished in the basement.


Then I coated everything in Zinsser's BIN primer. I used cheap foam brushes for this step because I didn't want to have to clean up good brushes afterwards. After the primer dried, I gave it a light sanding just to make sure it was nice and smooth and then I painted the legs and the trestle with two coats of Benjamin Moore Satin Aura in Mascarpone. I used a good paintbrush for this. (The Orel Lily Filbert brush from Omega is my absolute favorite and it was worth every single penny. It was not cheap as far as paintbrushes go, but I take really good care of it because I love it so much.)

Once the legs and trestle were completely painted, I brought them upstairs and reassembled the table (and threw down a tarp on the floor because I'm a messy painter). I figured it would be much easier to paint the top of the table with it attached to the legs. I followed the same steps as I did with the other parts of the table, making sure to run my brush lightly all the way from one end of the table to another to avoid brush strokes. The Aura paint is somewhat self-leveling, so it will dry smoother than it looks when you put it, but not if you overwork it. So I I'd put some on rather quickly (not slopping it in, but looking for a nice coating), and then remove most of the paint from the brush, hold it at an angle and run it all the way down the paint I just applied.


But I wasn't really happy with how the Aura coat looked. I knew I'd have to do another coat of paint, so this time, after lighting sanding with 200-grit paper and removing all the dust with a tack cloth (I wear latex gloves, which you can buy in a pack of 400 at Costco for every step of painting, to keep my hands clean and also because I can't stand touching those tack cloths. They give me the heebie jeebies), I brought out the big guns: Fine Paints of Europe Eco satin (color-matched to BM Mascarpone). This is what I used for the banquette and I knew it would do an awesome job (this stuff self levels so well it's unbelievable), but it's also super pricey and I didn't want to spend the money to do the whole table in the stuff. Plus, I had some left over from the banquette painting project. Now it was looking great.

Photobucket
After primer and two (or three, I can't remember) coats of paint, the table was looking sharp, but too perfect for my taste.

But it was a little too perfect looking for my taste. I wanted it to look a bit aged, especially since I knew it was bound to get a little beat up over the course of what I hope is many years of hard use. I started distressing it with some sandpaper. Let me tell you, there is a reason they call it distressing: It is very distressing to take sandpaper to a piece of furniture you've just obsessed about painting for weeks. I started out with a little distressing at first and then sort of freaked out.

Photobucket
These shots show my first attempt at distressing. I tried to distress the most in place that would actually see wear. Rayan of The Design Confidential told me I needed to do more, and she was right!

Enter Rayan from The Design Confidential. Rayan has some great finishing tutorials on her blog and I referred to them often, but when it came to the right amount of distressing, well, I just sent her an e-mail with some pictures. Over the next week she proceeded to hold my hand (virtually) through the emotionally distressing process of distressing. Sure, if I screwed up I could just paint it again, but come on, who wants to do that? Once, with Rayan's help, I was sure I had the amount of distressing I wanted (Rayan counseled me to distress more, so I did. It was the right call; the last thing you want is a little bit distressed piece, which just looks messy and well, like you didn't have the guts to do it right or you're a horrible painter), I went back with some walnut stain I had in the basement and applied it with a Q-tip to all the areas I distressed. Because there wasn't real wood underneath all that paint, it was somewhat colorless. By staining those areas it made it look much richer, like a farmhouse table was lurking under all that Mascarpone. I followed up with a rag immediately after applying it, so the stain only soaked into the exposed wood and didn't stain the painted portions. I had to repeat this process a few times to get the color I liked.

After all that, can you believe the hard part is just beginning? It was. The entire time I was finishing the table I knew that I'd have to do some kind of protective coating on it. Although some websites will tell you that you don't need to put anything over paint and that a topcoat won't add anything in the way of protection, I disagree. In fact, I actually ended up having to sand and touch up part of the table because a gym bag with rubber feet was set on it before I got around to putting on a topcoat. The rubber reacted with the paint somehow and there was a blackish-purple round stain from the foot that no amount of cleaning would take off.  This is a kitchen table, after all, where in addition to plates and dishes, all manner of stuff is routinely dropped in it (it's the first horizontal surface when you walk in the door). I did more research on what to coat this thing with than anything I've ever done. And then I bought products to sample and try out on the parts of the table we cut off. The criteria for some kind of protective coating was that it A. worked, B. wasn't too shiny (I was not going for high gloss) and C. didn't yellow.

Here's what I tried:
1. Minwax Polycrylic: This was widely recommended on various blogs, but in every test I tried it in, it got an almost crackled finish. I asked several people about it and no one had ever seen such a thing before but it happened to me in multiple tests, including those where I let the paint dry for a week or more before using the polycrylic.
2. Benjamin Moore Stays Clear: It doesn't (stay clear, that is).
3. Krylon clear protective finish: I'll be honest, I don't remember why I didn't like this one, other than that it is a spray, but I know it didn't work.
4. Deft Clear Finish Brushing Lacquer: Turns yellow and because it's a lacquer it's seriously full of fumes. Not something I wanted to apply inside the house.
5. Minwax water-based Polycrylic Wipe-on: This is what I ended up going with.


Rayan recommended a spray lacquer, but that wasn't an option because I was working indoors (in the middle of the kitchen, no less).

I applied the wipe-on polycrylic using a staining sponge and that worked really well. I also set up a shop light at the same height as the table so I could see where I had applied the finish because it really is that clear when you put it on. If you overlap just a little bit, you will end up with a yellow streak. I know this because I did it. And then I looked at it for two days. And I realized it would drive me nuts, so I sanded it down really lightly and did it again. I sanded lightly using 220-grit sandpaper between each coat and did three coats on the top. Everything else got just two coats. I wasn't worried about durability on the legs and trestle, but I was concerned that there could be slight yellowing on the top and I wanted to make sure the table ended up all the same color.

So how did it turn out? Overall, pretty good. It's not perfect by any stretch. It does look like a sprayed finish, which I love. It's downfall comes back to that damn top coat. It did yellow, and more than I wanted it to. It definitely looks creamier than the banquette, which is painted in the same color and I wish that weren't the case. The good news is that it matches the distressed Windsor chairs, which I saved from the kitchen set that came with the house, much better now. The bad news is that I would have much rather had to paint the chairs. Also, I was a little sloppy on the legs and in one spot there are yellow drips of the top coat.

Photobucket
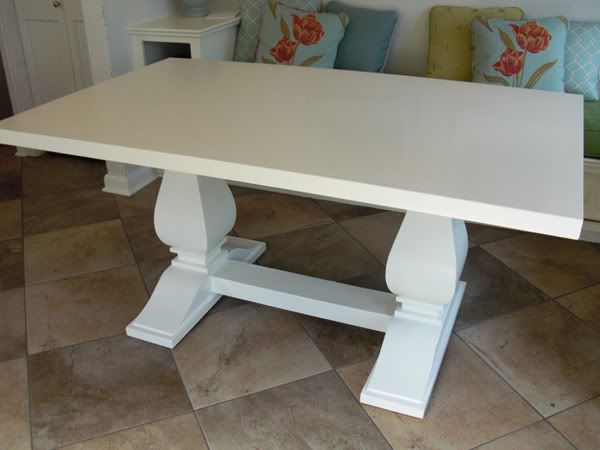
The completed table in the revised eating area.

I'm sure I'll redo the finish on the table at some point. No one else has noticed that it's a slightly different color than the rest of the white in the kitchen, but I do, and that's always my criteria. I do these things for me (and the husband), not other people. I think I will wait until the table needs refinishing for other reasons before I tackle it again and when I do, I'll haul that beast outside so I can spray it.

OK, so it's not the "perfect" table, but I love it more than anything I could have bought that was even close to my price range, even double my price range. And best of all, I think it looks perfect in the kitchen and we can now seat about seven (or even eight) people there, which was one of the goals of this in the first place.

Labels: ,

26 August 2010

How to turn an OK table into the perfect table: Part 1

When we started on the mini-kitchen redo last fall, I knew two things: I wanted a banquette and table that would allow us to easily slide in and out. That meant I was looking for either a pedestal or trestle style and after looking at what seemed like thousands of photos of tables online, I knew a trestle was just up my alley.

Photobucket
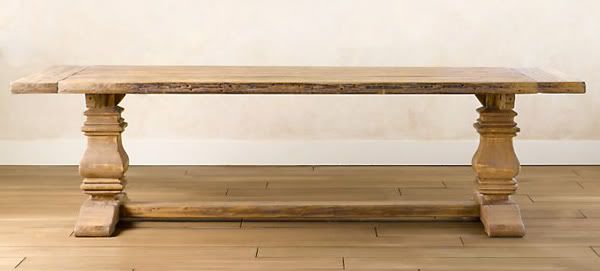
isn't she a beauty? Restoration Hardware photo


What I REALLY wanted was something distressed looking, like this Restoration Hardware table. What I didn't want is to pay a lot of money for a table.

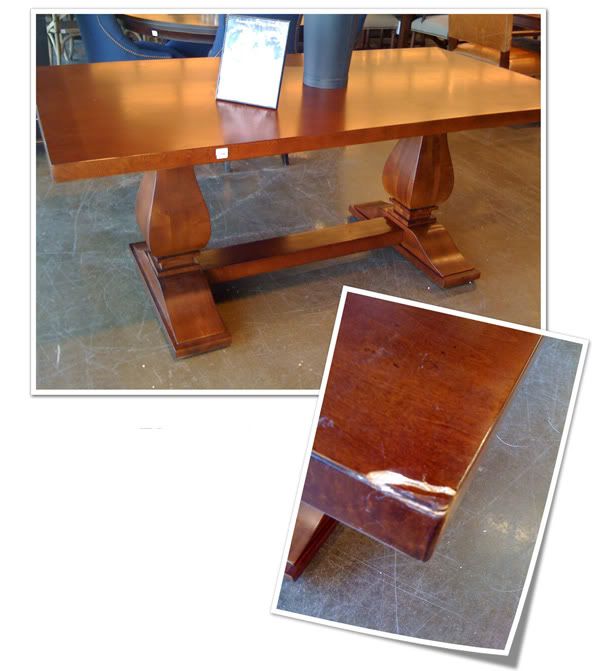
You might recall that I ended up finding this Camden Table at the Restoration Hardware Outlet, with one smashed in corner and a hefty chunk off the sticker price (plus, RH had its annual Friends and Family sale going on for an additional 20 percent off).

Photobucket
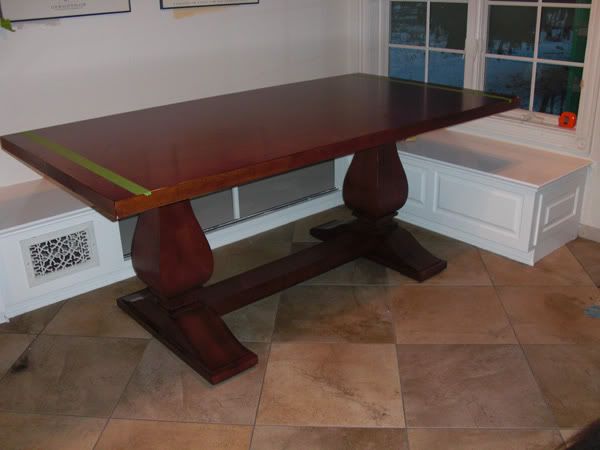
Love the shape, hate the color ... and oh yeah, there's that bashed in corner to deal with.


In addition to the damaged corner, there were other problems: the table was too long and all the wrong color. Ordinarily I wouldn't be comfortable buying something new and changing it drastically. It just feels wrong to me ... like the only things you should really attempt that kind of makeover on are things you find on the side of the road, in your grandma's basement or at Goodwill. But it became clear to me that I was never going to find the right table for the space at any kind of affordable price.

My husband prefers to stay out of these more complicated DIY endeavors, partly because he's a perfectionist (and I'm not) and partly because he knows that I tend to become obsessed with these projects, staying up to all hours to finish them until I'm  happy with them. I can't really blame him.

But this one was way above my DIY pay grade. And it involved power tools that have the capacity to cut off important body parts. So he got involved, if only to make sure we didn't spend the money we'd saved on the table on some sort of emergency hand re-attachment surgery. (For the record, one person in our house has mangled a finger in a saw, and it's not me. I'm just sayin'.)

Photobucket
The green tape was my attempt at figuring out how much needed to be cut off the ends.


Originally the plan was to just cut off and equal amount of table from each end to make it fit the space. This would also cut off the damaged corner. But then it became clear to me that that wouldn't work. In order to allow people to sit at the ends of the table (an important aspect of this table because part of the reason we started this mini renovation of the eat-in area was to be able to seat more than four people at once), there needed to be at least one foot of table overhanging the leg.

Photobucket

Photobucket
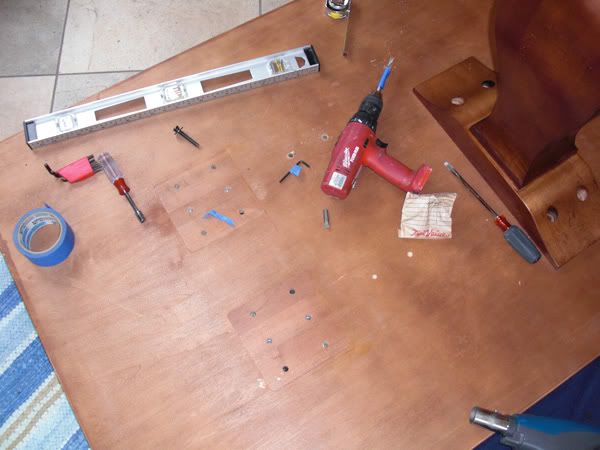
Here you can see the original holes where the leg was attached and our process of drilling new holes farther in.

It became obvious we were going to have to move one of the legs and shorten the trestle, then cut off just one end of the table to make it the right length. I wish I could give you instructions on how to properly cut the trestle part, because it involved a mortise and tenon joint, but all I can tell you is that he took it to his dad's house where he used some tools (let's call it a bandsaw) and it came home the right length. Then we drilled holes in the bottom of the table to the same depth as the existing holes (we measured the depth on the drill and put tape around it so we would know how deep to drill) and glued in these cool little threaded inserts. Then we just bolted the leg back in its new place.

Photobucket
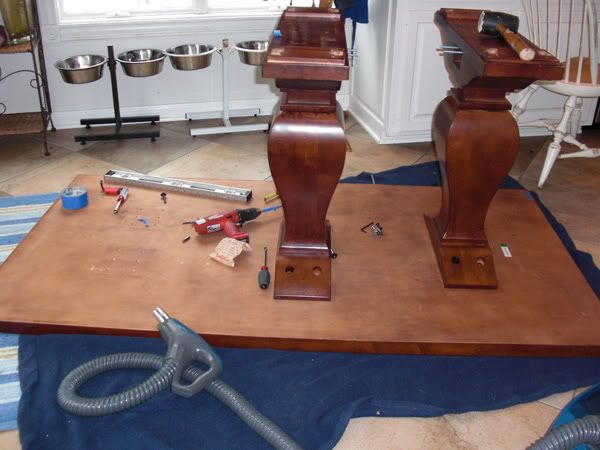
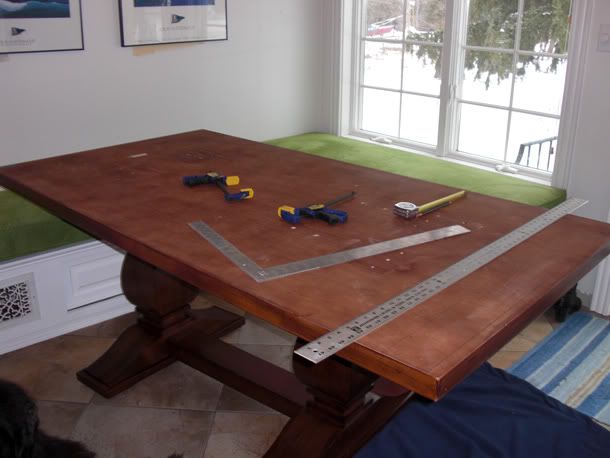
To cut off the table we flipped it over and taped the line where we would cut it. Then, using a square to make sure we had a square cut, we clamped the metal ruler in to act as a guide for the circular saw, outfitted with a new blade with the finest teeth we could find at the hardware store.


At this point, you're probably wondering why we did all this construction in the middle of our kitchen. It's a fair question and the answer is pretty simple: That table was the heaviest piece of furniture I've ever moved. The legs and the trestle were no problem, but the top of that table was crazy heavy. Definitely a hernia-giver. So we just opted to move it as little as possible. Also, it was winter, so it's not like we could just move it out the door and work on it right there.

Meanwhile, we cut off the end of the table. Since this is a veneered table, we flipped it over to cut on the underside, and we used painter's tape where we would cut, to make sure the veneer didn't crack or rip on the edges. We also bought a new blade for the circular saw with the largest number of teeth we could find. We wanted a very fine cut. We practiced on the first cut, cutting off only half of the total amount we wanted taken off. This served two purposes: testing to make sure our method would cut the table without destroying it and giving me a sample portion of table to sample finishes on. With the first cut going off as planned, we used a thick metal ruler clamped on as a guide, and cut on our tape line again. Whew. Done.

I lightly sanded the now bare edge of the table and attached some iron-on oak veneer (purchased at Home Depot). And then it was time to do something about the color of that table.

Here's part 2!

Labels: ,

15 November 2009

A weekend full of deals

I    've been doing some shopping this weekend. This is not necessarily a good thing, but sometimes a deal comes along and you know you only get one shot at it, so you better take it.

I've been planning to put banquette seating in my kitchen. Although I love the round table that came with the house (it has a lazy susan built in), it's just not the right shape for the space and you pretty much walk into it as soon as you walk in the back door, which is the entrance we use most often. It also is impossible to get more than four people at the table, and when you don't have a dining room, that really limits your entertaining possibilities.

I've found someone to build the banquette for us. But before I even thought about having him start, I wanted to find the right table. I considered the Ballard Designs Chianni table, but I had some concerns about quality after reading some reviews online. Then I found the Camden trestle table at Restoration Hardware. It's perfect in all but two regards: it's stained a beautiful and slightly distressed "tobacco" color and I was really hoping to have a white table and there's a possibility it might be just a "tad" too long (like a couple inches). It's hard to tell for sure despite the cardboard cutouts that I've had laying all over the kitchen to represent the table. Well there was one other problem with that table: the price.


Then lo and behold, I found out there is an RH outlet a little over an hour away. And guess what? They had a Camden table in stock. So I ran down there Saturday morning to check it out and there it was, looking just as great in person as I had hoped. Except for the corner. Which was mutilated (you knew there was a reason this was in the outlet store). So after much hemming and hawing (and frantic text messages to a friend and my husband), I bought it. The corner is not salvageable, so a repair is required. The plan at this point is to cut about two inches off each end of the table. It's maple veneer over something like MDF, I think (the base is solid maple), so after some searching on the internet it looks like the thing to do is score the veneer, put down some masking tape, attach a straight edge, then take a new, fine-edged blade on the circular saw and hold your breath. From there we'll re-veneer the edge. I took the table home for about 70% off the retail price, so for that price, for a table I really love, I think it's worth going to what some might consider an extreme. I will probably end up painting it white (I know a whole bunch of you just gasped) but I'll think about that first.

The other deal I found this weekend was on fabric for the banquette cushion. I wanted something really durable, so I found a microfiber suede in a great green color. It was already on sale for $14 and change through a discount fabric Web site, and then I found a coupon code (I LOVE coupon codes. It's like my personal mission to never buy anything online without a coupon code) for 30% off, so I got that fabric for $10/yard. That's not to shabby for a really durable upholstery fabric. I'll be doing a mix of throw pillows for the back so I'll look for a good deal on those later.


But all of that needs to wait because I have some other projects that need to be finished first. Stay tuned to see the before and afters on those, hopefully this week.

 So, what do you think? Am I nuts for bringing this table home?

Labels: , ,