Gardening and DIY tips and inspiration for the real world.
29 August 2017
THE GOOD AND THE NOT-SO-GOOD OF A NEW GARDEN
It's a good time for reflecting on the gardening year, and I've learned to be a little tougher on the gardener (me) and the gardens when it comes to analyzing what worked and what didn't. There are no perfect gardening seasons, so I try not to allow myself to make excuses because of the weather. Every year it will be something so plants and plantings need to be able to roll with the punches.
The only "new" garden I made this year was the circle garden. In fact it wasn't new, but a complete revamp. I have to say, overall I'm thrilled with how it turned out, but there are a few misses.
So I thought I'd share with you my no-holds-barred analysis of the first year of the circle garden. Warning: This ended up pretty long, so if you just want to cut to the chase, you can watch a video about my thoughts on how the garden performed either here or at the bottom of this post.
Hardscaping wise, I'm thrilled. The cobblestones were part of the garden I designed many years ago and the outside edges didn't change. But new paths and a lot of soil moving required that everything other than the perimeter be pulled up and replaced. I learned the lesson of landscaping fabric in the paths of the old garden, so this time I put down a crushed limestone base (sometimes called limestone screenings or paver base) and a thick layer of decorate crushed stone on top. I still see the advice that landscaping fabric be laid under gravel and after what I went through last time, I don't get it. Anything organic that falls in that gravel eventually becomes soil (or soil-ish). Weed seeds take hold and weeds grow, often with their roots through the fabric, making them nearly impossible to pull. My hope with the paver base is that weed seeds will find it inhospitable to grow in and if they do they'll be pullable. I can also use the weed torch on the gravel safely.
What can I say about that chive hedge? That funky little hedge that I'd been working on for years is amazing. It delineates each section of the garden without growing too high. I think it also discourages rabbits from coming in. And best of all, it has to be the most inexpensive hedge ever created. I started with two good-sized clumps of chives—divisions from my mom's garden—several years ago. And over the years I've divided those clumps into smaller clumps, and divided those again, and again, and again. I'm seriously in love with my hedge. Also, I ALWAYS have chives.
The original plan for the garden. A few things were shifted around and updated.
I divided the garden into four quadrants, and each of those into three segments. The central boxwoods in each section have been problematic. I replanted the entire bunch after the first round seemed to have failed. I blamed my dog, who I caught peeing on them, but guess what: two more of the second round are looked really rough as well. And they happen to be in the sunniest segments. I think this might entirely my fault: not enough water. We'll see how they do over the winter, but I'm happy they have warranties.
In each quadrant, I aimed for a foliage plant, and at least one annual that would provide color all season, along with a shrub or perennial, in some cases.
The white section, planted with Supertunia White and Diamond Delight Euphorbia is looking great.
'The Alnwick Rose'
The sunniest quadrant was planted with rhubarb, roses and a combination of white Supertunias and Diamond Delight Euphorbia. I'll admit, the rhubarb had me worried. Although its leaves can look tropical, it's also sort of a one-of-these-things-is-not-like-the-other situation with a vegetable in the middle of the garden. I shouldn't have been worried. It looks great and provides a much-needed bit of bold texture. The David Austin 'The Alnwick Roses' have been thriving and I couldn't be happier. I hope I can get them through the winter. And the white annuals in the front have just gone nuts, and filled in the area so well.
Floppy Egyptian walking onions are not looking good. At all.
To the east of that quadrant is perhaps the biggest disappointment. This quadrant was planted with 'Serkin' dahlias (I planted six and I should have done five), Goldilocks Rocks Bidens (it got a little wilder than is right for this area) and Egyptian walking onions. If you don't know these onions, it's worth finding them. They are a cool plant! They have fat, glaucous stems and grown bulblets on top. These weigh the stems down and the plant flops, allowing the bulblets to root and the plant to "walk." And that's where I went wrong. It all flopped, which if course is exactly what the plant is supposed to do, but it is a total mess. They'll have to be moved.
Although the Bobo Hydrangea and Hakonechloa 'All Gold' are looking good, impatiens were a poor choose for the front segment.
At the shadiest end of the garden, which is not really that shady, I think I hit the nail on about two-thirds of the head. The Bobo Hydrangeas are out of this world. They have bloomed all summer and they are just now started to fade to brown. What a fabulous performer! And because they are covered in blooms, it's like a massive of flowers there. The Hakonechloa 'All Gold' is just a tad washed out from being in a touch too much sun, but it will adapt and I love the texture of that plant. In the front I planted a beautiful impatiens called Peach Ruffles, but it was a poor choice. Impatiens doing really spread much, so I would have needed dozens of them to fill that area in. Also, again, there was more sun there than I anticipated. A Supertunia would have great.
'HS Flame' dahlia
And I'm very happy with the last quadrant, where I planted 'HS Flame' dahlia, an amazing single red flower with the darkest foliage, Verbena bonariensis Meteor Shower and the must have plant-it-and-forget-it Achemilla mollis (Lady's mantle). I'd happily replant this grouping.
I'm declaring the center a success as well. Two types of alyssum—White Knight and Dark Knight—have grown so well that I'm wondering why I wrote that plant off years ago, and the thai basil is a nice foliage accent with pretty flowers (the only basil I allow to flower). There are two clematis planted in the center that should grow up the tuteur, but they've not done much in their first year, as you might expect.
More than the individual successes and not-quite-failures in the circle garden, I have to say the garden in its entirety is having the desired effect on visitors. When people come they are immediately drawn to it and walk through its paths. I couldn't ask for anything better.
It's been a while since I updated you on the progress of the circle garden, but it's really coming along.
The brief history of this garden, which sits right by the front door, is that it was a weedy patch of dirt with a few perennials in it when we bought the house. I resurrected it as an oval garden divided into three segments, separated by curvy paths. It was a design that didn't work—I see that now—but for a brief time it wasn't terrible. Until it was. It needed a complete revamp and last fall I ripped it up and started from scratch.
I've gone more formal with the design, although it has a bit of an odd twist to it. There are four outer quadrants and a center circle, each delineated with a chive "hedge", and each outer quandrant is divided into three sections with a boxwood in the center.
Each segment is mass planted with one plant. In the segment closest, there is rhubarb on the right, roses on the left and petunias in the front. On the opposite side, which is shadier, are Bobo hydrangeas, Hakonechloa 'All Gold' and Impatiens.
The center is simply planted with alyssum, Thai basil and new clematis, which are just starting to climb.
'HS Flame' dahlia provides great dark foliage, bright blooms and stays low enough that I shouldn't have to stake it.
I chose the plants with an aim to get lots of color spread throughout the garden, a ton of texture and a foliage element in each area. There is a combination of shrubs, perennials and annuals, so some plants will take a few years to really come into their own.
It's still early days for everything and I hope the annuals will fill in their areas appropriately, although I did have to go back and plant some purple sweet potato vine between the Impatiens as that area was definitely looking too sparse.
Even as new plants, the Bobo hydrangeas are absolutely covered in flowers.
New gravel will be added soon.
Egyptian walking onions are sort of an oddity, but for now they offer great texture in the garden.
The final step in this project is to fill in the paths with a decorative gray gravel. Right now the paths are just a limestone road base that I laid down in fall. I didn't want to put the gravel in until I was finished planting as the longer I can keep soil out of the gravel, the longer I'll be weed free there.
It's an amazing time in the garden. Plants seem to be growing with reckless abandon and we are at that stage when things look lush but not overgrown. Every day something new is flowering, but plants still aren't battered by hot sun or too much slug damage, although with the amount of rain we've had it won't be long before they are as big as toads.
The circle garden is all planted and is really starting to come together.
Thanks to many, many hours in the garden last weekend, much of it is looking pretty good, but there are a few areas still waiting for their primary clean out and I hope to get to that later in the weekend.
It's nice though, because this is a lovely little sweet spot in early summer.
How's your garden this week?
I never noticed how blue this part of the garden was untilI took these pictures. I like it.
The Blue Kazoo Spireas are blooming and the blossoms are some of my favorite flowers. They are delicate, almost lacelike, and then they get sort of fuzzy looking as they open more.
The climbing hydrangea is just starting to bloom. It's looking great this year, certainly in part because of the mass amounts of rain we've had.
Already the planters are growing in nicely.
Oso Easy Parika rose is in full bloom and is one of those plants that calls you from across the garden.
The skinny patio bed is starting to fill in nicely.
My first herbaceous peonies bloomed this week. I know the whole world had peonies weeks ago, but here they are just starting.
Tuff stuff hydrangea is just blooming its head off. I'm so impressed with this plant.
This isn't at my house, but I had to share this picture of my mom's amazing fringe tree.
There are so many things happening in the garden at this time of year that it's nearly impossible to report on it all here. But it is certainly blog-worthy when actual progress is made on a project!
Most of the weekend was dedicated to working in the circle garden, to the detriment, of course, of the rest of the garden, which is sorely in need of attention. But there is real pleasure in getting some actual gardening done in this area, which I've been renovating since last fall.
When we last left the circle garden, I had ripped out the existing paths and created new ones with metal edging and paver base, which will be topped with decorative gray gravel when all the planting is finished, weeded it like crazy and shared the design plan.
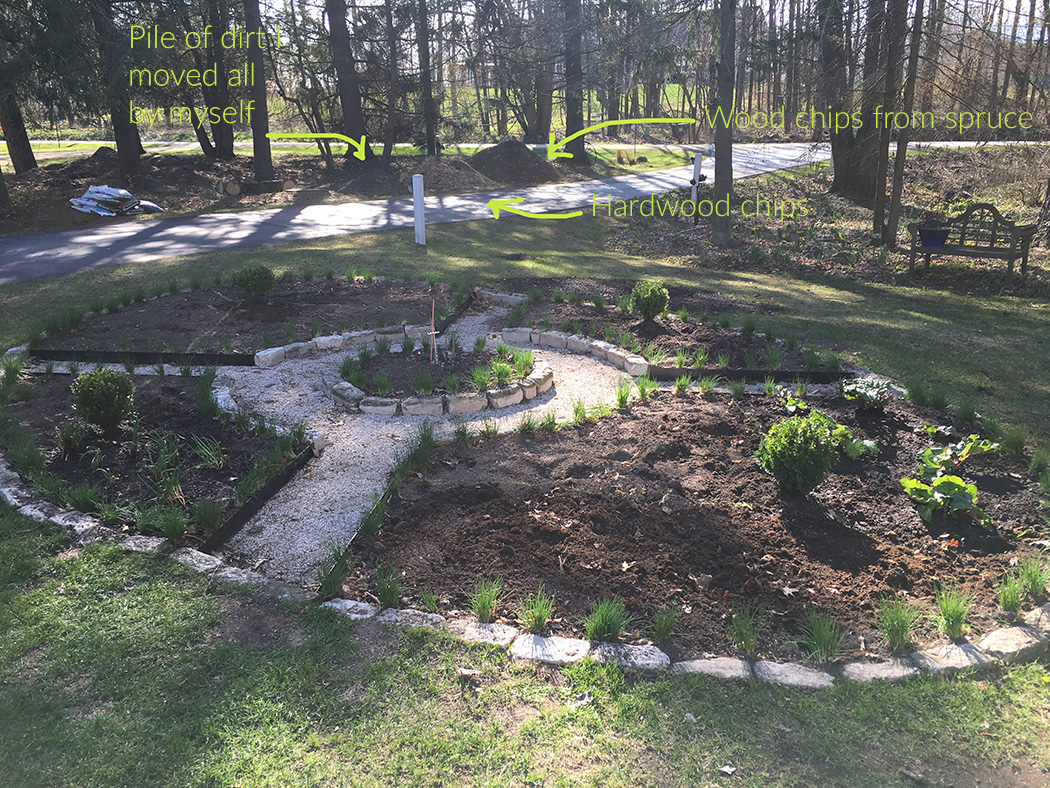
Somehow there was a lot of excessive soil after the path project last year but I left most of it in the beds assuming it would settle a bit. As it turned out, it didn't, and the better part of three hours was spent hauling very nice soil to a pile. I'm guessing it was about a yard and a half if not two yards just judging from the size of the pile.
Then I was able to get back to my beloved, if not quirky, chive hedge. I dug up everything that was already planted on the edges, just to inspect it and make sure it was weed free (a worthy effort judging by the pile of weeds I had), and then divided everything to outline every section of the garden in chives. I don't know that they'll grow together this year yet to form a proper hedge, but probably next year.
Rhubarb from grandma's garden that probably originally came from her parents' farm.
The next day I picked up four boxwood ('Baby Gem' which is a cultivar I've not used before and not the one I went to pick up—I had been planning to buy 'Winter Gem'), one for the center of each section. Then I laid out all my stakes and string again and created each planting area. I rehomed some rhubarb from my 100-year-old grandmother's house for the rhubarb area, but I'm sad that I won't be able to harvest any this year. And I also replanted the Egyptian walking onions I overwintered last year. I'm a little light on those so I'm hoping to find someone in my master gardeners group who can spare a few.
From here on out, it's really just planting left to do in that garden and I'll take on that project as I get plants or as things are ready to transplant. It's lovely to see progress though. And for a few precious moments I know that there is one weed-free spot in my yard.
Although it was a major topic in fall, I've not said much about the circle garden lately. To catch you up to speed here's the deal with the circle garden, which is not at all a circle, but "oval garden" is not the least bit catchy. When we bought our house it was a derelict vegetable garden that was mostly weeds with a few random shrubs thrown in. I dug it up, put in a poorly designed garden and as my love for it waned, it got worse each year. It lacked focus and was trying too hard to be all things in a very small garden.
It was a visit from my garden blog friend Linda from Each Little World that spurred me to action. She mentioned that she noticed that at the time she visited (early July) there were many shades of green in my garden, but not a lot of other colors. And she was right. So I worked to come up with a way to really have a blow out of color that was still structured.
The oval garden is a departure from the rest of my garden. Now redesigned with straight paths in an X pattern, it is far more formal in a structural sense than any other place in the garden. It is divided from other gardens by floating in the lawn near the front door, but it can't feel like a foreign place.
So the goal in designing this garden was to be a departure from the rest of the yard while not looking out of place. That's a tall order. And the only way to do that was by having a combination of informal plants in the confines of a formal design. Like all gardens, I fully expect this garden to be a work in progress and I think this first year will be largely experimental. I'm sure there will be things that work better than others. Perhaps the whole concept will be a flop. But hopefully it will be a riotous entry to the yard.
Four paths (created laboriously by me in fall) lead to a center circle and create four sections. Each section will have a small boxwood ball in the center and have three segments that radiate out from it. Each segment will be planted with a single plant. Deciding what should go in each segment was a bit like a Sudoku puzzle. I wanted each section to have a seasonal flowering aspect (such as a flowering perennial or shrub), a foliage element for texture and a flowering annual that should bloom all summer. I wanted a combination of warm and cool colors and I wanted some serious play on texture. And each segment had to play well with the segment next to it and across from it to balance the garden. Complicating the matter is the fact that although this is a smaller garden—about 30 feet long—because of the large trees that line our driveway, part of it is part sun to part shade and the other part is full sun.
There is a budget for this project. Not a specific budget, but I can't run out and buy all new plants just for this. So some of the plants need to be divisions from elsewhere in the garden or grown from seed to make it reasonable.
So here's what I came up with. What you don't see in the diagram is the chive hedge, saved from the previous design of this garden. Each segment will be "outlined" in chives. Although there is no repetition in the plants save for the uniting ties of the boxwood balls and the chive hedges, I'm hoping repetition will come in the form of texture and color rather than actual plants.
Moving clockwise, starting at 12 o'clock, here's what will be in each segment:
'Bobo' hydrangea: I've been hoping to work this diminutive hydrangea into my garden for a few years and I think this is the perfect opportunity. Its fluffy flowers will contrast well with the rest of the plants plants for this segment.
Hakenochloa 'All Gold': This is certainly one of my favorite plants and I'm happy that it likes my yard. When I redesigned the back/side yard a few years ago I used 'All Gold' divisions from another garden there. Now those division have grown enough that I can divide them to fill this bit for free.
Dahlia 'HS Flame': I'm a sucker for dahlias with dark foliage and I love the simplicity of a single flower. I chose this one to balance out the pinks from the bottom of the garden. It's also a short dahlia so I shouldn't have to worry about staking it.
Lady's mantle (Alchemilla mollis): This is probably my No. 1 go-to plant in my garden because it so good both as a foliage plant and as a long-bloomer with chartreuse flowers. It also divides easily so I'll have no problem finding plants for this section.
Verbena bonareinsis 'Meteor Shower': I grew this for the first time last year and I'm head over heels in love with it. It grown much shorter than your usual verbena—more like 2 feet instead of 4 or 5 feet—and blooms absolutely nonstop.
Rhubarb: I relocated two rhubarb plants from the old garden and I hope to get several more crowns from my grandmother's garden. I love it for its huge leaves but obviously also for eating. It will take a bit to establish this section so I don't anticipate this part looking great this year.
A white annual: I've shown a low-growing nicotiana here, but I may use a Profusion zinnia or something else.
Dahlia 'Serkan': This is another low grower so I hope to not have to stake it. I love the waterlily-type dahlias and I think the relatively simple form of this flower will contrast well with the multi-petaled rose in the segment next to it.
Egyptian walking onion: I think this plant is one of the most interesting forms there is. I dug out and potted up several of them from the garden last fall and I'm hoping they'll overwinter well. This is a rather experimental choice, but if it works, I think it could be stunning.
Signet marigold 'Lemon Gem': This is one of my must-have flowers that I grow from seed. It blooms like crazy, smells delicious and has the most lovely small textured leaves and flowers. The flowers are edible as well.
Other plants that will play a role in the garden are the two clematis in the center circle—'Venosa Violacea', planted last year and 'Avant Garde', which I randomly ordered Sunday morning after seeing a photo of it. Around the outside of the inner circle, I'm envisioning a ring of lime thyme, which is a lovely groundcover that looks better than it tastes, in my experience. And then I'd need a more upright but still low annual inside of that to hide the ankles of the clematis. Of course, the chives (upper right corner) are a factor and I think I'll probably go with 'Green Gem' boxwood for the centers of each section.
Work on the oval circle garden continued this weekend and by the end of the day on Sunday I let out a sigh of relief. If a blizzard came tomorrow (unlikely as we've not yet had a frost), I'd be OK with how far this project got this season.
On Saturday I reset the outer circle of cobblestones. One thing I had not expected was for them not to fit perfectly. This, of course, was a ridiculous notion, but until I set the first segment it had never even occurred to me that the math wouldn't work out for me to only be able to use whole cobblestones. This was a bit of a predicament as a half-hearted attempt to split one using a small chisel and a light hammer left me frustrated and suffering from very sore wrists. I only needed two pieces so I just left the holes and planned to deal with it later.
On Sunday I got a truckload of paver base. The place I got it from called it limestone screenings, other places call it paver base or road base and in some places in the country its stone dust. I think the difference is primarily the type of stone it comes from and here we have lots of limestone. In any case, it's a coarse sandlike material with tiny bits of stone in it that compacts nicely. The first time I used limestone screenings for a small path ages ago, I was convinced it had made the soil around it extremely alkaline and therefore inhospitable to most plants. That didn't work for that application because I has put it under flagstones, filled in the gaps with soil and tried to grow groundcover between the stones. As one plant after another failed there, I realized it was probably the limestone base.
Fortunately, since the path will be completely separate from the soil, held at bay by metal edging and cobblestones, I shouldn't have to worry about that effect on plants.
After dumping the base in the paths, I tamped the entire thing down. Then I wet it and let the water filter through before going back and filling in low areas with more base. I could have used a little more base but with one cubic yard of the stuff weighing about 1.2 tons and me borrowing a half-ton truck, I wasn't able to get as much as I would have liked. Once I had it smoothed and leveled by eye (since this is going to be topped with gravel it doesn't need to be perfectly level like it would have to be if I were setting stone on top it), I tamped it again, wet it down again and then walked away.
While I was at the nursery getting the base I found two broken cobbles that I figured I could put in the holes where I had gaps. They aren't a perfect fit, but I think once the cobbles get some age on them they'll blend in. And if they don't I can always change them out later and I'm only out the $1 they charged me for them.
Originally I was going to get the gravel this fall as well, but I've rethought that. Since I might be a little light on paver base, I'm going to let it settle and compact over the winter and then decide in spring if I should add more base or just top it up with all gravel. There's a significant cost difference: the paver base was $20 a ton and the gravel is $100 per ton. The other advantage to waiting on the gravel is that I don't have to worry about soil or seeds ending up in it and I can start next spring with clean and completely weed-free paths. In fact, I may wait to put the gravel in until after I plant the beds as there's sure to be some soil flying about.
Since this project is almost wrapped up for the season, here's a quick look at what's been done.
This is what the garden, the first I'd ever made from scratch (14 years ago now) looked like at its best. You'd notice it was nothing special even then.
It's a little easier to get a feel for the positioning and layout of the garden from Google Earth.
The first step was to move out the plants. I moved what I was keeping but was not returning to the garden and clustered all the chives for the chive hedge together where they will overwinter and I'll replant them in spring.
Then Mr. Much More Patient and I spent some quality time arguing about math as we laid out the location for the paths. I reviewed the serious mistakes I made when I designed the paths originally and ripped out all the dreaded landscape fabric.
That means that the only thing left to do this fall is to level out the heaps of soil. And then the fun begins. I can't wait to really get stuck in to the planting plan. What a great way to spend a cold winter day.
We were blessed with yet another gorgeous autumn weekend here. I can't say enough about how wonderful the weather has been for most of this year, but I feel like we deserve it after two really cruddy years. I'm still gardening in shorts most of the time and I can't think that's common for this time of year at all.
In an effort to keep you up to date with the oval circle garden progress, I thought I'd just give you a quick peek at what was happening this weekend. Frankly, I'm in full-on scramble mode, so I've not been taking much time to take pictures (or do anything else, like clean my house), but I did snap a few here and there.
You can see how the paths are coming together here. The random cobblestones more or less show where the inner circle path will be.
The big project in the ongoing circle garden ordeal was to install the metal edging. As I mentioned, I found it at Lowe's for about $10 per 8-foot piece. I bought extra stakes that are a foot long and really much better than the ones that come with the edging. I didn't really even bother with those. I have also ordered some end stakes for the inside ends, but those should be easy to put in.
From this angle you can see that the two side segments are going to be quite small. I may have to alter the design to accommodate that.
Mr. Much More Patient was in charge of cutting using a jigsaw with a blade for cutting metal and I handled the rest. The process wasn't difficult .... just a matter of leveling each piece from end to end and then with its partner on the other side of the path. I didn't bother with leveling each path's edging to the other paths. That would be impossible and the gravel will accommodate small changes in level.
The next step will be to install the paver base and the gravel, but first I have to dig the inner path around the circle down a little bit.
As the paths become more real, I'm seeing that the side segments are quite small, which may require some changes to the design. Fortunately I have all winter to think about that.
I also spent a little time this weekend being thankful for whoever invented the bulb auger. Last spring Mr. MMP said he'd love to see the woods full of daffodils, and I told him that was no problem so long as he would help plant them. With him running the auger and me putting the bulbs in and covering them over, we cranked through 200 bulbs in less than half an hour. Earlier in the day I planted 45 alliums in an hour and a half using a traditional bulb planter. Clearly the auger is the way to go.
And the last exciting tidbit from the weekend is a find that I'm super excited about. I've been so thrilled with how the rose I'm growing in a container is performing that I decided I'd like to grow a few more that way. My plan is to put them on the corners of the driveway apron where it meets the patio, but of course this requires a pair of matching containers of some size.
Here's the pair of planters I snatched up at a great price. I'll need to change the color though.
Although I went to the Restoration Hardware outlet store looking for a bed (I really want an upholstered bed, but that is really another issue all together), I swung by their outdoor area and saw a matching pair of their Adamo cast stone planters in the medium (24-inch) size. These babies go for $369 each on the website (really, RH? You need to get real with your pricing!), but they were marked down to $100 each at the outlet, plus there was an additional 30% off of everything that day, making them just $70 each. The color, called Honey Lemon, is sort of a light buff color and not my favorite at all, but I think I'll be able to stain them a gray color. I can't tell you what a relief it is to have found these at a great price. I struggle each year to find good containers and I feel like I often overspend. I'm envisioning a white rose in each pot with annuals around the edge.
Oh, and my favorite maple tree is starting to put on a show. I shared this photo on Instagram because even people who aren't too happy about autumn, like me, can appreciate that kind of beauty.
Location: Southeast Wisconsin (zone 5), United States
Welcome to the Impatient Gardener. I'm Erin and the title about says it all. I'm always striving for ways to get Mother Nature to hurry up in my Wisconsin zone 5 garden, yet I know sometimes it's best to sit back and just enjoy the ride. In my real life I'm an editor of a magazine, an avid racing sailor and the owner of two very large Newfoundland dogs who I love to work with. All of which means, like many people, I garden when I can. And just because there's not enough time in the day, that doesn't mean I'm not constantly taking on new gardening projects. Call it HGTV Syndrome: The belief that anything can get accomplished in 30 minutes or less. It can't, of course, but it sure is fun trying.