The Impatient Gardener

27 June 2017

A NEW GARDEN BEGINS TO GROW

It's been a while since I updated you on the progress of the circle garden, but it's really coming along.

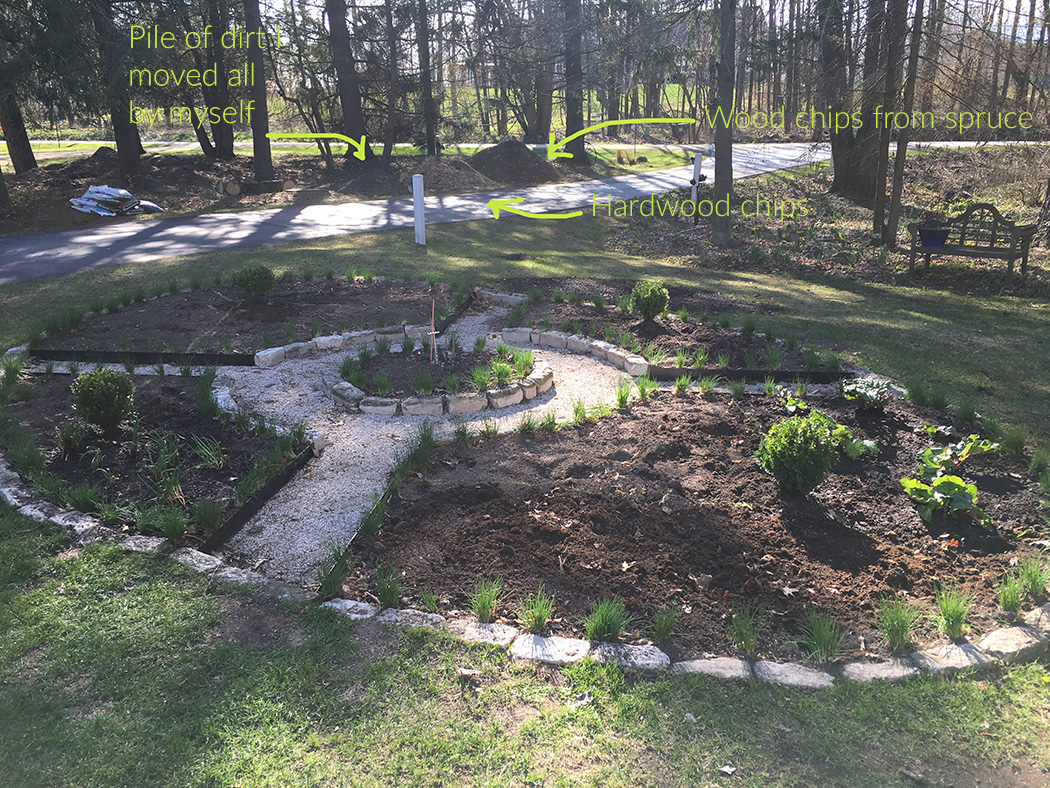
The brief history of this garden, which sits right by the front door, is that it was a weedy patch of dirt with a few perennials in it when we bought the house. I resurrected it as an oval garden divided into three segments, separated by curvy paths. It was a design that didn't work—I see that now—but for a brief time it wasn't terrible. Until it was. It needed a complete revamp and last fall I ripped it up and started from scratch.

I've gone more formal with the design, although it has a bit of an odd twist to it. There are four outer quadrants and a center circle, each delineated with a chive "hedge", and each outer quandrant is divided into three sections with a boxwood in the center.

Each segment is mass planted with one plant. In the segment closest, there is rhubarb on the right, roses on the left and petunias in the front. On the opposite side, which is shadier, are Bobo hydrangeas, Hakonechloa 'All Gold' and Impatiens.

The center is simply planted with alyssum, Thai basil and new clematis, which are just starting to climb.

'HS Flame' dahlia provides great dark foliage, bright blooms and stays low enough that I shouldn't have to stake it.

I chose the plants with an aim to get lots of color spread throughout the garden, a ton of texture and a foliage element in each area. There is a combination of shrubs, perennials and annuals, so some plants will take a few years to really come into their own.

It's still early days for everything and I hope the annuals will fill in their areas appropriately, although I did have to go back and plant some purple sweet potato vine between the Impatiens as that area was definitely looking too sparse.


Even as new plants, the Bobo hydrangeas are absolutely covered in flowers.

New gravel will be added soon.

Egyptian walking onions are sort of an oddity, but for now they offer great texture in the garden.

The final step in this project is to fill in the paths with a decorative gray gravel. Right now the paths are just a limestone road base that I laid down in fall. I didn't want to put the gravel in until I was finished planting as the longer I can keep soil out of the gravel, the longer I'll be weed free there.

I made a video about the process. Check it out here.

Labels: , , ,

17 May 2017

THE QUEST FOR 'SHROOMS CONTINUES

A while ago I showed you the rather odd loaf-like object taking up space in my refrigerator. Well, I'm happy to report that I was able to free up that space in the fridge this weekend, as the mushroom spawn has been planted scattered strewn.


The process of growing these Wine Cap mushrooms is less than exciting, and since I've never done this before, I pretty much just followed the instructions that came with the spawn, which was mixed with sawdust. My five-pound bag was enough for a 50 square foot area so, because my spatial relationship skills are not great, I laid out the bed area with birch logs. There is absolutely no need to do this, other than to make sure you have about the right size area and I liked the idea of knowing where exactly to look for my 'shrooms.


Because there was some grass and weeds in the area, I laid down some sodden cardboard as a weed block. This wasn't in the instructions that came from Field and Forest, but I saw this method in a few videos I watched. Then I spread several inches of damp wood chips on top. I used chips from maple and ash trees we had taken down a couple months ago, but you could use purchased untreated wood chips if needed. The instructions said a variety of chip size is best, and that's certainly what I had in my pile.


Then I took the "loaf" of spawn out of the fridge and broke it up in the bag, then sprinkled it all over the wood chips, trying to broadcast it evenly. After that, it was a few more wood chips and some damp straw.

And that's it. All I have to do now is make sure that the area stays damp but not wet, especially through the hot bits of summer.

This is about as big of a garden experiment as I've ever undertaken. Of course there was the potato tower a few years ago, but let's hope the outcome is significantly better than that.

With any luck, by the end of summer I'll be feasting on my very own homegrown mushrooms.

Have you ever grown mushrooms. Tell me about it!

Labels: , , ,

25 April 2017

PROGRESS ON THE CIRCLE GARDEN

There are so many things happening in the garden at this time of year that it's nearly impossible to report on it all here. But it is certainly blog-worthy when actual progress is made on a project!

Most of the weekend was dedicated to working in the circle garden, to the detriment, of course, of the rest of the garden, which is sorely in need of attention. But there is real pleasure in getting some actual gardening done in this area, which I've been renovating since last fall.

When we last left the circle garden, I had ripped out the existing paths and created new ones with metal edging and paver base, which will be topped with decorative gray gravel when all the planting is finished, weeded it like crazy and shared the design plan.


Somehow there was a lot of excessive soil after the path project last year but I left most of it in the beds assuming it would settle a bit. As it turned out, it didn't, and the better part of three hours was spent hauling very nice soil to a pile. I'm guessing it was about a yard and a half if not two yards just judging from the size of the pile.


Then I was able to get back to my beloved, if not quirky, chive hedge. I dug up everything that was already planted on the edges, just to inspect it and make sure it was weed free (a worthy effort judging by the pile of weeds I had), and then divided everything to outline every section of the garden in chives. I don't know that they'll grow together this year yet to form a proper hedge, but probably next year.

Rhubarb from grandma's garden that probably originally came from her parents' farm.
The next day I picked up four boxwood ('Baby Gem' which is a cultivar I've not used before and not the one I went to pick up—I had been planning to buy 'Winter Gem'), one for the center of each section. Then I laid out all my stakes and string again and created each planting area. I rehomed some rhubarb from my 100-year-old grandmother's house for the rhubarb area, but I'm sad that I won't be able to harvest any this year. And I also replanted the Egyptian walking onions I overwintered last year. I'm a little light on those so I'm hoping to find someone in my master gardeners group who can spare a few.


From here on out, it's really just planting left to do in that garden and I'll take on that project as I get plants or as things are ready to transplant. It's lovely to see progress though. And for a few precious moments I know that there is one weed-free spot in my yard.


Labels: , , ,

04 June 2015

PLANTING THE WINDOW BOX

After a lot of talking about planting window boxes, the weather finally (if briefly) improved enough to actually do it. This year I aimed for a slightly more restrained color palette (blue/purple, lime green and a touch of orange) and fewer plants. In the past I've jammed so many plants in the window box that I think they had a hard time reaching their potential.

Window box planting 2015
It doesn't look like much right now but in a few weeks it should be full of color and filled out.
It would be great to have mature plants to work with but that's just not possible here, so there's a fair amount of imagination required. Right after planting, the window box looks spartan and a little silly but in a few weeks it will be filled out.

Because of that, I made a sketch with colored pencils first to give me an idea of the overall look. That served as my roadmap for planting.

Window box planting 2015, make a sketch
My sketch is looking a bit worse for wear after being used while I planted the window box. It's no Picasso, but it's enough of a guide to get my thoughts on paper so I have a feel for what it will look like. 

I start with new potting mix in the window box every year, using a combination of Fafard 3B mix, Lucky Frog potting soil, a small amount of well-rotted manure (manure can be heavy and weight is a concern with window boxes), a little chicken grit for extra drainage and some Osmocote time-release fertilizer. I use organic fertilizers on everything I plant in the ground, but I use Osmocote in my planters because it's hard for me to stay on top of regular feeding.

I fill the box about three-quarters of the way with soil, so I have to dig a little to put in plants, but I still have to top it off with more potting mix to fill the holes after planting. If I put any more soil than that in the box to start with, I end up with it going all over the place as I pull it aside to plant.

From there, it's just a matter of filling in the plants. Here's what I used:

  • 3 Nicotiana alata lime (grown from seed)
  • 2 Verbena bonareinsis Meteor Shower (Proven Winners variety due on the market next year that I'm very excited about; said to grow to 30 inches, perfect for containers)
  • 2 Nassella tenuissima (Mexican feather grass)
  • 2 Superbena Royale Chambray
  • 2 Lemon Licorice Plant
  • 2 Nasturtium 'Yeti' (grown from seed)
  • 1 Supertunia Morning Glory Charm
  • 4 Signet Marigold 'Orange Gem' (grown from seed)
The marigolds may get swapped out. I wanted a little touch of orange in the box, but not an overpowering amount and couldn't decide between the signet marigolds, Calendula 'Geisha Girl' that I also grew from seed or a new Proven Winners Bidens variety (which I decided was too red for this use). If the marigolds don't feel right in there, I'll be happy to swap them out for something else.


I spent a lot of time talking about the importance of texture variety in window boxes the other day and I feel like I've got a good variety here with coarse texture provided by the nicotiana and nasturtium, medium texture with the licorice plant, supertunia and superbena, and fine texture from the Mexican feather grass, verbena bonareinsis and signet marigolds.

I made a time-lapse movie of planting. Let me tell you, it's hard to get a good angle on a window box. I taped my phone to a stick and stuck it in the self-watering hole.


 I'll show you what it looks like in a few weeks and give you a peek at some of the other containers I planted this year.


Labels: , , ,