The Impatient Gardener

04 August 2017

WINDOW BOX INSPIRATION IN ALL SHAPES AND SIZES

I think window boxes are some of the most fun but most challenging containers to get right. Depending on their placement they may need to drape, may have restrictions as to how high they can be (so as to not block a window) and are often narrow, leaving not a lot of soil for plants to grow in. But done right, they become an architectural asset. 

I like to study window box design because I'm always looking to do it better. And Mackinac Island (which I visited a few weeks ago, as I do every year), is full of window box inspiration.

This is actually several window boxes butted up together and mounted a little below eye level. The gap between boxes is bridged by the Thunbergia on a simple stick trellis. 

Brightly colored window box

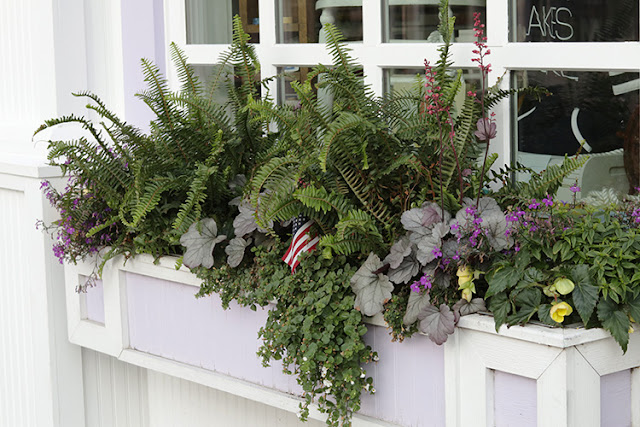
Planting a window box in sun leaves oodles of options for plant combinations. But shade window boxes can be a challenge. Here's a charming shade box, mounted under a window outside a shop at about hip height. This might be my favorite window box of all of these. Don't you love how the lilac color of the box is reflected in the heuchera in the box?

Shade window box

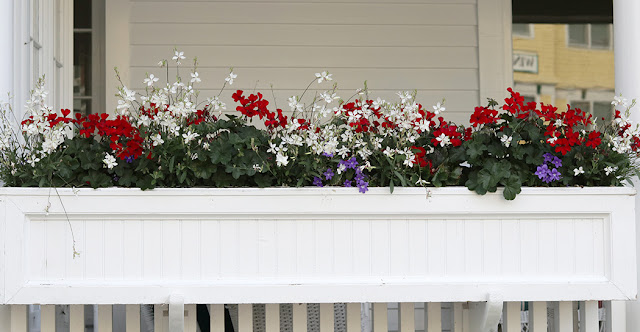
All of the window boxes at the Iroquois Hotel, all planted by Jack Barnwell's amazing crew, were red, white and blue this year. I like how the white flowers reflect the color of the boxes and the building (hmm ... I'm sensing a theme here). 

Red, white and blue window box


This is a huge "window box" at the back of the giant spa on the lake side of the Chippewa Hotel. I love the papyrus grasses, but I'd like to see a little more drape. That may be coming when the sweet potato vine and the petunias get a little more mature.


Poolside window box

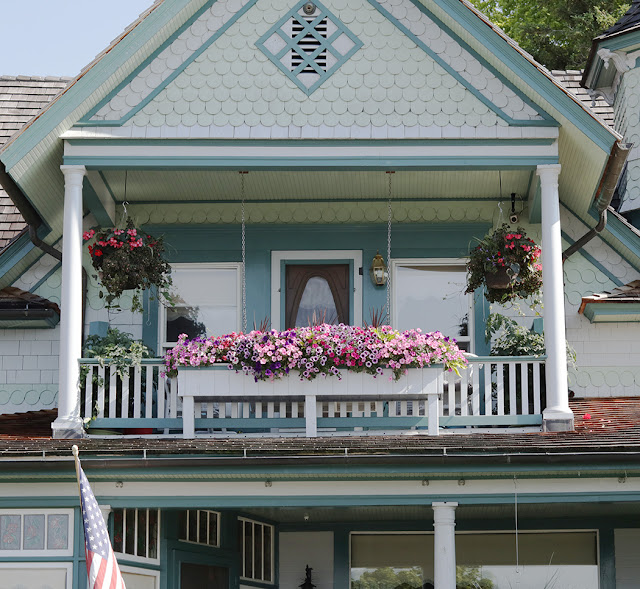
This is more of a railing box, but it's the same concept. I quite like this design as well, but again, I'd like to see less box. I always wonder how people water these boxes on a second floor. I would hate to have to get water from a bathroom or something.

Second story window box

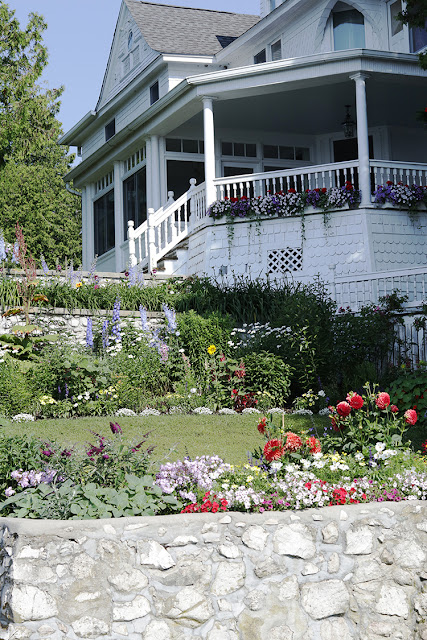
 Here's another railing box and this one is SO good. What a great tie in to the gardens below.

Railing box

What does your ideal window box look like? You can see how I planted mine up this year here. I'll post an update on my containers soon. 

Labels: , ,

01 August 2017

CHICKEN-RESISTANT PLANTS + THE CUTEST COOP

It's no secret that I covet chickens. For various reasons, they've been a non-starter with Mr. Much More Patient, so I enjoy chickens vicariously through friends who have them. And I'm not going to lie here, one of the main reasons that I want chickens is because I want a super cute chicken coop.

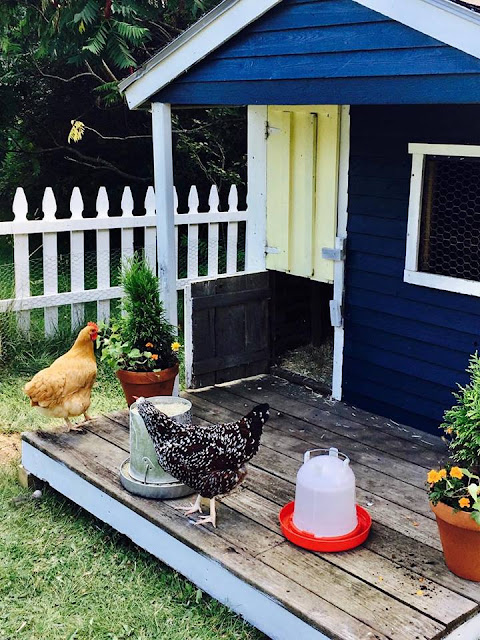
My friend Roisin has created the MOST adorable coop, which means I'm not only envious of her beautiful fresh eggs and her cute chickens, but also her coop, which I've threatened to move into.

The Speckled Sussex chicken getting a prime view at the top of the coop just happens to be named Erin. :)

You won't believe what this coop looked like originally though.


Roisin rescued it from a friend who was no longer using it, and it lived on the edge of her property for a time until she had time to renovate. She removed the railings, cleaned up the inside and gave it the prettiest new paint job in Sherwin Williams Archipelago with a Valspar Summer Wish door.


Roisin is also an amazing gardener and let's be honest, the planting opportunities on this cute coop were way too good to pass up. But what Roisin has learned this summer—her first with her girls—is that not all plants work with chickens around. Some plants are definitely on the chicken menu. Others are just libel to fall victim to digging and scratching. Containers are likely to have a chicken end up in them, if only so they can check it out, she said.

Chickens are also very interested in anything colorful, so all new flowers plants seem to get a thorough chicken inspection, Roisin said.

Hostas and petunias fell prey to the chickens rather quickly so Roisin learned that those need to either planted somewhere the chickens don't go or caged for protection. Tulips were also deadheaded by the chickens before they needed to be. But after some trial and error she's found a few plants that seem to be of little interest to the flock.

I want a chicken coop just for that window box.

Here's Roisin's list of chicken-resistant plants that she's found so far. (Roisin notes that her research suggests all flocks have different tastes, but these plants have worked for her.):
  • Echinacea
  • Salvia
  • Arborvitae
  • Ivy
  • Zinnia
  • Yarrow
  • Roses
  • Marigolds (although the chickens did scratch a few up out of pots)

The chickens, it seems are happy with the new coop (although it took some getting used to). Here are some of the presents they left.


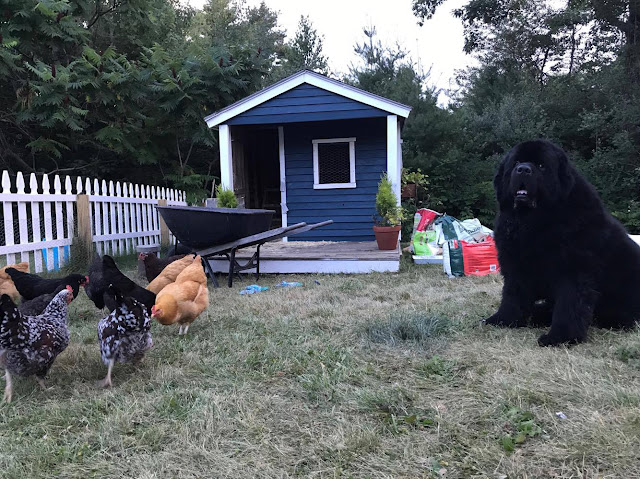
Lucky chickens also have a great guardian, Roisin's Newfoundland Gunner, who take great care of the girls and has made it his mission to make sure they are a happy, egg-laying bunch.


The girls even got a little swing in a recent addition.

What chicken wouldn't want to live here?


I love to see reader's gardening projects and even more so if they involve chickens! Hope you enjoyed this peek at the most charming chicken coop.

Labels: , ,

23 June 2017

FRIDAY FINDS

The rabbit struggles continue here. I have borrowed a few traps but the little buggers aren't big enough to set them off. They are absolutely decimating any annuals I've planted in the ground and it is getting so frustrating! Deer repellent seems to have no effect on them. If you have some proven ways to manage them, I'm all ears.

I had to take a break from gardening last weekend to give Odin a bath. This is a full half-day activity but the pay off is a clean, fluffy, good smelling dog. It's not often that I get a clean dog and a decent looking garden at the same time! By the way, those white alliums that you see in the foreground ('Mount Everest') are real winners. Going to have to add more of those.


I also got very late in planting in the vegetable garden, just planting many seeds in the last week. But I figure better late than never. I'll just have these crops later in the season.

Matt is clearly more on the ball than I am this year and his sweet pea pictures are to die for. My sweet peas are currently 8 inches tall.


I might do that cake thing, but this? Gimme a break. 

I look forward to each and every post from Deborah Silver this time of year, when her amazing container creations spill forth. Don't miss her latest post

Lastly, in case you missed my latest video, here it is. I was supposed to be in it, but as you'll see at the end, I had a bit of a miscalculation in trying to shoot it myself. Whoops.


Will you be spending time in the garden this weekend or are you into "relax" mode? Either way, I hope you have a great weekend and avoid some of the crazy weather that is popping up all over the country.


Labels: , , ,

28 September 2016

THE WINDOW BOX IN REVIEW

On Tuesday I walked into a funeral service in full on late-summer weather and emerged a couple hours later into weather more suitable for late October. A brisk breeze came off the lake, leaves were falling on our heads and the sun refused to provide the warmth I swear it had earlier in the morning.

In case I wasn't fully aware of the changing garden, that chilly breeze set off the alarm in my gardener's brain: It's time to start wrapping things up in the garden.

And while I'm starting to move things around, clean out the oval circle garden and generally taking stock of the garden's performance this year, it's also a good time to analyze the summer's container plantings. By this time in the year they've done all they will do; it's all downhill from here.

At the end of the summer the window box is looking a bit raggedy and overgrown, but it's a good time to analyze how the design performed all summer. 
Some affiliate links have been used. I appreciate your support of this blog!

The window box is both my favorite container to plan and plant every year and the one I struggle with the most. Part of that is because it really is a focal point and a show piece and when you only really get one crack at it a year, it is disappointing when it doesn't turn out how you had envisioned.

For the most part, I've been happy with it this year. Now, certainly it looks shaggy, tired and, at least in the case of the coleus, a bit overgrown.

I'm very happy with how the Verbena bonariensis 'Meteor Shower' performed at the back of the box. It got tall enough to provide enough height but didn't completely block the view out the window. It would have looked nicer throughout the summer if I had kept up with deadheading it, but that's not the most fun in a window box and it didn't suffer much because of it. The plants on the end flopped out a little bit, but I sort of like how that turned out.

In front of that was 'Lemon Twist' coleus. I felt that I needed a strong foliage plant in that position, but honestly it didn't grow as well as I would have liked. It took awhile to get going and now, of course, it's too big. It's not horrible, but I think the whole box would have been better if I had chosen a darker color coleus.

In the front row I planted Surfina 'Heavenly Blue'Ornamental Oregano 'Kent Beauty'Helichrysum petiolare 'Lemon Licorice' and Superbells 'Coralina'. The oregano did well and the licorice plant did what it normally does for me, which is to say nothing spectacular but nothing horrible either. The 'Coralina' looked nice for the majority of the summer, although I think it may have been a bit crowded. Unfortunately the 'Heavenly Blue' was a huge disappointment. I used it both in the window box and the large container by the front door and it hardly grew in either location. The color of the few flowers it did produce was gorgeous but it was a big underperformer.

It looked pretty pathetic when it was first planted back in June.


So all in all it was an OK window box year. Even though I cut back on the amount of plants this year,  I still think I planted too much. And I think next year I'll go for some darker foliage to contrast better with the white house. I'd probably give it a B- if I were grading it. If the petunia would have grown decently I think it might have been firmly in A- territory.

Now I can start thinking about next year's design. I just wish I didn't have to wait so long to take another crack at it.


Labels: ,

04 June 2015

PLANTING THE WINDOW BOX

After a lot of talking about planting window boxes, the weather finally (if briefly) improved enough to actually do it. This year I aimed for a slightly more restrained color palette (blue/purple, lime green and a touch of orange) and fewer plants. In the past I've jammed so many plants in the window box that I think they had a hard time reaching their potential.

Window box planting 2015
It doesn't look like much right now but in a few weeks it should be full of color and filled out.
It would be great to have mature plants to work with but that's just not possible here, so there's a fair amount of imagination required. Right after planting, the window box looks spartan and a little silly but in a few weeks it will be filled out.

Because of that, I made a sketch with colored pencils first to give me an idea of the overall look. That served as my roadmap for planting.

Window box planting 2015, make a sketch
My sketch is looking a bit worse for wear after being used while I planted the window box. It's no Picasso, but it's enough of a guide to get my thoughts on paper so I have a feel for what it will look like. 

I start with new potting mix in the window box every year, using a combination of Fafard 3B mix, Lucky Frog potting soil, a small amount of well-rotted manure (manure can be heavy and weight is a concern with window boxes), a little chicken grit for extra drainage and some Osmocote time-release fertilizer. I use organic fertilizers on everything I plant in the ground, but I use Osmocote in my planters because it's hard for me to stay on top of regular feeding.

I fill the box about three-quarters of the way with soil, so I have to dig a little to put in plants, but I still have to top it off with more potting mix to fill the holes after planting. If I put any more soil than that in the box to start with, I end up with it going all over the place as I pull it aside to plant.

From there, it's just a matter of filling in the plants. Here's what I used:

  • 3 Nicotiana alata lime (grown from seed)
  • 2 Verbena bonareinsis Meteor Shower (Proven Winners variety due on the market next year that I'm very excited about; said to grow to 30 inches, perfect for containers)
  • 2 Nassella tenuissima (Mexican feather grass)
  • 2 Superbena Royale Chambray
  • 2 Lemon Licorice Plant
  • 2 Nasturtium 'Yeti' (grown from seed)
  • 1 Supertunia Morning Glory Charm
  • 4 Signet Marigold 'Orange Gem' (grown from seed)
The marigolds may get swapped out. I wanted a little touch of orange in the box, but not an overpowering amount and couldn't decide between the signet marigolds, Calendula 'Geisha Girl' that I also grew from seed or a new Proven Winners Bidens variety (which I decided was too red for this use). If the marigolds don't feel right in there, I'll be happy to swap them out for something else.


I spent a lot of time talking about the importance of texture variety in window boxes the other day and I feel like I've got a good variety here with coarse texture provided by the nicotiana and nasturtium, medium texture with the licorice plant, supertunia and superbena, and fine texture from the Mexican feather grass, verbena bonareinsis and signet marigolds.

I made a time-lapse movie of planting. Let me tell you, it's hard to get a good angle on a window box. I taped my phone to a stick and stuck it in the self-watering hole.


 I'll show you what it looks like in a few weeks and give you a peek at some of the other containers I planted this year.


Labels: , , ,

19 May 2015

THE DEFINITIVE GUIDE TO WINDOW BOX DESIGN

Designing containers is one of my favorite parts of gardening. There are so many options and there's so much less commitment than designing a garden: You get to redo it every year.

Pretty much everyone knows about the thriller, spiller, filler method of designing containers and although this isn't the only way, it's a pretty fail-safe method.

Except when it comes to window boxes. I love window boxes because I think they do more for curb appeal than almost any other kind of container, but they don't follow the same rules of design.

To create a great window box design, start with the right box. Always make your window box bigger than you think, both for ease of design and to reduce the amount of time you need to water. You want a window box to anchor your window, so make it longer than the base of your window, extending out at least to the window trim if not a few inches longer. Undersized window boxes never really look right. I upsized quite a bit when I bought our window box and I wish I had gone even larger.

Window boxes are the exception I make to self-watering planters. Generally, I'm not a big fan of them: I prefer to control the moisture level myself and when you plant in large containers, it's not that big of a deal to quickly water everything every couple of days or once a day in the heat of summer. It's a good chance to do a little deadheading and check on the condition of the plants. But window boxes can be difficult to water, so I use a self-waterer in mine. That allows me to go four or more days without watering it.

The design of a window box depends on a lot of factors including if your eye reads multiple boxes as one or more.

MULTIPLE SMALL WINDOW BOXES


If you have several window boxes under separate windows on your house, unless the boxes are very close together, your eye will read this as individual boxes. For these, it's important to be mindful of not making a design too busy. The window boxes will have a much greater overall effect if they each have the same design. Two or three varieties of plants, planted en masse will be stunning.

MULTIPLE WINDOW BOXES ON THE SAME LEVEL
This window box on Mackinac Island is actually three or four boxes but because the planting continues seamlessly it reads as one long box. 

Designer Jack Barnwell bridged the gap between boxes with vines that meet in the middle. 
These window boxes in Charleston are all separate but they have identical plantings that read as one long box. 
If window boxes are all on the same level, say under a row of windows, and don't have a lot of space between them, design them as though they are one large window box in which the design continues from one box to another.

CLEARLY SEPARATED BOXES


If there aren't a lot of window boxes, perhaps a pair of matching boxes clearly separated, mirror the design in each box.

And keep in mind the actual window situation when you design them. If the window box is outside of casement windows (as mine is), you either have to mount the box low, which can be a bit odd looking when it's not fully in bloom, strategically place plants around where the windows will open, or accept that you'll only be able to crack the windows and not open them fully.

That's the rough design guidelines for window boxes. Here's where we get to the specific design. Thriller, spiller, filler in the traditional sense doesn't work for most window boxes because the proportions are off if you have something tall and spiky in the middle. But a variation of thriller, spiller, filler, does have some merit if you look at the window box from the side. In other words, tall plants in the back, medium plants in the middle and cascading plants in the front.

TEXTURE IS KING

My window box from a few years ago. It's pretty, but it's not stunning. Notice how there is no variation in texture?
What I've found in designing my own window box is that, more than any other kind of container, texture is king. It matters more than absolutely anything else. One year I did a really beautiful window box design that was filled with gorgeous colors that repeated themselves through the box. It grew beautifully but something was off. It wasn't until the end of the summer that I figured out what it is: everything in the window box had the same texture. Superbells had half-dollar sized leaves with half-dollar sized flowers. Lysimachia (creeping Jenny) had coin-sized leaves spilling over the front of the box. Lobelia was slightly smaller, but pretty close in texture. It all fell flat.

When I started paying attention to the elements that I loved in a window box, I realized there were always bold forms and delicate treasures. That's the way texture works though, you only really notice texture when it stands in opposition to other texture. It works the same way that complimentary colors do.

There are so many wonderful annuals out there now that unless you are really stuck on a specific color theme, I think it works best to pick one plant that you really like to work off of. Make a mental note of its texture. Then choose a second plant with a different texture. Then choose a third plant with the exact opposite texture. Remember that factors other than leaf and flower size determine a plant's texture. I like using Blue Mohawk grass in containers because of its spiky nature. Consider airy plants that read a little softer as well.

This spring container in Charleston has a nice balance of textures. The flowers and round leaves of the cyclamen have a bold texture. Spiky leaves in the back have a good contrasting color as well. Airy asparagus ferns add softness, and smaller texture flowers frame the front.
KEEP COLOR IN MIND

I have a horrible time sticking to a limited color palette, but in most cases, it's for the best. Of course if you go back up to the top photo, you'll see every color under the sun and it still works, I think because it's such a huge planting. Let's say that's the exception though. For most home window boxes, you're going to have much more impact with fewer colors.

http://www.deborahsilver.com/blog/a-bit-more-box-talk/
Deborah Silver used a restrained color palette in this wild and wooly window box. Lime, white, lavender and a tinge of pink. That's it.  Deborah Silver photo
 If you have good contrasting texture, you can make a huge impact with seemingly no color (although of course green is a color too. Check out this amazing box, again from Deborah Silver.

Deborah Silver photo
PLANT PLACEMENT

I started this all by saying that window boxes offer a chance to break from the thriller, spiller, filler mode. Take a glance at the photos above and you'll see that there are plenty that don't subscribe to that planting theory. In general, the smaller the window box, the better a thriller, spiller, filler scenario works. Keep proportion in mind. If you have a single tall plant in the center of a very long window box, it just doesn't look right (I'm certain this has to do with a rule of thirds). But if you put a series of tall plants in a long window box, that can work.

An example of a small window box with small "thriller" in the middle. Take note at how the color of the pansies echoes the color of the box itself. 

In the photo above, this small window box in Charleston using a cyclamen as a thriller. Normally that would be more a filler, but it's the tallest thing in the box and the whole thing works because it's a small box and the white of the cyclamen is tied in to the white alyssum on the ends.

Spillers are hugely important in window boxes and I love it when a window box planting looks like it's just dripping. For a lone window box like mine, I always try to plant a trailing plant near the corner as well as plant that will stick out a bit on the sides right at the end. I don't like to see bare ends on window boxes.

Deborah Silver photo

You don't have to have a thriller at all. Mounded plantings can be beautiful and I think they are particularly effective the closer the box is to eye level. And just to bring this full circle, the above container is an excellent example of how important texture is in a container. That window box would be far less interesting were it not for the wide array of textures.

All of which makes designing a window box so much fun. So go forth and design!

It is no secret that I think Deborah Silver is the container design guru. If you want more window box inspiration, go to her Pinterest page to see more of her work. 


Labels: , ,

31 December 2014

2014: A YEAR IN REVIEW

Wow, how did it get to be December 31 already? It seems like the year just flew by. Come to think if it, since I was 25, they all seem to have flown by.

It was a good year on the blog. I've been doing this since April 2009 and I wrote (a few) more posts this year than any other. I hope to keep that up in 2015, but I never like to set a schedule because I don't want to start writing stuff that you don't want to read.

Anyway, let's take a look at the highlights of 2014 on The Impatient Gardener.

JANUARY


To keep myself busy during the cold winter months before I allow myself to really start dreaming of gardening, I made this really simple little magnetic chalkboard for the inside of the pantry.

FEBRUARY

I wrapped up what was probably the biggest indoor project of the year when I put the finishing touches on the small hallway outside the kitchen. For such a small space it sure was a pain to fix up. In the end it got smooth walls, a fresh coat of paint all over, a fun blue planked ceiling, a new light and a new thermostat. It wasn't pretty, but in the end it was so worth it, even though I still find drywall dust in odd places.

MARCH

The ugly vanity in the ugly bathroom got (another) coat of paint. I still hate it but it's much better navy than it was pickled pink. I'll be happy the day that the vanity, and the rest of the bathroom, are tossed out.

APRIL

Finally, after what seemed like the crappiest winter in history, it was time to garden. Indoors, anyway. For the first time, I started a lot of things from seed last year. Overall, I really enjoyed it because it helped the gardening bug a little and I had a lot of success with some of the things I grew from seed (and not so much from others).

MAY

The garden finally came to life (albeit slowly) in May. I was rejoicing in every swelling leaf bud and bit of green I could find.

JUNE


I showed off the wood planter we built. It ended up being heavier than heck and way more expensive than we planned, but it was still a fraction of the price we would have paid for something similar. It was a really satisfying project.

JULY


In July I finally finished up the back yard garden renovation I'd been working on. By creating a little more form in the shape of ovals, I defined the space much better and finally made the edge of the property much nicer to look at.

AUGUST


It was a pretty good year for containers and I shared some of the progress in August.

SEPTEMBER


I grew a perfect tomato. I grew very few tomatoes last summer, but this one was damn near perfect.

OCTOBER


Thanks to growing parsley from seed, I had a welcome abundance of it. I saved the harvest in a variety of ways and we're still enjoying it.

NOVEMBER


I experimented with a new way to ward off deer this winter. So far it's been successful, but since we've had no snow, the deer have plenty of other food to eat. We'll see what happens the rest of the winter.

DECEMBER


I added a little color to the drab landscape by decorating the outside containers. I'll enjoy them until March.

Not bad for a year. How was your 2014?


Labels: , , , , , , , , , , , ,

01 December 2014

HOLIDAY CHEER FOR OUTSIDE

My favorite holiday decorations are the ones I do outside. It's partly because they brighten up what is otherwise a pretty dreary landscape, but also because the decorations outside, particularly the containers, provide the most decorating bang for the buck.

I love how with a few collected (and some purchased) materials you can create something that is really beautiful. These containers will last all winter and I won't get sick of them, like I tend to do after a couple weeks with indoor decorations. I think they make the whole house feel more welcoming.


I took advantage of some unseasonably warm weather over the weekend to decorate three containers at home and another two at work. Although I purchased some of the materials for the containers, it would certainly be possible to create containers like these completely out of found materials (save for the lights).

holiday window box with steel ring: The Impatient Gardener

Holiday window box with lighted steel ring at night - The Impatient Gardener

Holiday window box with greens, dogwood twigs, silver dollar eucalyptus, faux berries -- The Impatient Gardener

I rely on evergreen boughs and dogwood twigs to fill the bulk of the container. Although I'm not a Black Friday  shopper, I swung by Home Depot Friday afternoon to pick up a couple $5 wreaths and scored an entire shopping cart full of the bottom branches of trees that people had purchased that day for free. I also collected some cedar cuttings from our own trees and purchased the rest of the evergreens: Douglas pine boughs and a small amount of incense cedar.

The dogwood twigs were harvested from my parents' yard, where they grow alongside the lane, and I purchased the silver dollar eucalyptus.

Holiday container with birch, dogwood, greens, pine cones-- The Impatient Gardener

Holiday container at night

pine cone, birch, berry, dogwood container detail -- The Impatient Gardener

And it pains me to admit that I also purchased the birch branches. The face of the matter is that it's hard to find slim birch branches that people will allow you to harvest (for goodness sake, don't go cutting down someone's young birch tree!). And although I think you could probably take any relatively straight branch of the right diameter and paint it white for the same look, it just seemed easier to pick up some 6-foot birch branches on sale at the nursery/craft store and cut them to the size I needed.

I pilfered a trellis from one of the clematis for the urn in the center of the garden and put a "column" of red dogwood twigs in the center for some color.

I do have a few tricks that I've picked up over the years from other gardeners and designers who nicely share such tips on their blogs. I cut thick styrofoam to size for each container and, if needed, use staked pounded into the usually frozen soil below to hold it in place. Then I can easily and securely fit all the greens in and they won't budge. Here's how to do it.

I also learned a great trick from Deborah Silver to create nice bunches of branches by bundling them together around a stake and using wire ties to hold them together. That way you only have to drive the stake into the pot. You can see how I do this here (a few years ago before I discovered the foam trick).


In the large planter by the front door, I also used some extra large pine cones I've had for years.

pine cone, birch, berry, dogwood container detail -- The Impatient Gardener

For the window box, I used a steel ring that I had not yet "planted" in the garden for the centerpiece, along with some faux berries, saved from last year, eucalyptus and more dogwood. I wrapped lights around the ring and then stuck a whole bunch of lights at its base to give the illusion of the center of the ring glowing. I'm happy with the effect viewed from outside, but I'm positively in love with the ambiance it brings to the inside.

Holiday window box from inside -- The Impatient Gardener

 There is more decorating to be done outside and certainly inside, but for now, early in the holiday season, these containers bring all the cheer I need. And they also satisfy a gardener held hostage by winter. What sort of decorations do you do outside?

Labels: , , , ,