The Impatient Gardener

15 November 2016

WRAPPING UP A GARDEN PROJECT FOR FALL

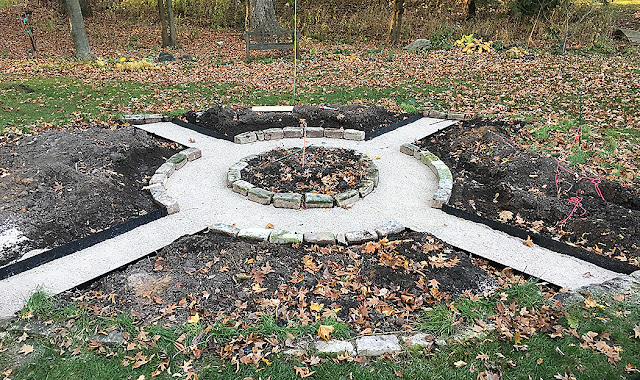
Work on the oval circle garden continued this weekend and by the end of the day on Sunday I let out  a sigh of relief. If a blizzard came tomorrow (unlikely as we've not yet had a frost), I'd be OK with how far this project got this season.


On Saturday I reset the outer circle of cobblestones. One thing I had not expected was for them not to fit perfectly. This, of course, was a ridiculous notion, but until I set the first segment it had never even occurred to me that the math wouldn't work out for me to only be able to use whole cobblestones. This was a bit of a predicament as a half-hearted attempt to split one using a small chisel and a light hammer left me frustrated and suffering from very sore wrists. I only needed two pieces so I just left the holes and planned to deal with it later.


On Sunday I got a truckload of paver base. The place I got it from called it limestone screenings, other places call it paver base or road base and in some places in the country its stone dust. I think the difference is primarily the type of stone it comes from and here we have lots of limestone. In any case, it's a coarse sandlike material with tiny bits of stone in it that compacts nicely. The first time I used limestone screenings for a small path ages ago, I was convinced it had made the soil around it extremely alkaline and therefore inhospitable to most plants. That didn't work for that application because I has put it under flagstones, filled in the gaps with soil and tried to grow groundcover between the stones. As one plant after another failed there, I realized it was probably the limestone base.

Fortunately, since the path will be completely separate from the soil, held at bay by metal edging and cobblestones, I shouldn't have to worry about that effect on plants.

After dumping the base in the paths, I tamped the entire thing down. Then I wet it and let the water filter through before going back and filling in low areas with more base. I could have used a little more base but with one cubic yard of the stuff weighing about 1.2 tons and me borrowing a half-ton truck, I wasn't able to get as much as I would have liked. Once I had it smoothed and leveled by eye (since this is going to be topped with gravel it doesn't need to be perfectly level like it would have to be if I were setting stone on top it), I tamped it again, wet it down again and then walked away.

While I was at the nursery getting the base I found two broken cobbles that I figured I could put in the holes where I had gaps. They aren't a perfect fit, but I think once the cobbles get some age on them they'll blend in. And if they don't I can always change them out later and I'm only out the $1 they charged me for them.

Originally I was going to get the gravel this fall as well, but I've rethought that. Since I  might be a little light on paver base, I'm going to let it settle and compact over the winter and then decide in spring if I should add more base or just top it up with all gravel. There's a significant cost difference: the paver base was $20 a ton and the gravel is $100 per ton. The other advantage to waiting on the gravel is that I don't have to worry about soil or seeds ending up in it and I can start next spring with clean and completely weed-free paths. In fact, I may wait to put the gravel in until after I plant the beds as there's sure to be some soil flying about.

Since this project is almost wrapped up for the season, here's a quick look at what's been done.

This is what the garden, the first I'd ever made from scratch (14 years ago now) looked like at its best.  You'd notice it was nothing special even then.


It's a little easier to get a feel for the positioning and layout of the garden from Google Earth.


Here's a rough design concept for the renovated garden.


The first step was to move out the plants. I moved what I was keeping but was not returning to the garden and clustered all the chives for the chive hedge together where they will overwinter and I'll replant them in spring.

Then Mr. Much More Patient and I spent some quality time arguing about math as we laid out the location for the paths. I reviewed the serious mistakes I made when I designed the paths originally and ripped out all the dreaded landscape fabric.


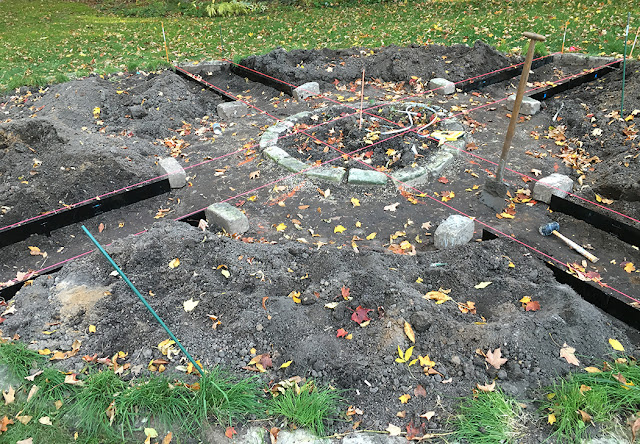
Then I was left to do a little light digging.


With the paths dug, we installed the metal edging for each "spoke."


And that led to where it is now.


That means that the only thing left to do this fall is to level out the heaps of soil. And then the fun begins. I can't wait to really get stuck in to the planting plan. What a great way to spend a cold winter day.


Labels: , , , ,

24 October 2016

WEEKEND PROGRESS

We were blessed with yet another gorgeous autumn weekend here. I can't say enough about how wonderful the weather has been for most of this year, but I feel like we deserve it after two really cruddy years. I'm still gardening in shorts most of the time and I can't think that's common for this time of year at all.

In an effort to keep you up to date with the oval circle garden progress, I thought I'd just give you a quick peek at what was happening this weekend. Frankly, I'm in full-on scramble mode, so I've not been taking much time to take pictures (or do anything else, like clean my house), but I did snap a few here and there.

You can see how the paths are coming together here. The random cobblestones more or less show where the inner circle path will be.

The big project in the ongoing circle garden ordeal was to install the metal edging. As I mentioned, I found it at Lowe's for about $10 per 8-foot piece. I bought extra stakes that are a foot long and really much better than the ones that come with the edging. I didn't really even bother with those. I have also ordered some end stakes for the inside ends, but those should be easy to put in.

From this angle you can see that the two side segments are going to be quite small. I may have to alter the design to accommodate that.

Mr. Much More Patient was in charge of cutting using a jigsaw with a blade for cutting metal and I handled the rest. The process wasn't difficult .... just a matter of leveling each piece from end to end and then with its partner on the other side of the path. I didn't bother with leveling each path's edging to the other paths. That would be impossible and the gravel will accommodate small changes in level.

The next step will be to install the paver base and the gravel, but first I have to dig the inner path around the circle down a little bit.

As the paths become more real, I'm seeing that the side segments are quite small, which may require some changes to the design. Fortunately I have all winter to think about that.

I also spent a little time this weekend being thankful for whoever invented the bulb auger. Last spring Mr. MMP said he'd love to see the woods full of daffodils, and I told him that was no problem so long as he would help plant them. With him running the auger and me putting the bulbs in and covering them over, we cranked through 200 bulbs in less than half an hour. Earlier in the day I planted 45 alliums in an hour and a half using a traditional bulb planter. Clearly the auger is the way to go.

And the last exciting tidbit from the weekend is a find that I'm super excited about. I've been so thrilled with how the rose I'm growing in a container is performing that I decided I'd like to grow a few more that way. My plan is to put them on the corners of the driveway apron where it meets the patio, but of course this requires a pair of matching containers of some size.

Here's the pair of planters I snatched up at a great price. I'll need to change the color though.

Although I went to the Restoration Hardware outlet store looking for a bed (I really want an upholstered bed, but that is really another issue all together), I swung by their outdoor area and saw a matching pair of their Adamo cast stone planters in the medium (24-inch) size. These babies go for $369 each on the website (really, RH? You need to get real with your pricing!), but they were marked down to $100 each at the outlet, plus there was an additional 30% off of everything that day, making them just $70 each. The color, called Honey Lemon, is sort of a light buff color and not my favorite at all, but I think I'll be able to stain them a gray color. I can't tell you what a relief it is to have found these at a great price. I struggle each year to find good containers and I feel like I often overspend. I'm envisioning a white rose in each pot with annuals around the edge.


Oh, and my favorite maple tree is starting to put on a show. I shared this photo on Instagram because even people who aren't too happy about autumn, like me, can appreciate that kind of beauty.


Labels: , , , , ,

18 October 2016

DIGGING MACHINE

Progress continues on the renovation of the oval circle garden but I won't lie, I'm getting nervous about how slowly it's going. I spent a good part of last weekend working on it and have gotten it to the point where I'm waiting for materials before I can move on. My goal is to have all of the hardscaping finished before the snow flies so I'm feeling better about reaching that now.

When we last checked in on what was happening, we had spent a ton of time marking everything out. I'll just tell you again, my advice is to not make an oval anything. Circles are easy: Stick a stake in the center and run a measuring tape from there. But ovals, especially this one, which is not perfect, is much more difficult to get everything even. And since this is meant to be a very symmetrical design, that's an issue. My hope is that it will be close enough that no one will notice a few math errors here and there.

The paths had been 16 inches wide, which was way too narrow. I'm widening them all to 24 inches. Here's the inner circle with the path marked out. The perspective makes it look quite large, but for reference that inner circle is 5 feet in diameter.

Since we marked everything, I've been painstakingly forking over the whole thing. I had previously moved out all the plants except for a few in the center, and relocated a bunch of the chives for the hedge to a section. Once that was finished I attempted to get rid of every weed root I could. A few years ago I battled a particularly nasty weed called Campanula rapunculoides, aka creeping bellflower.  It was particularly bad in one section of the garden so I pulled out all the plants and brushed Roundup on every little leaf of it, repeated the process a week or so later, then waited several weeks before replanting. It worked quite well, but there are a few little spots where it still pops up. It was the first time I'd ever used a herbicide in any part of my garden, but desperate times call for desperate measures. 

The other weed—and I'm prepared to take some heat for using that term—that is problematic there is lily of the valley. It came with the garden and I sort of liked it. In fact I quite like lily of the valley in the right place and in small quantities. But the nature of lily of the valley is that where it is happy, there will be more. And it is happy in a lot of places. 

Lily of the valley and I are no longer on speaking terms. This is just a very small sample of all of the roots I dug up.

I pulled out lily of the valley roots by the wheelbarrow full. No lie. I knew it was rampant there, but I had no idea it was that bad. I'm certain I didn't get it all and the fight will continue.

As I grumbled about the stupid weed situation, I made two interesting observations. The first was the health of the soil in that garden. It is a lovely texture: not too sandy (a concern here), not full of clay (believe it or not, also a concern, from where soil had been brought in over the years, and full of worms (I take large quantities of worms in my garden as Mother Nature's atta-girl). I worked on the soil in that garden over the years, adding compost, mulching and, frankly, not doing much else, which in my opinion is better than a lot of disturbance. The other thing I noticed was that all that forking over was creating a lot of very fluffy soil. 

After two days of digging, the tools were strewn everywhere and huge piles of soil were mounded up. It's crazy to think that all that soil fit in there before!

With that rather laborious, not to mention boring, process finished, I started digging the new paths. As you might imagine, this displaced a significant amount of soil in the process as well. By the time I was finished it looked like a backhoe had been busy. I know a lot of soil will natural compress in time, but some of it has to go, so now the next step will be to do a bit of soil relocation. That's no problem here: there is always an area that needs a little soil. 

There is a small amount of digging left to do. The area around the inner circle, needs to be dug down a bit more. Unfortunately it is very compacted there from the path that had been there and I just didn't have it in me to tackle that. 

The next step will be to install metal edging along the paths, then replace the cobblestones along the inside edge of each segment. After that it's time for paver base and gravel. Like I said, the clock is ticking. 

Two parting notes: 
  1. Make sure to enter to win a fabulous collection of alliums from Longfield Gardens.
  2. When I needed a break from digging dirt, I found this picture on Pinterest:
So of course I went out and tried to French braid some grass. I'm not sure if what I did counts as a Pinterest fail, but let's just say the effect is somewhat different. In my defense, the picture is of a nice green Miscanthus and my Korean feather reed grass is getting pretty crispy. I will say, though, that the alternative was just cutting it off because it was flopping everywhere and irritating me, so at least now it's reined in a bit. 


SaveSave

Labels: , ,

04 October 2016

A CHIVE CONVENTION

I didn't have much time to work in the yard last weekend, which is sad indeed. It has been raining here for days and days and there were other projects that took precedence (which you're about to hear about).

The few hours that I did have for garden time were dedicated to working on the oval circle garden update. Mr. Much More Patient and I spend almost two hours laying out the whole plan. Since it's meant to be symmetrical, being precise was important. But precision in an oval is difficult, especially when the original oval wasn't perfectly precise.

You can see the layout for one of the paths marked by yellow paint. It continues across the center of the garden. 

We spent hours with a tape measure, stake and landscape marking paint drawing lines and dots, to the point where we forget which dot was which. (Not to self, always have at least two colors of landscape paint for these projects).

We got it all laid out and later I came back to start moving things around. The first step was heeling in all the chives from the areas that will be changed. For the most part, the outer rim of chives can stay where it is, but those along the paths had to be moved. Since I knew where the new paths are going to be, I forked over a segment between them, doing my best to root out any weeds and then just heeled in chives from other areas. The soil in that segment of the garden, which was originally used for tomatoes, is so lovely to work in, it really wasn't difficult to do. Then I started popping out the cobblestones on the inner ring of each segment.

Chives moved and new paths marked. Good thing we also marked the grass or the lines would have been lost when I dug out the chives.

I'll be widening the paths from the existing 16 inches to a much more realistic 24 inches, so there's a fair amount of moving to be done.

As I took out some cobblestones I came across the dreaded landscape fabric. Yep, I put that nasty stuff down under the pea gravel paths and that was all well and good until weeds started growing in the paths a few years later. I'm wondering now if that fabric will make pulling up the pea gravel easier or more aggravating. I'll find out soon enough.

A funny little garden full of tufts of chives.

Still lots of cobblestones to move and then that nasty pea gravel to deal with. As usual this project is progressing a snail's pace, but there's nothing to be done but keep on plugging away.

Labels: , , ,

23 September 2016

A PLAN COMES TOGETHER

It's Friday, so I bet you're expecting Friday Finds. Never fear, they are coming later, but I didn't want to let another day pass without giving up an update on the oval circle garden (I feel like that's now the best way to refer to it).

When we last checked in on this garden that is the first thing people see when they come in our driveway (other than possibly the garage straight ahead), I was sharing how I had let the whole thing sort of slip into a sad state because I knew I was sick of. Upon further reflection I realized that there were design problems from the very beginning (which I'm letting myself off the hook for because it was the first garden I ever designed) and while I still like the concept, changes are needed.

I've been doing a lot of sketching and have settled into something I'm liking quite a bit.


As I've mentioned before, the chive hedge will stay and I'll rearrange it to line each segment. The paths, which are now a paltry 16 inches wide, will expand to 24 inches wide. That will eat up a lot of planting space, but it has to happen (and there's always room for plants somewhere else). The pea gravel that is currently there will be changed out for some other kind of gravel. Cobblestones will line the outside and the middle circle, but I'll do steel edging again for the "spokes."

Not that you can tell there's an obelisk under there, but there is and it supports the 'William Baffin' climbing rose (that the deer like more than I do) and a clematis.

As I previously mentioned, I'll leave the obelisk with a climber in the center circle and probably replant a few other things in there. For the rest of the planting, I'm thinking about a boxwood meatball or even a square, but something tightly clipped, in the middle of each section. Then each section would be further divided with three different grouping of plantings. If I line them up right, the effect would be a diamond shape.

Each subsection (shown by different colors on the drawing) would be completely planted with just one plant variety but not divided by any other physical barrier. I'm envisioning a combination of flowering annuals, grasses, dwarf shrubs and perennials. Planting a variety of things would allow me to accommodate for the fact that even though it's a small garden, part of it is much shadier than the rest.

Among the plants I've been playing with in my head are Mexican feather grass, verbena bonariensis, dahlias, 'Bobo' hydrangeas, rhubarb (which is the only plant staying because I don't want to move it), hakonechloa, begonias, coleaus, nepeta and alliums. None of that has to be decided now and I'm having fun playing with all the options in my head so I'm sort of saving the fun for winter.

The gardening season is rapidly drawing to a close, but my goal is to get the hardscaping finished this fall. I also wanted to get the boxwoods planted if possible but now is a great time to plant here and planting in two or three weeks isn't so great. I'm just not sure I can get it to that point in time and I don't want to risk the health of four expensive boxwoods by planting them too late.

I can't tell you how much better I feel about this garden now that I have a better concept of a plan. Frankly, it's the most excited I've been about this space in a very long time. That's good because I'll need the enthusiasm to get through some of the hard work that needs to happen before the snow flies.

Labels: , ,

08 July 2014

A NEW BACK YARD GARDEN

The weather has just been lovely here the past few days. It is all I can do to tear myself away from the garden in the morning and go to work. 

Today I'm going to share with you the new garden area in the back / side yard. Despite this being one of our main views from the house, I've put off doing anything there for the dozen years we've owned the house because it was such a weedy mess that I just didn't feel like taking on a project of that magnitude. Now I wonder why I didn't just deal with it sooner. 

Like most new gardens, it's looking a bit sparse, but I've learned to pay more attention to plant spacing over the years and I have hopes it will fill in nicely in the coming years.

The easiest way to get a feel for what changed is the overhead view (from our bedroom). I gave the lawn an oval shape, reshaping the existing bed on the bottom of the photo and creating the new bed on the top. I also reshaped the oval that crosses the path. (Click here for more on the planning stages.)

Redesigned back yard (The Impatient Gardener)

Here's another overhead view that shows how it all connects with the "Main" garden off the patio (which would be the bottom right corner of the photo below). You'll have to ignore the multiple colors of mulch I have going in that bed. I used "good" mulch around the plants, and then laid down cardboard and the cheapest mulch I could find (cypress) in the areas that aren't currently planted. The mulch is fresh in these photos and it should darken as summer goes on.

Redesigned back yard (The Impatient Gardener)


Here's a quick view of what part of that area looked like before the path and terraced beds were added.

Redesigned back yard BEFORE (The Impatient Gardener)

Three Viburnum lantana 'Mohican' shrubs were added a couple years ago and are growing well despite a lot of "pruning" by the deer this winter. I would like to add one or two more to the left of the existing ones but I just didn't have the energy to manage planting two more big shrubs this year.

Picea glauca Hudsonii; Redesigned back yard (The Impatient Gardener)


The focal point of the new garden area is Picea glauca 'Hudsonii' (Hudson white spruce). When I thought about planting this area, I always imagined a deciduous tree (maybe a tricolor beech) there, but in winter, it is rather open to our neighbors' back yard. I ran across Hudsonii quite by accident in late winter. I was researching evergreens for screening in other areas when I came across it. It caught my eye because by this time it was clear that our dog Hudson (who passed away in April) wasn't going to be around much longer and the thought of a memorial tree was sort of nice. We had hoped that Hudson would be around when we planted it, but sadly that wasn't meant to be. 

It's a lovely little tree that shouldn't get much over 8 feet tall and 4 feet wide, which is about the right size for this space. It is a heavy cone producer and is said to be covered in bright red cones in spring. 

Picea glauca Hudsonii

In front if it, I planted some strappy Carex, divisions from my mom's garden. I think it may be 'Moonraker' because in my mom's garden, where it is properly planted in a bit more shade, it is white with green edges. Since it's in a touch more sun in my garden, it is more lime/yellow, which I don't mind at all. This should fill in the area in front of the tree nicely.

Redesigned back yard (The Impatient Gardener)


To the left of the tree is the stump that I've turned into a container.

Tree stump as planter (The Impatient Gardener)

Surrounding that are several Hakonechloa 'All Gold' plants, mostly divisions from several large clumps growing on the west side of the house.

I seem to be lacking in photos beyond that, although you can see it above in the first photo of the tree, but the area gets shadier as it extends under the huge Norway spruce, so I planted several divisions of 'Tilt-a-whirl' hostas, Ligularia 'Desdemona' (which happens to be our cat's name, but that has nothing to do with why I grow that plant), Geranium Biokovo and then some ostrich ferns and sweet woodruff where I hope to phase it into a more natural area (in front of the wood pile).

To the right and behind the tree are a variety of plants. Most of them are planted in groups of three, which is a little sparse, but I hope to be able to divide them in future years to fill in a bit more.

In this photo you can see, among other things, 'Earth Angel' hosta, 'Teaspoon' hosta, Angelia gigas, Geranium 'Rozanne', Ajuga 'Chocolate Chip' and Heuchera 'Cinnamon Curls' (a trial plant for this year).

Redesigned back yard (The Impatient Gardener)

I planted Lysimachia atropurpurea 'Beaujolais' (a purple loosetrife cultivar) in the back. I hope it will spread a bit, but not too much. Given purple loosestrife's aggressive nature, I'll keep a close eye on it. It's just such a beautiful plant.
Purple loosestrife 'Beaujolais' (The Impatient Gardener)

I also planted Spirea 'Blue Kazoo', another trial plant from Proven Winners, near the front of the garden. It has the most lovely blue color to it and I'm really excited to see how it performs.

Spirea Blue Kazoo, Proven Winners (The Impatient Gardener)

The area by the garage was the most difficult to plant. A lot of snow tends to get piled there in winter, so it's an inhospitable place for a plant to grow. Right along the edge are several Allium senescens var. glaucum (pink curly onion) which have interesting blue-gray foliage that grows in a twist. I also put Sedum 'Neon' there (three new plants and several other starts from pinching out other plants in the garden) and a few Nepeta 'Walker's Low', which I love for its flower color despite the fact that it has a tendency to get a bit bigger and floppier than I would like.

I transplanted two Oso Easy 'Honey Bun' roses from the deck garden (I replaced them with more colorful roses). Unfortunately I moved them much later than I would have liked so I cut them back pretty hard to get them through the transition. These bloomed nonstop for me last year and I hope they do the same next year after they are over the trauma of the move. Along the path I planted five Pennisetum alopecuroides 'Bunny Tails', a dwarf ornamental grass. I amended this area of the garden more heavily than any other prior to planting. Much of the soil there is clay (undoubtedly fill brought in at some point in the property's history) and I mixed in lots of compost and pine bark fines to aid drainage and lighten the soil. I will pay special attention to this part of the garden in fall to make sure these plants go into winter as strong as they can possibly be to maximize their chances of making it through to spring.

Redesigned back yard (The Impatient Gardener)

In the shade of the north side of the garage (although not right next to the garage) I planted several more Hakonechloa 'All Gold' divisions and a climbing hydrangea that I hope will grow up the side of the garage to soften it a little. I'm not sure how well it will bloom in that much shade but I think the vine itself is pretty enough to justify a spot there. Normally I would never think about planting a climbing hydrangea on a structure (they have been known to rip siding off of houses), but I don't think it could do much more damage to our sort of ramshackle garage. I will make sure, though, to prune it to keep it from climbing up on the roof.

I made a rustic trellis from three branches that I cut in spring and bended over. Clematis 'Sweet Summer Love' and 'Lemon Chiffon' will hopefully be happy to climb up it in years to come. In front of the clematis, at the front of the border are nine Allium 'Summer Beauty' plants. I found three gallon-size plants on sale at the hardware store and divided them before planting them. I love this plant as much for its strappy bright green foliage as its cheery pink flowers. There are also dahlias, Joe Pye weed, Little Lime hydrangeas, boxwood and some Verbena bonareinsis dotted about.

Redesigned back yard (The Impatient Gardener)

I didn't change much to the oval that crosses the path other than to slightly change the beds to make them line up nicely. The bed on the south (right) side of the path is a bit of a happy mishmosh these days. Most of the plants in it (mostly hostas, blue globe spruce and heucheras) fall in the blue, purple or yellow foliage category and while it's not a cohesive look, I quick like what it has become.

Redesigned back yard (The Impatient Gardener)

I also changed the bed shape on the deck side of the yard to continue the oval shape of the lawn. This created a new planting area near the steps up to the deck. Inspired by a garden at this year's Chelsea Flower Show (that I showed you here)  I planted this area with Alchemilla mollis (Lady's Mantle) from divisions, more Nepeta 'Walker's Low', another boxwood and Nassella tenuissima (Mexican Feather Grass) for that airy look that I so loved in the Chelsea garden. This grass is apparently quite invasive in warmer areas, but it won't be hardy here. I'm just hoping that it grows enough in one year to put some size on. I may dig it and try to overwinter it, but I'm prepared to treat it as an annual and replace it every year. I also put in some yellow ball dahlias and some purple and blue geraniums.

Lady's mantle, Mexican feather grass, Walker's Low nepeta

Lady's mantle, Mexican feather grass, Walker's Low nepeta, boxwood

For the first time, I have (so far, please keep your fingers crossed) kept the deer from nibbling on the Incrediball hydrangeas that flank the stairs. If I can keep that up, I'm hope for a spectacular flower display there this summer. I planted those hydrangeas right after we built the deck (2011, I think) as quart-size plants and they are now approaching 4 feet tall and fulfilling what I had envisioned for that area.

Incrediball hydrangeas flanking the stairs

Although it's immature, so far I'm very pleased with the redesigned portion of the yard. It makes it that much harder to go to work on these beautiful summer days.

Labels: , , , , , , ,