The Impatient Gardener: February 2017

28 February 2017

WHY I'M GOING TO USE A GARDEN JOURNAL FOR THE FIRST TIME

I have always resisted journaling. I'm sure that part of that is related to a bad journaling experience I had in eighth grade when a teacher who required us to journal every day took quite literally what I had written, which in my mind was the start of one of the many of my novels that have never gotten past the first chapter. I was writing fiction, she thought (as one probably would) that I was writing nonfiction, there was a meeting with a guidance counselor and I never journaled again.

The other issue I've had with it is that it is not in my nature to just jot things down. I like full sentences and a story and there is no time for that every day. That turns a journal into a task and I don't really need any more of those.

When I started this blog almost eight years ago, it was my de facto gardening journal. I figured if I was going to keep track of this stuff I might as well share it. Well that changed, and thankfully so as it is painful to look back at those first posts.

I picked up this pretty set of simple journals (affiliate link*) for my first crack at keeping a written garden journal. 


But two things happened recently that have made me change my mind about keeping a garden journal for the first time.

The first was seeing the journals of my friend Linda, who blogs at Each Little World. They are works of art and she is on volume 21. What a treasure trove of information they must contain.

The other revelation I had was in reading my vacation book: Cuttings: A Year in the Garden with Christopher Lloyd (that's an affiliate link*). Prepare yourself because you're going to be hearing a lot about this book as it has been as informative for me as any gardening book I've read and it has my brain full of ideas. At some point while reading this book and subsequently looking at photos from last year's garden, I realized that the main fault with my garden is not design related, but maintenance related. I'm lazy or perpetually late on cutting back, staking, deadheading, moving and dividing plants and I really believe that if I up my maintenance game, the garden will be far better for it.

But the problem with these kinds of tasks is that I figure out too late when to cut things back by half (or I forget all together). If I knew how long it takes the nepeta on the path to grow back again after cutting back I could better time when it should be cut back in the first place (my recollection is two to three weeks, but that's all it is). And if I knew that in a week's time I'd be busy deadheading flowers or that I should have staked dahlias a week before I did, I could plan for these activities instead of not scheduling enough time to do them.

And then you factor in the crazy weather we've had this year. Two weeks ago it was 65 degrees. A photo that popped up on Facebook from four years ago reminded me of the more than foot of snow we had on February 27, 2013. Certainly there was not an aconite popping up in the garden at that time that year. Phenology fascinates me and as the climate changes it becomes more important and far more worthwhile to know the conditions during which a garden task is performed than the date it was performed on. And unless you have an exceptional memory, I don't know how you'd figure these things out for your own garden other than with the aid of journals.

Of course such information is of more use when there are several years to compare, so the real usefulness of a garden journal probably won't come until a few years down the road. But if I don't start now, I'll never get there.

The challenge for me will be keeping it simple and therefore manageable. I'll aim for note style, not prose, and hope to include weather observations, garden observations, notes about what I did in in the garden and notes about what I should have done differently. I didn't buy a specific journal for gardening because I doubt one would offer what I really need. I just bought a cheap but pretty (pretty always helps) journal that I can leave laying around and quickly grab. I consider it a bit of an experiment, but it's well past time that I start doing this.

Do you keep a garden journal?


* When you follow an affiliate link, I may receive a small commission if you make a purchase, which helps support these blogging endeavors. I do appreciate the support, so thank you!

Labels: ,

23 February 2017

DAHLIAS I HAVE LOVED + A GIVEAWAY

It would be cruel to ask me (or any gardener) to name my favorite flower, but I can say without any hesitancy that I can't imagine a garden of mine ever being without dahlias. They are, to me, the quintessential flower. And there are so many varieties I can't imagine that everyone couldn't find at least one (ha!) that they wouldn't love to grow in their garden.

'Cafe au Lait' dahlias in a variety of colors from my garden last year. 

I've always loved dahlias but growing them in our zone 5b climate along Lake Michigan, which makes a deal with the devil to offer warm, long autumn at the expense of warm springs, is an exercise in patience. Dahlias are, in general, at their best in late summer, but the cold soil in my garden in spring pushed that back even later.

Several years ago I figured out a way to circumvent this problem. I now pot up tubers in gallon-size nursery pots in mid-April so that dahlias have a good amount of growth on them by the time the soil is warm enough to plant them out. You must never plant a dahlia in cold soil; it will sulk at best and rot at worst.

A collection of dahlias cut before frost a couple years ago. The center flower is 'Pablo' and the orange flowers are 'David Howard'.

My taste in dahlias varies from year to year. There are so many categories of dahlias and varieties within each category, that the idea of never delving into the other options is appalling to me.

Best known are the dinnerplate dahlias, so called for their enormous flowers, although to truly get flowers the size of a dinner plate, you'll need to be ruthless about pinching out side shoots, allowing all the nutrients and plant love to go to one single, favored bud per stem. This is how dahlias are grown for show and I'm far too greedy a gardener to follow this practice. I'll take four 6- or 7-inch blooms over one giant one any day. Dinnerplate dahlias must also be staked because their heavy blooms will certainly make the stems topple over. I've admitted my staking mistakes here regularly but this is one of those do-as-I-say not do-as-I-do things. Stake them either with some sort of cage or metal support or with individual supports (i.e. bamboo canes) for each major stem when the buds begin to swell, if not before.

Because of the hassle factor, I don't grow a lot of dinnerplates. I also find that they can be a touch difficult to incorporate into a border so unless you have a specific cutting garden area you have to be a little choosy about siting them. For the last several years, however, 'Cafe au Lait' has been the star of my garden. I think I first became aware of this dahlia when Erin from Floret started using them in her amazing bouquets. The color on it will range from buff or blush to almost candy pink and everything in between.

The seductive center of a 'Cafe au Lait' from my garden.
'Labyrinth' Longfield Gardens photo

I grow 'Cafe au Lait' in the skinny bed that runs between the house and the patio (quite the micro-climate there), but the rest of that garden has become quite colorful as I fill it with mostly annuals grown from seed. So this year I'll be alternating 'Cafe au Lait' at the back of that garden with 'Labyrinth', which is similar in form and style to 'Cafe au Lait' but much brighter. I look at it almost as a more saturate 'Cafe au Lait'.

'David Howard'

'HS Flame' Longfield Garden photo

I am also fond of dark-leaved dahlias although in a book I'm reading the great Christopher Lloyd (the late owner of the famed British garden and home Great Dixter) said he thought they could be "funereal" (on this point, Lloyd and I do not agree). 'David Howard' is an excellent example and of all the dahlias I've grown it produces the most flowers year after year. This year I'll be adding a red-flowered, dark foliage dahlia called 'HS Flame', which also has the single petals that pollinators appreciate and looks just a little less fussy than some dahlias. I'll be devoting a section of the circle garden to this dahlia.

'Roxy'

Last year I also grew a dark-leaved one called 'Roxy' which was a good performer in a pot for me. All three of these last dahlias I've mentioned have the benefit of being lower growing, so in many cases do not require staking, although 'David Howard' always grows taller than it should for me and flops by the end of summer.

'Crichton Honey'

I have an affinity for ball-shaped dahlias as well. There is something so orderly and almost unnatural about the shape of them that I find captivating. By far the best of these that I grew last year was 'Crichton Honey', which again varied in color (on the same flower, no less) from yellow to salmon to orange with a bright green center. I also like the tiny pom dahlias, although I've not had good luck with these and for some reason the slugs in my garden attack these over all others. I think that's a coincidence more than anything, but it's a shame because I think a pom dahlia thrown in a bouquet of more natural-shaped flowers is a lovely thing.

'Art Deco'

Gallery dahlias are fabulous because they are the lowest growing of the dahlias and are perfect for the front of a bed or a container and will never need staking (hallelujah). Sometimes, though, I find them almost too compact, without a lot of room for them to really show off their flowers. Such problems. Their color and form is somewhat limited as well. 'Art Deco' is a lovely deep salmon color. A few years ago I got a mixed bag of unknown gallery dahlias and there was one spectacular one that I didn't know the name of at the time. I now believe it was 'Pablo' and it was outstanding.

'Serkan' Longfield Gardens photo

As I said, I'm far to undisciplined of a gardener to stick to just a few varieties of dahlias and this year I'll be growing a few new ones. First is 'Serkan', a blue-purple waterlily variety that will also go in the circle garden. The waterlily dahlias are so unusual compared to other varieties and there's something graceful about them. I think the flower shape is a good juxtaposition with a lot of other flower forms that may be growing near it.

'Myrtles Folly' Longfield Gardens photo

'Nuit d'Ete' Longfield Gardens photo

If there was ever a flower to go a little wild with, it's dahlias and that's what led me to these next two varieties; they are just a little nutty. The first is 'Myrtles Folly', a big, almost fuzzy looking flower with split petals and bright colors. And the second is 'Nuit d'Ete', which is said to be one of the darkest dahlias and the cactus form is always interesting. I'm thinking I may grow them together, as dark flowers are no use if you don't have something near them to set them off so they don't get lost in the background.

Dahlias will keep blooming if you are good about deadheading them. Here's some information on how to do that.

Now, onto the fun part. I want to prove to you that:

  1. Dahlias are easy to grow,
  2. Everyone should grow some, and
  3. Once you grow them you'll fall in love with them too.
Longfield's Summer Wine mix

Longfield's Sugar Plum mix

Longfield Gardens has offered to give TWO lucky readers one of their dahlia collections. I picked out two that I thought were fantastic: their Summer Wine mix and a Sugar Plum mix. Right now most of their dahlias are on sale so if you haven't ordered yet, make sure you do before they are sold out!

Just clicking will get you one entry but you can earn additional entries as well. If you have some sun in your garden or a place you can put a pot in the sun, you can grow these!
Longfield Gardens Dahlia collection giveaway

Longfield Gardens has offered to give away two dahlia collections to The Impatient Gardener readers and has offered me a few dahlia varieties to try free of charge. All opinions are my own. 

Labels: , ,

20 February 2017

HOW TO MAKE AN INDUSTRIAL LIGHT FIXTURE

You know what a bummer it is when you find something you really like only to discover you really don't want to spend that much money on it? That sort of sums up my search for lights in the basement, which, as you may recall, we are trying to do on a tight budget. At one point during my search for lights, which was all over the place as I couldn't decide what kind of "feel" I wanted down there, I found a simple but sharp industrial style light that I kept coming back to. At $130 plus shipping, it would have been in the budget had I only needed one, but it was a no-go when I needed three.


At some point during the process of falling in love with this light, I posted a picture of it on Instagram, to which my friend Eric from Gardenfork replied, "You know you can make that, right?" So I watched Eric's video on making an industrial pendant light and set to work sourcing the parts.

My Instagram post showing the $130 inspiration light that I recreated for $60. 


I had a sneaking suspicion that it probably wasn't that hard to make some light fixtures, but my concern was knowing what parts I needed. And since I would have to order most of them online, I didn't want to end up in a situation where I'd order things I didn't need or fail to order something important. Eric's video helped with that part and then I went to the Gardenfork Facebook discussion group (a group hosted by Eric for discussing DIY projects, gardening stuff, and tons more), posted the list of the parts I was planning to buy and asked someone who had a clue to check my list to make sure I had everything. Eric was nice enough to reply and I had to swap out one item, but from there it was off to the races. In the end, I was able to recreate the inspiration light for less than half the price!

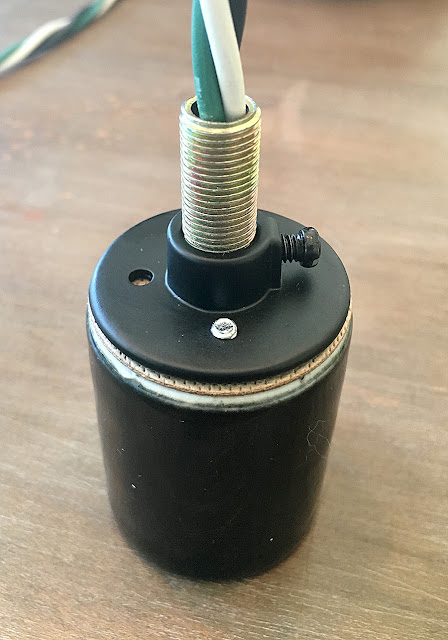
The parts you need to make this light, clockwise from the left: Metal shade, brass shade fitter/clamp, nut, electrical wire, ceiling canopy, porcelain socket, threaded nipple. 

Here are the parts I ordered (links take you to where I ordered them from but there are lots of places to order these things from):

You can absolutely pick up the wire at at the hardware store but I threw it in the cart as long as I was ordering.

Other parts:
  • Threaded hollow nipple. We reused the ones from the old lights but we could have purchased them for 38 cents. 
  • A nut that fits that nipple (purchased locally)
  • A canopy "kit" if necessary. This includes the metal piece that stretches across the hole in the ceiling where the electrical comes out (maybe this is called a junction box, but the fact that I made these lights with no concept of what these parts are called ought to reassure you that you can do this) and bolts to screw into. Again, we were able to reuse the old parts from the previous fixtures. 
Onto the assembly. This is the part where I should warn you that electricity is dangerous, etc. but you already know that and, frankly, I made it through this alive so you probably will too. (I'm kidding. You will.*)
This is the bottom of the socket where the light bulb screws in. The only thing you need to worry about on this end is loosening the screws to allow the cap of the 

Start by unscrewing the cap from the socket. There are a bunch of screws in there so make sure to only unscrew the ones holding the cap on. 


Then use a wire strippers to take off about 1/4-inch of the plastic covering from the end of the hot (black) and neutral (white) wires and about a half-inch off the ground (green) wire.

Next, you have to attach the hot and neutral wires. Start by twisting the exposed ends of the wire and bending it into a 90-degree angle (just to make it easier to fit in the space. When you look in the socket, there will be a screw on either side of the green screw. Each is backed by a small plate, one in silver, one in brass. Attach light to light and dark to dark, so the black wire goes to the screw on with the brass plate and the white wire goes to the screw with the silver plate (it's hard to see in these photos but when you have the socket in front of you it's obvious). Unscrew the screw a few turns, slip the exposed wire under it and tighten. When you think it's snug, give it a little tug to make sure it's really in there. Do this for both wires.


Next, wrap the green ground wire around the green screw in the same fashion. This screw is larger, so you can make a hook with the wire and sort of wrap it around the screw before tightening.

Thread the nipple into the cap of the socket, tighten the set screw on the cap and feed your wires through it, working the cap down.


This next bit takes a little doing because there are a lot of wires to jam in that tiny socket, but work them down as best you can, then tighten the screws that hold the cap on firmly. 


When it's on it should look like this:


Now take a deep breath because you've done the hard bit. Next you want to feed the wires through the canopy and push the nipple through the hole (there will be no snickering, thank you very much).


Use a nut to secure the canopy tight to the socket.


Then attach the shade holder to the shade. It just slips on and you tighten the screws. Slide the socket in the top and tighten the top clamp screw to secure it. We actually did this after we wired the lights to the ceiling as it was easier to attach everything without the shade on. 


 Then wire it to the existing electrical box like you would any other light. Mount the canopy onto the metal holder on the junction box to secure the light to the ceiling.

And that's it ... a light that, as far as I can tell, is identical to one you can buy, except mine cost $60 and the inspiration light was $130.

Here's the inspiration:

 And here's mine:


* But if you don't, don't blame me.


Labels: , , ,

17 February 2017

FRIDAY FINDS

It is a gorgeous day in Wisconsin. The sun is shining, the high temperature may break a record and I have completely mixed feelings about that. Don't get me wrong, I love an easy winter. But I love it during winter. There are consequences though. Last year I had Japanese beetles in my garden for the first time ever, probably caused by a mild winter and spring. Plants can handle a pretty wide range of temperature fluctuations, but extended periods of weather in the 50s in mid-February in what is supposed to be zone 5 can cause problems. And I worry about the broader implications that go beyond my garden.


As part of the basement project, we've been paring down our STUFF. I recently sold a set of dining chairs that I loved very much but needed some work that I've not had the time to get to for years. We have big dinners a couple times a year so we need chairs, but these were huge and unwieldy to store. I'm on the hunt for comfortable folding or stackable chairs at a good price to replace the set we just sold, so if time allows I'm going to head to the Restoration Hardware outlet where everything is an additional 40% off this weekend and see if they have something that might fit the bill. I was thinking about these cafe-type chairs, but only if they can be stacked.

Loi's Tudor house is for sale. What a dream this house would be if you wanted a place that was completely finished and ready to just move in and live.

Erin at Floret is running a series on garden planning this week. She approaches it from the flower farm perspective but her method can certainly be scaled back to apply to home gardeners. Her first book is coming out in a couple weeks and I'll be doing a review of it, so stay tuned.

I wouldn't say there's much that's earth-shattering in this list of ways to design a beautiful edible garden, but those oak wine barrels are phenomenal.

The latest Anthropologie catalog was shot at the Gianetti's Patina Farm. It's crazy because I saw the catalog and the setting was vaguely familiar but I didn't recognize their house at all with such different furnishings in it. I gotta say ... I like the "real" way better.

And lastly, I had intended to get this how-to post up this week but ran short on time so next week. But I still have to give you a preview because ....


I. MADE. THIS.

Can you tell I'm just a little proud of myself? Tutorial on the way, I promise. Also, that's the new basement wall and ceiling color in that photo too. Just a tad better than raspberry and baby blue, right? Remember how that looked?


Eek ... it's so bad, especially with the pink floors! All we've really done down there so far is paint and do the lights and it's already about 98% better.

If you're craving the sun, be sure to follow me on Instagram as there is certain to be a beach photo or two popping up there next week. I'm headed south for a quick jolt of Vitamin D and a little break from the daily grind. I'm more than a little excited.  Have a great weekend!

Labels: , ,

15 February 2017

THERE'S A FUNGI IN MY FRIDGE

So this is in my fridge. In case you can't tell what that is, it's a 5.5-pound bag of slightly moldy-looking sawdust. Makes it all clear, right?

That's a bag of mushroom spawn in my fridge, complete with the directions on top of it because if I don't keep them in there I'm sure to lose them.

It's actually a bag of wine cap mushroom (Stropharia) spawn mixed with sawdust that I picked up over the weekend at the Wisconsin Garden Expo. A few weeks ago, on a dark winter weekend, I somewhat randomly decided that I'm going to grow mushrooms this year.

My interest in mushrooms actually started last spring when I was chatting with garden blogger friend Kenny Point from Veggie Gardening Tips as we passed the time waiting for our flights at the airport. Kenny loves to grow things just for the challenge of growing something different (he also got me hooked on growing culinary ginger and turmeric) and told me that I was crazy not to give mushroom growing a try because, he said, some varieties are dead simple to grow.

Later that spring I went to a talk on growing mushrooms, but that one was centered mostly on using inoculated wood plugs to "seed" logs and seemed to require a fair amount of waiting, something we all know I'm no good at (see name of blog), but I kept remembering that there was a variety Kenny told me was very simple to try. I recalled that a few weekends ago and decided I would officially give wine caps a try.

Here's why I picked that variety:

  1. They can be grown in wood chips or straw.
  2. If I plant them in spring I should have mushrooms by August.
  3. The mushrooms are unique looking so even I should be able to identify them and not kill myself.
That last one sounds like a joke, but it's not. We have a pretty wooded lot and there are lots of mushrooms around. Some, I'm sure, are edible, but there are plenty that are absolutely not. I'm no mycologist, so I don't play around with taste testing things that might make me die. But wine caps are beautiful mushrooms with a lovely merlot-colored cap and gray gills that don't even look remotely like anything I've seen growing here. So I should be able to recognize them and be safe eating them.

Field and Forest photo

I bought the spawn—enough to cover a 50-square-foot bed—from Field and Forest Products, a mushroom supplier in Peshtigo, Wisconsin, and found the staff to be just full of knowledge and more than happy to share. 

I'm still researching the more specific aspects of creating my wine cap bed, but I know where it's going to go: Behind the three big virburnums at the back of the garden in the back/side garden that help block our neighbor's house. That area gets filtered light in the morning and late in the day and does a great job growing creeping Charlie, which the folks at Field and Forest said is a good indication that the mushrooms will do well there. I'll lay down a three-inch bed of well moistened hardwood chips, spread the sawdust/spawn mixture over them and top it with wet straw. Then all I have to do is keep the bed moist but not wet this summer. 

So this will be my big gardening experiment for the summer. Of course I'll take you along on the journey. And don't worry ... I'll do all the taste testing. 

Labels: ,

14 February 2017

FORMAL STYLE + A RIOT OF COLOR COME TOGETHER

Although it was a major topic in fall, I've not said much about the circle garden lately. To catch you up to speed here's the deal with the circle garden, which is not at all a circle, but "oval garden" is not the least bit catchy. When we bought our house it was a derelict vegetable garden that was mostly weeds with a few random shrubs thrown in. I dug it up, put in a poorly designed garden and as my love for it waned, it got worse each year. It lacked focus and was trying too hard to be all things in a very small garden. 

It was a visit from my garden blog friend Linda from Each Little World that spurred me to action. She mentioned that she noticed that at the time she visited (early July) there were many shades of green in my garden, but not a lot of other colors. And she was right. So I worked to come up with a way to really have a blow out of color that was still structured. 

The oval garden is a departure from the rest of my garden. Now redesigned with straight paths in an X pattern, it is far more formal in a structural sense than any other place in the garden. It is divided from other gardens by floating in the lawn near the front door, but it can't feel like a foreign place.


So the goal in designing this garden was to be a departure from the rest of the yard while not looking out of place. That's a tall order. And the only way to do that was by having a combination of informal plants in the confines of a formal design. Like all gardens, I fully expect this garden to be a work in progress and I think this first year will be largely experimental. I'm sure there will be things that work better than others. Perhaps the whole concept will be a flop. But hopefully it will be a riotous entry to the yard.

Four paths (created laboriously by me in fall) lead to a center circle and create four sections. Each section will have a small boxwood ball in the center and have three segments that radiate out from it. Each segment will be planted with a single plant. Deciding what should go in each segment was a bit like a Sudoku puzzle. I wanted each section to have a seasonal flowering aspect (such as a flowering perennial or shrub), a foliage element for texture and a flowering annual that should bloom all summer. I wanted a combination of warm and cool colors and I wanted some serious play on texture. And each segment had to play well with the segment next to it and across from it to balance the garden. Complicating the matter is the fact that although this is a smaller garden—about 30 feet long—because of the large trees that line our driveway, part of it is part sun to part shade and the other part is full sun.

There is a budget for this project. Not a specific budget, but I can't run out and buy all new plants just for this. So some of the plants need to be divisions from elsewhere in the garden or grown from seed to make it reasonable. 

So here's what I came up with. What you don't see in the diagram is the chive hedge, saved from the previous design of this garden. Each segment will be "outlined" in chives. Although there is no repetition in the plants save for the uniting ties of the boxwood balls and the chive hedges, I'm hoping repetition will come in the form of texture and color rather than actual plants. 

Moving clockwise, starting at 12 o'clock, here's what will be in each segment:


  • 'Bobo' hydrangea: I've been hoping to work this diminutive hydrangea into my garden for a few years and I think this is the perfect opportunity. Its fluffy flowers will contrast well with the rest of the plants plants for this segment.
  • Hakenochloa 'All Gold': This is certainly one of my favorite plants and I'm happy that it likes my yard. When I redesigned the back/side yard a few years ago I used 'All Gold' divisions from another garden there. Now those division have grown enough that I can divide them to fill this bit for free.
  • New Guinea Impatiens 'Orange'
  • Dahlia 'HS Flame': I'm a sucker for dahlias with dark foliage and I love the simplicity of a single flower. I chose this one to balance out the pinks from the bottom of the garden. It's also a short dahlia so I shouldn't have to worry about staking it.
  • Lady's mantle (Alchemilla mollis): This is probably my No. 1 go-to plant in my garden because it so good both as a foliage plant and as a long-bloomer with chartreuse flowers. It also divides easily so I'll have no problem finding plants for this section.
  • Verbena bonareinsis 'Meteor Shower': I grew this for the first time last year and I'm head over heels in love with it. It grown much shorter than your usual verbena—more like 2 feet instead of 4 or 5 feet—and blooms absolutely nonstop. 

  • 'The Alnwick Rose': Ordered from David Austin roses.
  • Rhubarb: I relocated two rhubarb plants from the old garden and I hope to get several more crowns from my grandmother's garden. I love it for its huge leaves but obviously also for eating. It will take a bit to establish this section so I don't anticipate this part looking great this year.
  • A white annual: I've shown a low-growing nicotiana here, but I may use a Profusion zinnia or something else. 


  • Dahlia 'Serkan': This is another low grower so I hope to not have to stake it. I love the waterlily-type dahlias and I think the relatively simple form of this flower will contrast well with the multi-petaled rose in the segment next to it.
  • Egyptian walking onion: I think this plant is one of the most interesting forms there is. I dug out and potted up several of them from the garden last fall and I'm hoping they'll overwinter well. This is a rather experimental choice, but if it works, I think it could be stunning.
  • Signet marigold 'Lemon Gem': This is one of my must-have flowers that I grow from seed. It blooms like crazy, smells delicious and has the most lovely small textured leaves and flowers. The flowers are edible as well.


Other plants that will play a role in the garden are the two clematis in the center circle—'Venosa Violacea', planted last year and 'Avant Garde', which I randomly ordered Sunday morning after seeing a photo of it. Around the outside of the inner circle, I'm envisioning a ring of lime thyme, which is a lovely groundcover that looks better than it tastes, in my experience. And then I'd need a more upright but still low annual inside of that to hide the ankles of the clematis. Of course, the chives (upper right corner) are a factor and I think I'll probably go with 'Green Gem' boxwood for the centers of each section.


Labels: , , , ,

10 February 2017

FRIDAY FINDS

I've been following Claus Dalby on Instagram for quite some time and if you hang out there he's worth a follow. Gardenista recently wrote about him and you can see some of his work, although I detest the headline (I don't really see any comparison to him and Martha Stewart).

Over at the Rusty Duck, an ongoing bedroom renovation is progressing and I love it so much. Do not miss what they did with rustic wood dressers (made from floorboards) that they topped off with modern hardware for the best of all worlds.

You can tell that northern gardeners are going a bit stir crazy because we're all talking about seeds. Matt at Growing with Plants has some fantastic tips for seed starting that shouldn't be missed.

These are a handful of the photos I've shared on Instagram in the past couple weeks:


So I guess there's no doubt where my brain is these days. I'm pining a bit for warmer weather. But this week I took Margaret Roach's "365-day garden" webinar and I'm rethinking all this wistfulness I'm feeling for summer.  Her main message was that there is beauty to be found in the garden all year round, whether it is beauty that the gardener creates or beauty that naturally occurs. So I'm going to make it my goal to revel in the season we have now. Well, as soon as it's warm enough to actually walk around out there.

By the way, I enjoyed that webinar. I'm a pretty avid reader of A Way to Garden, so much of what Margaret talked about and showed were familiar to me, but I still picked up a lot of ideas for new plants I'd like to try, including a possible solution to the troublesome spot I have in front of the chimney on the west side of the house that has me excited.

We made pizza in the cast iron skillet last week and holy cow it was good. I like a really crispy, thing crust and this was the most crispy crust we've ever had come from a homemade pizza. I'm definitely going to use that technique again! By the way, this is my very favorite cast iron pan (affiliate link). In fact it's my favorite pan period and well worth the hefty price tag.

I'm off to GardenExpo this weekend and I'm really looking forward to immersing myself in a bit of garden fantasy. And work continues on the basement. There will be an update coming soon on that! What will you be doing this weekend?

Labels: , , ,

09 February 2017

PLANTS OF THE YEAR

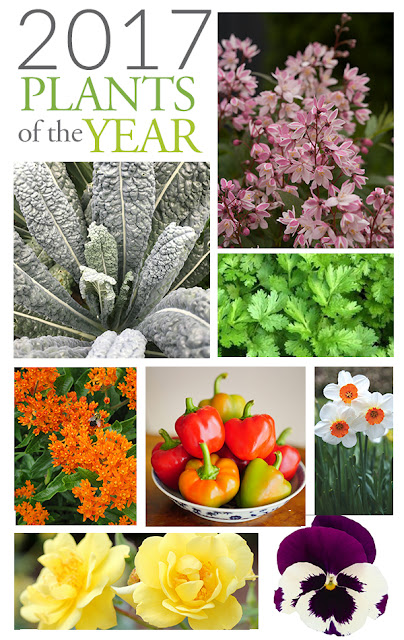
It has become very popular for different organizations to features "plants of the year." These usually involve a marketing push as well, so retailers tend to stock up on featured plants and the odds are much better that you'll be able to pick them up without a lot of hunting.


Here are a few of the featured plants of the year for 2017.

Proven Winners launched its own plant of the year program this year and I'm thrilled with what they picked as their landscape plant of the year: Deutzia 'Yuki Cherry Blossom.' I had never grown (or possibly even heard of) Deutzia until Proven Winners several compact varieties a couple years ago and sent a few plants as part of their garden writers trial program. I've found them to be well-mannered, highly textural little surprises perfect for all sorts of different areas. Although I like this pink variety, I like 'Creme Fraiche,' which has variegated leaves, even more.

Proven Winners photo

The National Garden Bureau assigns broader categories to their annual picks, offering four in a variety of categories. So they've declared 2017 as the year of the pansy, daffodil, rose and brassica. That may seem far ranging, but I can get behind all those picks.

Pansies make me feel guilty. I think they are a lovely, cheery plant and yet I rarely use them. Spring is short here and even those pansies can handle cold weather, potting some up in a container is wonderful, but that container will only be around for a few weeks because all of a sudden it's time for summer containers. I'm going to try to remedy that this year.

National Garden Bureau photo

What can I say about daffodils? You know I love them, the deer don't eat them and nothing could be easier to grow. The Bulb of the Year title is well deserved.

National Garden Bureau photo
According to the National Garden Bureau, it's the year of the rose. I sure hope so because I'm about doubling the amount of roses in my garden this year.  Seriously though, if you think of roses as high-maintenance divas, it's high time to rid yourself of that misconception. Yes, those roses still exist but I recommend you skip them and aim for easy-care roses that grow pretty much like any other shrub. And the good news is that fragrance is being bred back into these easy-to-care for roses.

National Garden Bureau photo

It's also the year of the brassica, that being all those vegetables in the kale, cabbage and broccoli family. I'll confess, I'm not a brassica lover. But growing kale has made me appreciate it and I do love the Lacinato variety that I grow. And I've discovered that just about any vegetable that is roasted with olive oil and salt and pepper tastes pretty darn good so broccolini and even the occasional Brussels sprout has made its way into my veggie repertoire. The category is big and full of incredibly nutritious food, so it's well worth finding one and giving it a shot this year. I can't speak for growing all of them, but kale is a cinch to grow from seed.

The Impatient Gardener photo


The International Herb Society has been naming an Herb of the Year for ages and for the past few years I felt like maybe they were running out of herbs to give this distinction to (artemesia, elderberry and savory have been featured recently). But this year it's cilantro's year and I like that pick. Cilantro is certainly one of the most popular fresh herbs that people use, even though there is apparently a gene that makes it taste like soap to some people. It's fussy to grow though. It doesn't like heat and it will bolt quickly and as soon as that happen you might as well get comfortable with the fact that now you're growing coriander (the seeds of cilantro), not cilantro. Still, I love it in Mexican food. In recent years I've grown one called Slo-Bolt. I don't know if it's true to it's name as I've not grown it side by side with "regular" cilantro, but I get a few harvests out of it. Here's a little tip: If you love the taste of cilantro but hate that it bolts so quickly, consider growing papalo, which has a similar flavor in much larger, thicker leaves.
Renee's Garden photo. I've grown this variety in the past, but this year I may try this. The flowers are edible as well.


The Perennial Plant Association has chosen Asclepias tuberosa aka butterfly weed as it's plant of the year. Not only does this fit in with the movement to create more pollinator friendly gardens, I believe this to be an excellent plant. I remember the first time I saw it on a garden tour. I was drawn to it from clear across the yard. It's a nice height of between 2 and 3 feet, is deer resistant, can be grown from seed and it has long lasting flowers. It's a member of the milkweed family but has less milky sap than most of that group. 

Perennial Plant Association photo


Proven Winners also picked an annual to feature this year and it's one of their gold standards: Supertunia Vista Bubblegum. OK, it's confession time: I have never grown this plant. I've grown oodles of annuals from Proven Winners but never this one. There is something about that specific color of pink that I just don't love. But I'm clearly in the minority as I see people grabbing it by the flat-full at garden centers and P. Allen Smith has raved about it for years. I found this photo of it in a landscape, though, and I think my mind may be changing. It really is pretty stunning (of course the rest of that garden isn't so bad either).

Proven Winners photo


Lastly, there are the All-American Selections. These are excellent choices to pay attention to as these plants have been tried and tested and are chosen for their performance. The AAS logo appears on seed varieties that have earned the distinction so it's a good thing to look for. Here are their 2017 selections.

Sweetie Pie paper. All-American selections photo. 


OK ... it's your turn: If you were choosing a plant of the year for 2017 what would it be?

Labels: