The Impatient Gardener: April 2014

30 April 2014

BLACK IS NOT BLACK

It is predicted to rain here. All week. And hover in the 45-degree range. The optimist in me assumes this is because Mother Nature wants to make sure we get our fill of April showers so we get our May flowers.

It does give me a chance to take a break from talking about gardening, to catch you up on at least one inside project with a very important lesson.

First, the lesson: Black is not black.*

I discovered this lesson when I set out to repaint the inside of our back door, that opens to our kitchen.

You may recall that the first time I painted it black, I did so on a whim and over cocktail hour. There’s a chance I may not have done a good job on my prep and I think it’s safe to say we can and should blame the Cabernet for that. Anyway, that paint job was chipping and getting a bit scratched up so I figured I’d redo it the right way this time.

I sprung for very expensive Fine Paints of Europe Eco Brilliance paint. After sanding and priming, I put a coat of the insanely high gloss paint on. The color was to die for. The most amazing black (just “Black” in FPE parlance) that was deep and rich and just lovely. The first coat didn’t go on well, but that’s to be expected with dark paints. The second coat went on weird. It was all lumpy in some spots. The third coat (sanding between coats) only made it worse. Something was horribly wrong.

It may have been the primer I used (FPE says you must use their primers with the Eco line and I no longer think that’s just a sales strategy). It could have been that high gloss paints are just difficult to work with and even FPE recommends that you paint the first coats in satin and finish with a coat of Brilliance. Whatever the cause, it looked awful and I couldn't stand it.

So I sanded it all off (some areas came off in sheets, proving that the paint had not bonded with the primer). I would have stripped it if the door weren’t very much in use. And I reprised and I went back to my comfort zone, which is Benjamin Moore Aura, although in an exterior formulation for better durability.

You can sort of tell the issues with different paint colors in my little finger-dip paint testing method. I can't remember which two Ben Moore colors the first two are, but the color farthest to the right is Fine Paints of Europe's Black and it is utterly gorgeous.

I bought Black. And I put a coat of black on. And Black was gray. Not even charcoal gray, actually. So I took it back to the paint store, where they told me this is not an unusual problem. I exchanged it for Onyx which looked very black on the swatch. And I put on a coat of Onyx. And that was better. I’d say it was the color of a chalkboard that had been erased. Beautiful color, but not black. Then I bought Twilight Zone, which looked darker than Onyx, but was actually lighter.


So I wrote to Benjamin Moore who very nicely replied to say that Black is their richest, darkest color. Hmmm, that didn’t add up because Black was the lightest of the colors I’d tried. But maybe there was a calibration problem at the paint store. 

So I went to ANOTHER paint store. This time I found a paint guy willing to get creative (while I love my regular paint/hardware store, they are reluctant to mess with paint formulas), so we mixed up Black and then added as much additional black pigment as the can could hold.


All that and we're back, more or less, to where it was, sans scratches and chipping. Looking at this photo, I realize I need to touch up some of the baseboards. Sigh. Another day.

It's still not as nice and rich as that gorgeous FPE paint, but sometimes it's a compromise. And for me, a good paint job in a not-perfect color is better than a great color that looks like a mess.

I know you're wondering why I didn't just paint it the same black it was. Would you believe I don't know what color that was? I actually gave the can away to my nephew for a project so I don't have it and I didn't make note of it in the blog. Looking back at those photos from when I first did it, I think the original was actually darker. Which goes back to the theory that something has changed with the paint colors or pigments or machines since then.

The lesson? I don't think I'll use Benjamin Moore paint if I want a true black in the future. And if you do use it and you want a real black, find a nice paint guy who will just load up the can with as much pigment as you think it can handle.

* When it comes to paint, anyway.

P.S. Longtime readers may remember that I once posted an entry with almost the same name (or exactly the opposite depending on how you want to look at it), only about white. Maybe I should stick to gray.


Labels: , ,

28 April 2014

FIRST PLANTS IN, MORE SEEDS TO COME

It was a great weekend in the garden: two marathon days that left the garden in pretty good shape and my body in pretty bad shape. There is something so satisfying about the pain one feels after long days in the garden.

I put some row cover over the peas and lettuce seed, if only to protect them a bit from the torrential rains predicted for this week.

A highlight of my work in the garden this weekend was planting my first veggies in the garden. Kale, lettuce, peas and onion seedlings (purchased) all went in this weekend. Some of the kale and the peas were among the seedlings I started inside.

By and large, the seeds have been doing well. Everything germinated and grew very well. As seedlings got their first sets of true leaves, I pulled out or snipped off all but the strongest seedling in each plug of basil and kale. I let the bunching onions get bunchy and I had already thinly sowed the nasturtiums.


On Friday I potted up the basil into 3-inch pots. They have a long way to go before I'll plant them outside. In a normal year I wouldn't plant basil outside until the last week in May at the very earliest. With the way the weather is going this year, it could be a couple weeks into June before it is warm enough for them. Most of the pots are back inside and will be moved to the mini greenhouse (essentially a cold frame) when it gets a little warmer. A few pots didn't fit in the tray, so they are outside in pots protected by row cover fending for themselves as a bit of an experiment.

I've been hardening off the kale for the last week or more and planted out the plugs directly into the garden on Sunday. I also planted some kale seeds as well. I will plant more kale in coming weeks as well.


The bunching onions aren't doing much. They seem to be stalled in their growth. I may harden them off and move them out hoping to spark some growth.


The nasturtiums are growing really well. In fact, when I picked up the tray the other day, I noticed roots were jumping out the bottom, so I also potted them up in 4-inch pots, two plants per pot, on Friday. I pinched them back at the same time, hoping to encourage nice bushy growth.

The roots of the peas were already coming out the bottom of the biodegradable pots.

Peas planted in their pots in the garden.

I read that while peas like cool weather to grow, they germinate best at 70 degrees, so I sowed some snap peas in a cardboard seed tray. They germinated quickly and I immediately started hardening them off. Sunday, I planted out the trays intact into a corner of the garden where they will quickly disintegrate (the roots were already coming through the bottom). I hope to have a better pea harvest than most years, as I'm using first planting seeds outside at this point.

The biggest challenge so far has been keeping the cat away from the seedlings.

With some room in the seed trays and under the grow light, I was able to sow a few more seeds.

I planted an entire tray of kale. Yep, more kale. I intend to plant most of these in the ornamental gardens where they will be beautiful foliage (that we'll nibble on when we're too lazy to walk to the veggie garden). Once those germinate (i.e. move off the heat mat), I think I'll start some zinnias and some more nasturtiums, or perhaps some parsley. I'm so impressed with how the basil is doing (it's already at the size I have purchased plants at in the past) that I'm inspired to give parsley (which I never have enough of) a try.

Some ciopollini onion seedlings also went in and plenty close as they stay small. Also, you're getting a sneak peek at another project I'm working on in the background.

How is your seed growing going? Did you get to plant anything in the garden this weekend?

Labels: , , ,

25 April 2014

FEATURE FRIDAY: WATER IN THE GARDEN

First of all, thank you all so much for your kind words about the loss of our dog Hudson. So many of you shared stories of your beloved pets and I know that you know just what we're feeling.

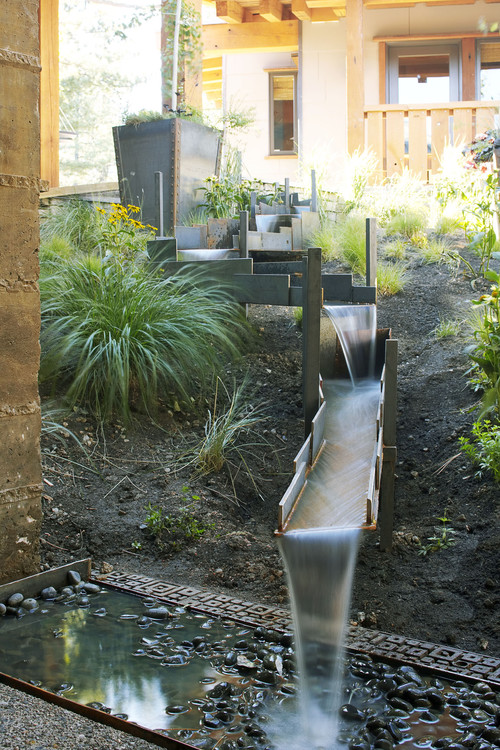
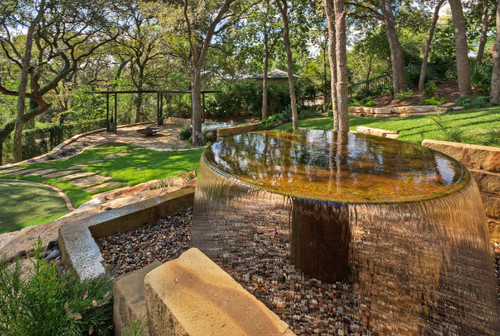
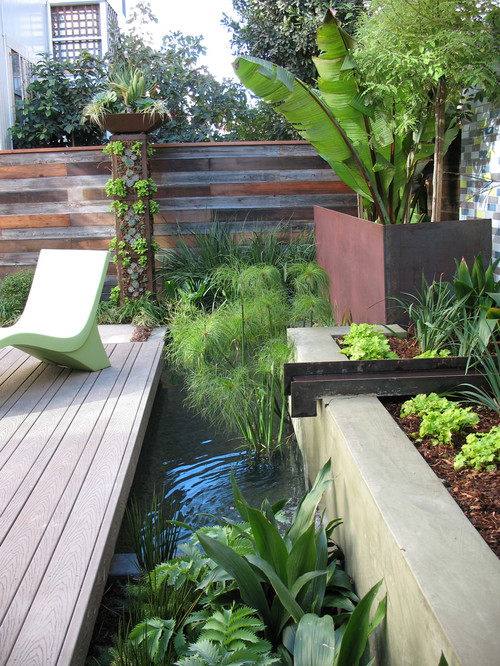
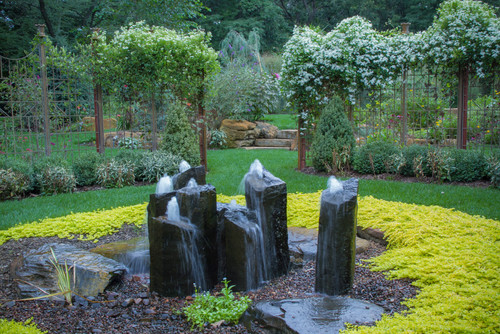
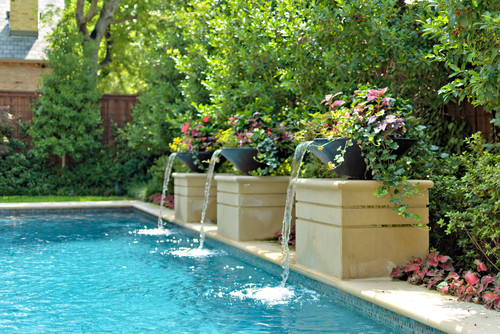
Hudson loved water as all Newfs do. In fact they love it so much that having a water feature in my yard would be an invitation to a constantly wet dog. Plus, some water features can be a bit more maintenance than I'm interested in, so beyond the natural creek that runs through the yard, we don't have a water feature. But there is nothing like water in the garden, and water features are so much more than overgrown ponds or tri-level Italian-style fountains. In fact, I found some really creative water features ranging from quite large and complicated to simple but beautiful.

Enjoy.


And then there is this absolutely amazing work of art from Deborah Silver's Branch Studio. You must visit her blog to see how this fountain was created. I hope this ends up in a garden that is created around it, because it is just that special.


Do you have water in your garden? What would your dream water feature be?

Labels: ,

23 April 2014

GOODBYE TO A GOOD FRIEND

I try not to get overly personal here and I hate to do posts that can be kind of a downer. But I would be remiss in not remembering a great friend here.


Yesterday we had to say goodbye to what was certainly one of the world's greatest dogs. At just about 10 years and 7 months old, our Newfoundland Hudson was sound in spirit but his body was failing him. He suffered a lot of orthopedic issues in his life and they all caught up with him. If he had been a smaller dog, we could have carried him in and out of the house, but this is one of those things you sign up for when you get a giant breed dog. The fact that he was in great health otherwise made this decision that much more difficult for us.

I know that everyone's dogs are special to them, but Hudson and I had bond from the moment we met. He was a proud beast, who wanted nothing more than to be given a job and carry it out. He did that literally, by carrying in our groceries, getting the newspaper and delivering flowers to me when Mr. Much More Patient would bring them home for me. Most Newfoundlands are excellent swimmers and have a natural instinct for water rescue, but Hudson was special even in that regard. At 8 months old I took him to water rescue training (Newfoundlands can earn titles for water rescue) and he did almost every exercise immediately. We tried three times to get that water title before his joint problems and the resulting surgeries got in the way, and we failed every time on the same exercise: the one where he had to leave my side to go out and take a line to a drowning "victim."

That's the thing, he never wanted to leave my side. We achieved other things together. He got a draft title in one try, by my side. We explored the beach together every weekend. We swam in Lake Michigan together, him towing me (and any neighbor kids who were around) over and over again. It was never clear who was having more fun.

As anyone who has had a beloved pet will tell you, the problem with pets is that in the end, you always have to say goodbye.

A friend posted something on my Facebook page this morning: The luckiest people in the world have shared their life with a good dog.

I am indeed fortunate.


Labels: ,

17 April 2014

GETTING COMFREY WITH GROWING MY OWN FERTILIZER

Since I wrote this post, I estimate that I’ve watched more than 50 hours of British gardening shows. And I think I’ve learned more from them than I ever learned over all the years of watching American gardening shows. Some of that information—how to take cuttings, for instance—may not be completely practical as I have nowhere to overwinter delicate new plants, but it is fascinating information to know.

But until I watched a 2011 episode of "Gardener’s World" (one Youtube poster lists it as the “Best show in the world” and I wouldn't argue with him), I had no idea that I’ve been missing out on growing my own fertilizer all this time. 

Apparently a small patch of comfrey will nourish your plants and kick your compost pile into high gear.

Until recently, my knowledge of comfrey was limited. I knew it was part of the borage family. I know that borage is a beautiful plant in an old-fashioned kind of way but also one that you never get rid of once you have it. I’ll be honest, plants like that scare me. I’ve had too many plants try to stage a bloodless coup in my garden (like these) and eradicating them is a chore that has taken years (and continues annually, in some cases). 

I also knew that I liked the name of the plant: comfrey. It sounds … well … comfy. It does have fuzzy leaves, so maybe it is sort of comfy (although it can be irritating to some people’s skin so maybe don’t curl up in a patch of it). 


But it turns out that comfrey is a little powerhouse of a plant. It can be used for medicinal purposes because it contains allantoin, which stimulates cell growth and repair, and as a high-protein animal feed, but that's not why I've got my eye on it.

Nope, I’m interested in it because it’s a great fertilizer. Comfrey is high in potash, aka potassium (the "K" in NPK fertilizer ratios), which means it’s an excellent feed for overall plant health and particularly good for tomatoes and flowers later in the season. One source says that comfrey has more than twice as much potassium as farm manure and 30% more than compost. The NPK (nitrogen-phosporous-potassium) breakdown of comfrey leaves is 1.80-0.50-5.30 for true comfrey and that last number bumps up to 7.09 for Russian comfrey. 

On "Gardener’s World," good ol’ Monty Don made comfrey tea and then watered his plants with it. He also used it as a foliar feed. And he used a big bunch of leaves as mulch for his tomatoes. Just slapped them right on there. They will feed the soil as they decompose. And anything that was left, including the stems, was thrown in the compost pile where it kick starts a pile that’s a little heavy on browns (i.e. carbon-based material). And another source claims that earthworm farms have found that adding comfrey to their worm beds increases worm numbers by 400%. Even if that's an exaggeration, imagine what it could do for the worms in my compost bin.


You can also put a few leaves near plants prone to slug damage. Apparently it is so tasty to slugs that they will forego eating anything else in favor of attacking the comfrey. I'm not sure howI feel about that logic as it's a little bit like feeding the deer in your yard and expecting them not to eat your garden, but it might be interesting to try.

How have I been missing out on all this goodness? It all sounds too good to be true.

Making comfrey tea is no more complicated that putting a lot of comfrey leaves in a bucket and covering them with water (some recipes say not to add water and just let them turn into sludge on their own). And then covering the whole thing with a lid or a board and stashing it away from human interaction for several weeks while it creates a black, disgusting stew that apparently is extremely foul-smelling (hence why you don’t want to store it on your patio while it’s brewing). 

When it’s finished you strain it, dilute it with water and pass the goodness onto your plants. 

It seems to be difficult to find plants, other than from other gardeners. I was surprised that our master gardener group doesn't sell it at our annual heirloom plant and herb sale given that it's such a useful plant. And all the gardeners I asked don't grow it. So I ordered a few root cuttings, which it is said to grow from easily. That alone is a little scary. Any plant that grows well from root cuttings means that you better put it in a place that you like from the beginning because digging it out will be difficult. Unless you dig up all the roots, you'll have more plants in that spot.


I ordered Russian comfrey (Symphytum x uplandicum), a variety called Bocking 14, which is said to be sterile, so at least I don't have to worry about it reseeding all over the place,  although cutting off the flowers before they set seed would also work (this is so much easier said than done). Apparently it is best to use it before it flowers, or right as it starts flowering. This strain is not great for animal feed—apparently it is more bitter than other strains—so I'm hoping that it won't be tasty to deer.

I’m going to find a little patch that’s out of the way. I’m still worried about it getting aggressive, but I think if I can provide it a nice little spot away from the main garden areas, I can let it be true to its nature. There is a variety that is supposed to be sterile and I may seek that one out to help keep it in check,

Growing my own fertilizer: what could be better? I’m becoming a more self-reliant gardener, recycling in my own yard and saving money in the process.

Comfrey, here I come.

Have you grown comfrey? I’ll take any tips you have and I’d love to hear how you use it.


Labels: , ,

15 April 2014

WHY GARDENING ISN'T TRIAL AND ERROR

A lot of people are blogging about gardening these days. People who normally blog about clothing, interior design and a little bit of everything (or, um, nothing) are writing posts about gardening. I think that is fantastic. The more gardeners in this world the better, so if people are inspired to put a few plants in containers or improve their landscape or install raised beds to grow some veggies, this is only a good thing. Especially when people are new to gardening. I hope every one of them has great success and falls in love with it.

Last week, one of the non-gardening blogs I read had a beautiful mood board full of gorgeous pictures of all the plants the blogger was planning to put into a new border, and it was a great mix. But then she said this: "Gardening is TOTALLY trial and error."

I cringed. By and large, there is very little trial and error in gardening, at least for the home gardener, in terms of whether a plant lives or dies. And gardening can be a rather expensive endeavor (of course it can be done very economically depending on how you approach it). So why would anyone spend a good deal of money to just guess if a plant is going to live or not? Most people wouldn't so I would hate for people to think that whether a plant lives or dies in your yard is a crapshoot.

So here's a way to make sure a plant is going to live in your yard. In other words ... all the ways that gardening is not totally trial and error.

PLANT SELECTION CHECKLIST


1. Is it hardy in your area? Find your USDA hardiness zone and only buy plants that are hardy in your area. Better yet, buy plants that are a half zone or full zone hardier than your zone (a good rule to follow for expensive investment shrubs and trees).


2. Is it suitable for the amount of sun it will get where you intend to plant it? Your choices are full sun, part sun, part shade and shade (very few plants grow in deep, full shade). It can be hard to know how much sun a spot in your yard gets so one technique that can be helpful is to put a plain white sheet of paper in that spot and make note of it throughout the day. It sounds weird, but it's much easier to tell if the sun is really shining on something or if it's just bright in an area. Or you can get a sunlight calculator, which will tell you after a day outside how much sun a spot gets (presuming you use it on a nice, clear day).

Full sun = 6-8 hours of sun
Part sun = 4-6 hours of sun
Part shade = 4-6 hours of sun
Shade = Less than 4 hours of direct sun

The difference between part sun and part shade is difficult to delineate, but I think it's safe to say that closer to 4 hours of direct sun is part shade and closer to 6 hours of sun is part sun.

Be mindful that you are judging the amount of sun after the trees have leafed out, not in early spring when you are planning a garden.

When we built the path in the backyard we got a good look at what our soil is really like. The top layer was mostly clay, the middle was a lovely humus-rich loam and the bottom was mostly sand.

3. What kind of soil does it like? Some plants absolutely need acidic soil to thrive. Azaleas and camelias will never grow decently in my yard because I have alkaline soil. Some plants need sharp drainage, others like soil that's a bit boggy. But most plants fall somewhere in the middle. If plant has a special soil requirement, it will clearly state it on the plant tag. Otherwise, most plants will do fine with a good-draining soil rich with organic matter.

The hot bright area along the south side of the house is helping 'CanCan' climbing rose and 'Mrs. N. Thompson' clematis thrive, so long as I can give them enough compost and water to meet their needs.

4. Does your site have special conditions? I have a small bed alongside the south side of the house, bordered by the patio. It is hot there, not just because it is tucked up alongside the house, but also because the white siding reflects a lot of light. It's also a bit dry because of the eaves on the house. It's a microclimate and I can certainly grow plants there that are at least a zone less hardy than the rest of my garden, if not more. But they also need special attention in the form of feeding, regular top-dressing with compost and extra water. Houses, walls, low spots, high spots, etc. can all create microclimates that might make a plant that would normally grow there unhappy. The silver lining is that it also sometimes means you could plant something in that spot that you wouldn't be able to otherwise.

And really, that's about it. HSSS (hardiness, sun, soil, special conditions). OK, so it's not the catchiest acronym in the world, but it gets right down to it. Once you establish those things—and you can tell if a plant will fulfill those needs just by reading the tag or doing a quick Google search—the rest is just a matter of taste. Whether you like how plants look with one another just comes down to your preference (which is not to say that there aren't some design rules, but rules are meant to be broken, and I'm a firm believer in creating a garden that pleases the gardener first), but if you get a plant that will work in your yard by checking off that HSSS list, and pay attention to it the first year, mostly by making sure it gets enough water to establish itself, it will live. Plants want to grow. Give them the right spot and they will.

So, no, gardening is not trial and error. Nurseries, botanical gardens, plant hunters and plant developers have done all the hard work for us. All gardeners need to do is read a tag.


Labels:

11 April 2014

FEATURE FRIDAY: GARDEN ORNAMENTS

I love garden ornaments and sculpture. The right piece in the right place adds another dimension to a garden. There's a place for serious sculpture and whimsical ornaments in any garden, but I think the key is to know when to stop. Nothing makes a garden look a little bit like a junk yard with plants growing in it faster than too much stuff laying around in it. Ornaments should always compliment the plants, not the other way around.

I love using driftwood in my garden and I have a collection of interesting pieces that some day I'd like to turn into something. The problem is, I don't know what that is.

But I'm also adding a little something to the garden hopefully this weekend that I hope will say "sculpture" and not "random junk from the side of the road" when it's finished. I'm not even going to tell you about it yet because I really have no idea how this is going to go.

In the meantime, I thought we'd look at some great garden ornaments for a bit of inspiration this spring Friday.

I think this is a great example of the plantings and the sculpture being perfect for one another.


This one is just downright cool. In the comments on this photo, several people asked how you make such a sphere but the artist isn't saying.


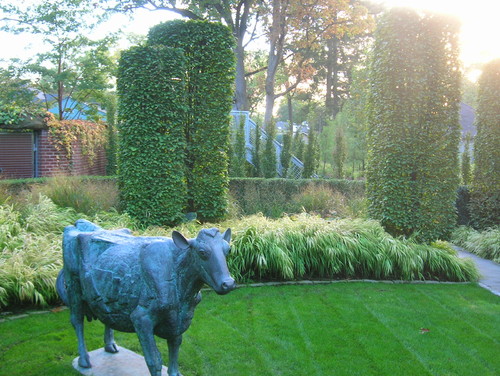
I like this cow. I once saw a concrete pig (almost life sized) in a garden and I've been somewhat infatuated with concrete pigs ever since. And no, I'm not adding a pig to my garden (not this weekend anyway).


This falls in the creepy-but-cool category for me.


How can you not love this gravity-defying sculpture?


While I'm not sure I love the sculpture itself (I'm a bit concerned about this women's head), I love the siting of it. Something so modern and geometric in a woodsy area is so interesting.


What's your favorite kind of garden ornament?


Labels: , ,

10 April 2014

A Wythe Blue door on a falling-down garage

I forgot to show you something I did about a month ago.


I painted the garage door Wythe Blue (Benjamin Moore color). I've been sort of lusting over that color, which is this really interesting grayish greenish blueish, sort of turquoise-but-not color for a long time and I really wanted to paint something that color. 

Since I didn't want something as bold as the blue on our front door (I didn't remember until went to link that post that I had entertained the idea of painting the front door Wythe Blue), but I did want to have a little fun, it hit just the right sweet spot on the garage.

Of course the rest of the garage is still a wreck. We're waiting for the contractor/neighbor to finish up a couple projects so he can rip the roof off the entire thing and put on a new one that matches the house on. 

And do you see that dirty snow pile next to the garage? The last vestiges of snow are finally melting but the bottom of the heap is always the grossest. And that red roof peeking out is actually our neighbor's two-story garage poking up above ours. That's the neighbor who is doing a roof, so we keep telling him that the sooner he fixes our roof, the sooner the view from the window on that side of their garage improves.

We'll be painting the whole thing as well. We decided to go with gray for the siding and white for the trim (what a shock, right?). The problem is this silly weather, which just won't warm up soon enough. All of these projects need a bit of warmth to get going.

Even on the derelict-looking garage, we love the new door color. So much so that we're thinking of painting the outside of the new screen door for the back door that color. I mean, if you can't paint a screen door a fun color, what can you?


Labels: , ,

09 April 2014

COMBATING COLD WITH INDOOR SEED STARTING

I know that it is high time to stop complaining about how bad winter was, but those of us who experienced it will be dealing with its aftermath for some time. In my area, where Lake Michigan reached an absurd 93% ice coverage this winter (for the first time since the 1970s), the water is going to be cold most of the summer.

And that means my garden, which is about 500 feet from Lake Michigan, will be plenty cold too. I wonder if there will be a ripe tomato before late September.

So this year I'm taking extraordinary measures to combat the lingering cold weather. In addition to tenting all my raised vegetable gardens with plastic to warm the soil, for the first time ever, I'm starting some things inside. 

I'm embarrassed to say that I'm not much of a seed grower. I find it a little intimidating. You have to time it correctly, keep those little babies alive, harden them off and then hope they take to their new homes. Rather than mess with all that, I've always just bought plants for the vegetables I didn't need many of (tomatoes and zucchini) and direct sowed seeds in the garden for the other things. For the most part, this has worked out quite well.

But this year I'm afraid that if I wait until it's warm enough to direct sow seeds, there won't be enough growing time left to get any production out of my plants. If I can transplant things started from seed indoors at the same time I would have sowed seeds, I'll be weeks ahead of the game. 

So I ordered a grow light (there's no way I can provide enough natural light to grow seeds inside without one), dragged out the heat mat I bought years ago for growing amaryllis in pots for Christmas gifts, and started sowing.

Seed starting

Seed starting
The future garden grows in a window with the help of a grow light. The spray bottle is full of composted manure tea, which is all I'm watering the seedlings with.

So far, I've sowed evergreen bunching onions, a variety of kale, basil and vining nasturtiums. I intend to plant seeds as well as the transplants of the onions and kale to extend the harvest. This is the first time I've grown basil from seeds, but I've had limited success with the small plants I buy in nurseries. Talking to fellow gardeners, it seems like the people who have those enormous basil harvests are the ones who grow from seed, so I'm giving it a shot. If it all fails, I can always go back to buying the plants.

The nasturtiums are meant for the window box. Last year I threw in some seeds and by the time the plants grew, they were gorgeous and I absolutely loved them as an element in the window box. However, I started them so late that they had sort of missed the peak of the display by the time they were really getting going. I can always stick the extra plants elsewhere in the garden so I'm not worried about that.

Seed starting
Nasturtiums

Seed starting
Evergreen bunching onions
Of course, now I'm really into this seed growing thing. It's fun to have something to baby a bit and it's really quite remarkable how much they grow over the course of a day. I think when they get larger, I'll pot them up into 3- or 4-inch pots and continue growing them until it's time to harden them off and then I'll start some more seeds. I'd like to start a few different varieties of nasturtiums (you know I can't get enough of them) and zinnias, and maybe even more kale.

Seed starting
Basil

Seed starting
Kale

The only thing I have to be watchful of is making sure I have room for all these things to be growing in the house. Funny how that works: gardeners always seem to be running out of room, no matter how much room they have.


Labels: ,

08 April 2014

THE IMPATIENT GARDENER v.7.0 (WITH CIRCLES!)

Yep, you're in the right place. I just made a change to the design here.

Although the last design, which I did myself after not being satisfied with multiple people who I paid to try interpret what I wanted, was a favorite, I think it's been there since January 5, 2013, so it was feeling a bit stale to me. At the time, I wrote that that was version 6 of this blog, so that makes this one version 7. That seems like a lot of switching around, but the first ones were not good.

I'm hoping you'll find this new design to be lighter, brighter and easier to look at. Readability is a huge thing for me, so I've chosen fonts and other elements with that as the main criteria. If you ever find something is difficult or cumbersome to read (other than my occasional ramblings), I'd appreciate it if you'd let me know because I want to fix that.

I spent a lot of time trying to figure out what I wanted this incarnation of the blog, which is approaching the start of it's 6th year in blogland (my first post was April 27, 2009), to look like, and a big part of that was creating a new header. Since I'm a bit of a font geek, I pored over more fonts than you can imagine and ultimately decided that there was no font that would be just right.


That's when I sought out a hand lettering artist and I found just the right person in Caitlin Welsh, who runs the Etsy shop CharlieWhiskey. Caitlin does all kinds of very cool stationary, wedding stuff and all kinds of custom work. I'm a fussy customer and she worked with me on drafts until we found exactly what I was looking for. She even spent extra time doing something special to a handwritten "The" that I ended up not using in the final logo/header. Maybe it will show up in the future. 

Anyway, that cool looking "Impatient Gardener" you see up there at the top of the page is actually her hand lettering. I love that.

Here's a quick guide to what's what here on the new design.


Those little black icons on the right are the quick way to connect with me and the blog in more ways than you'll probably ever want to (but do it, anyway). They are, in order, Facebook, Twitter, Instagram, Pinterest, Bloglovin, send me an email and subscribing to posts.

A lot of you receive my posts by email and the link to sign up for that is right under all those icons.


My favorite way to follow blogs is Bloglovin because it has such a clean interface that works well on all my devices.

Follow on Bloglovin

I still have the Instagram preview over there, just in a different format so you can get a peek at what I've been doing over there. That's often where you'll get real-time updates of what I'm working on weeks (sometimes months) before they end up on the blog.

And I've added a Popular Posts widget as well. I enjoy these on other people's blogs so I'm hoping you enjoy these here too. That window box post (which is currently in the No. 1 position) is far and away the most popular post ever, and it's from 2010. I think that means I need to do more how-to posts.

One of the things I like on other blogs, is the links to other posts on similar topics, so you'll find that below each post as well.

You can still pin images from here to Pinterest using the hover "Pin it" button that appears over every image (although less obviously than before). Please feel free to pin away from here, but I do as that you keep or add source information if you have time to. Last week alone I went through four different copyright disputes because my content was posted on other spammy type sites without permission or any kind of credit.

Most of the rest of things are the same here, other than that I went a little circle happy. I'm going to try to update the tabs at the top and I'd love to try to create some kind of map of the yard with the various gardens named so you can refer to it when I talk about a specific garden. All in due time.

For now, I hope you like the new look.


Labels: ,

07 April 2014

FINALLY, A WEEKEND BACK IN THE GARDEN

The temperature hovered in the 40s here this weekend but the sun was shining and it was a glorious two days in the garden.

It was one of those weekends when there were a billion different things I could have done outside. Which means I was able to happily jump around from project to project, just enjoying being outside.

I emptied all the containers of their holiday greens, for starters. I know, you're thinking that's a bit like still having your Christmas tree up, but I really loved having something to look at over the past several months. The silver dollar eucalyptus faded to a beautiful tan and while the greens had dried out quite a bit, they still looked good. I saved the dogwood branches in case I decide to try to make some rustic obelisks, which is on the "I think I want to try" list.

I also took care of a bit more pruning. All of the roses were pruned, including a couple of Oso Easy roses that I pruned back quite hard in anticipation of moving them. I also cut back the rest of the ornamental grasses and pruned most of the clematis. I still have to do the Group 2 'Ken Donson' in the middle of the circle garden which requires a bit more time and concentration and a couple of the Group 3s that are still under snow (yep, parts of the garden are still under ice and snow).

The ground in the raised vegetable beds is still frozen solid. I can't even get the pots that I heeled in over winter out. So I covered them all in 4-mil plastic from the hardware store. The box said clear, but it's sort of milky white. Anyway I just held it down with bricks and I'm created a little greenhouse affect to warm things up.

Plastic-covered vegetable beds

I spent a lot of time just poking around. Tulips are poking up in the southern-facing bed at the front of the house, most of the sedums have growth at their bases and it looks like the dozens of Geranium x cantabrigiense 'Biokovo' that I planted in the new garden bed last summer have hung there. Tiny little leaves are visible on the bases of many.

But mostly, I spent a great deal of time laying out the new back yard plantings. It required a rather elaborate arrangement of stakes, a tape measure and a lot of landscaping paint. It is so worth getting the kind of spray paint meant to be sprayed inverted for this. I altered the plan a few times once I got it all laid out and looked at it from the upstairs window so there is a lot of paint around, but I think I have it set.


This photo should be called "Indecision." The farther to the left the lines are indicates more garden over grass. Guess which one on I'm going with?


There were so many other things I could have been doing. I should rake out that bed along the house sooner rather than later with everything popping up there. I need to lay down some cardboard over some of the weedy areas on the periphery of some of the newer gardens. There are a few more perennials to be cut back. At this time of year the garden chores are happily never ending.

Of course in a few months I'll use this space to whine about having too much to do in the garden. I'll tell you that I yearn to just sit back with a drink in my hand and enjoy my hard work. But now, after such a long winter, it is the hard work that I yearn for. It is so good to be in the garden again.

Did you get into the garden this weekend?

Labels: , ,